Set Reviews

Set Review - #4000026-1: LEGO House Tree of Creativity

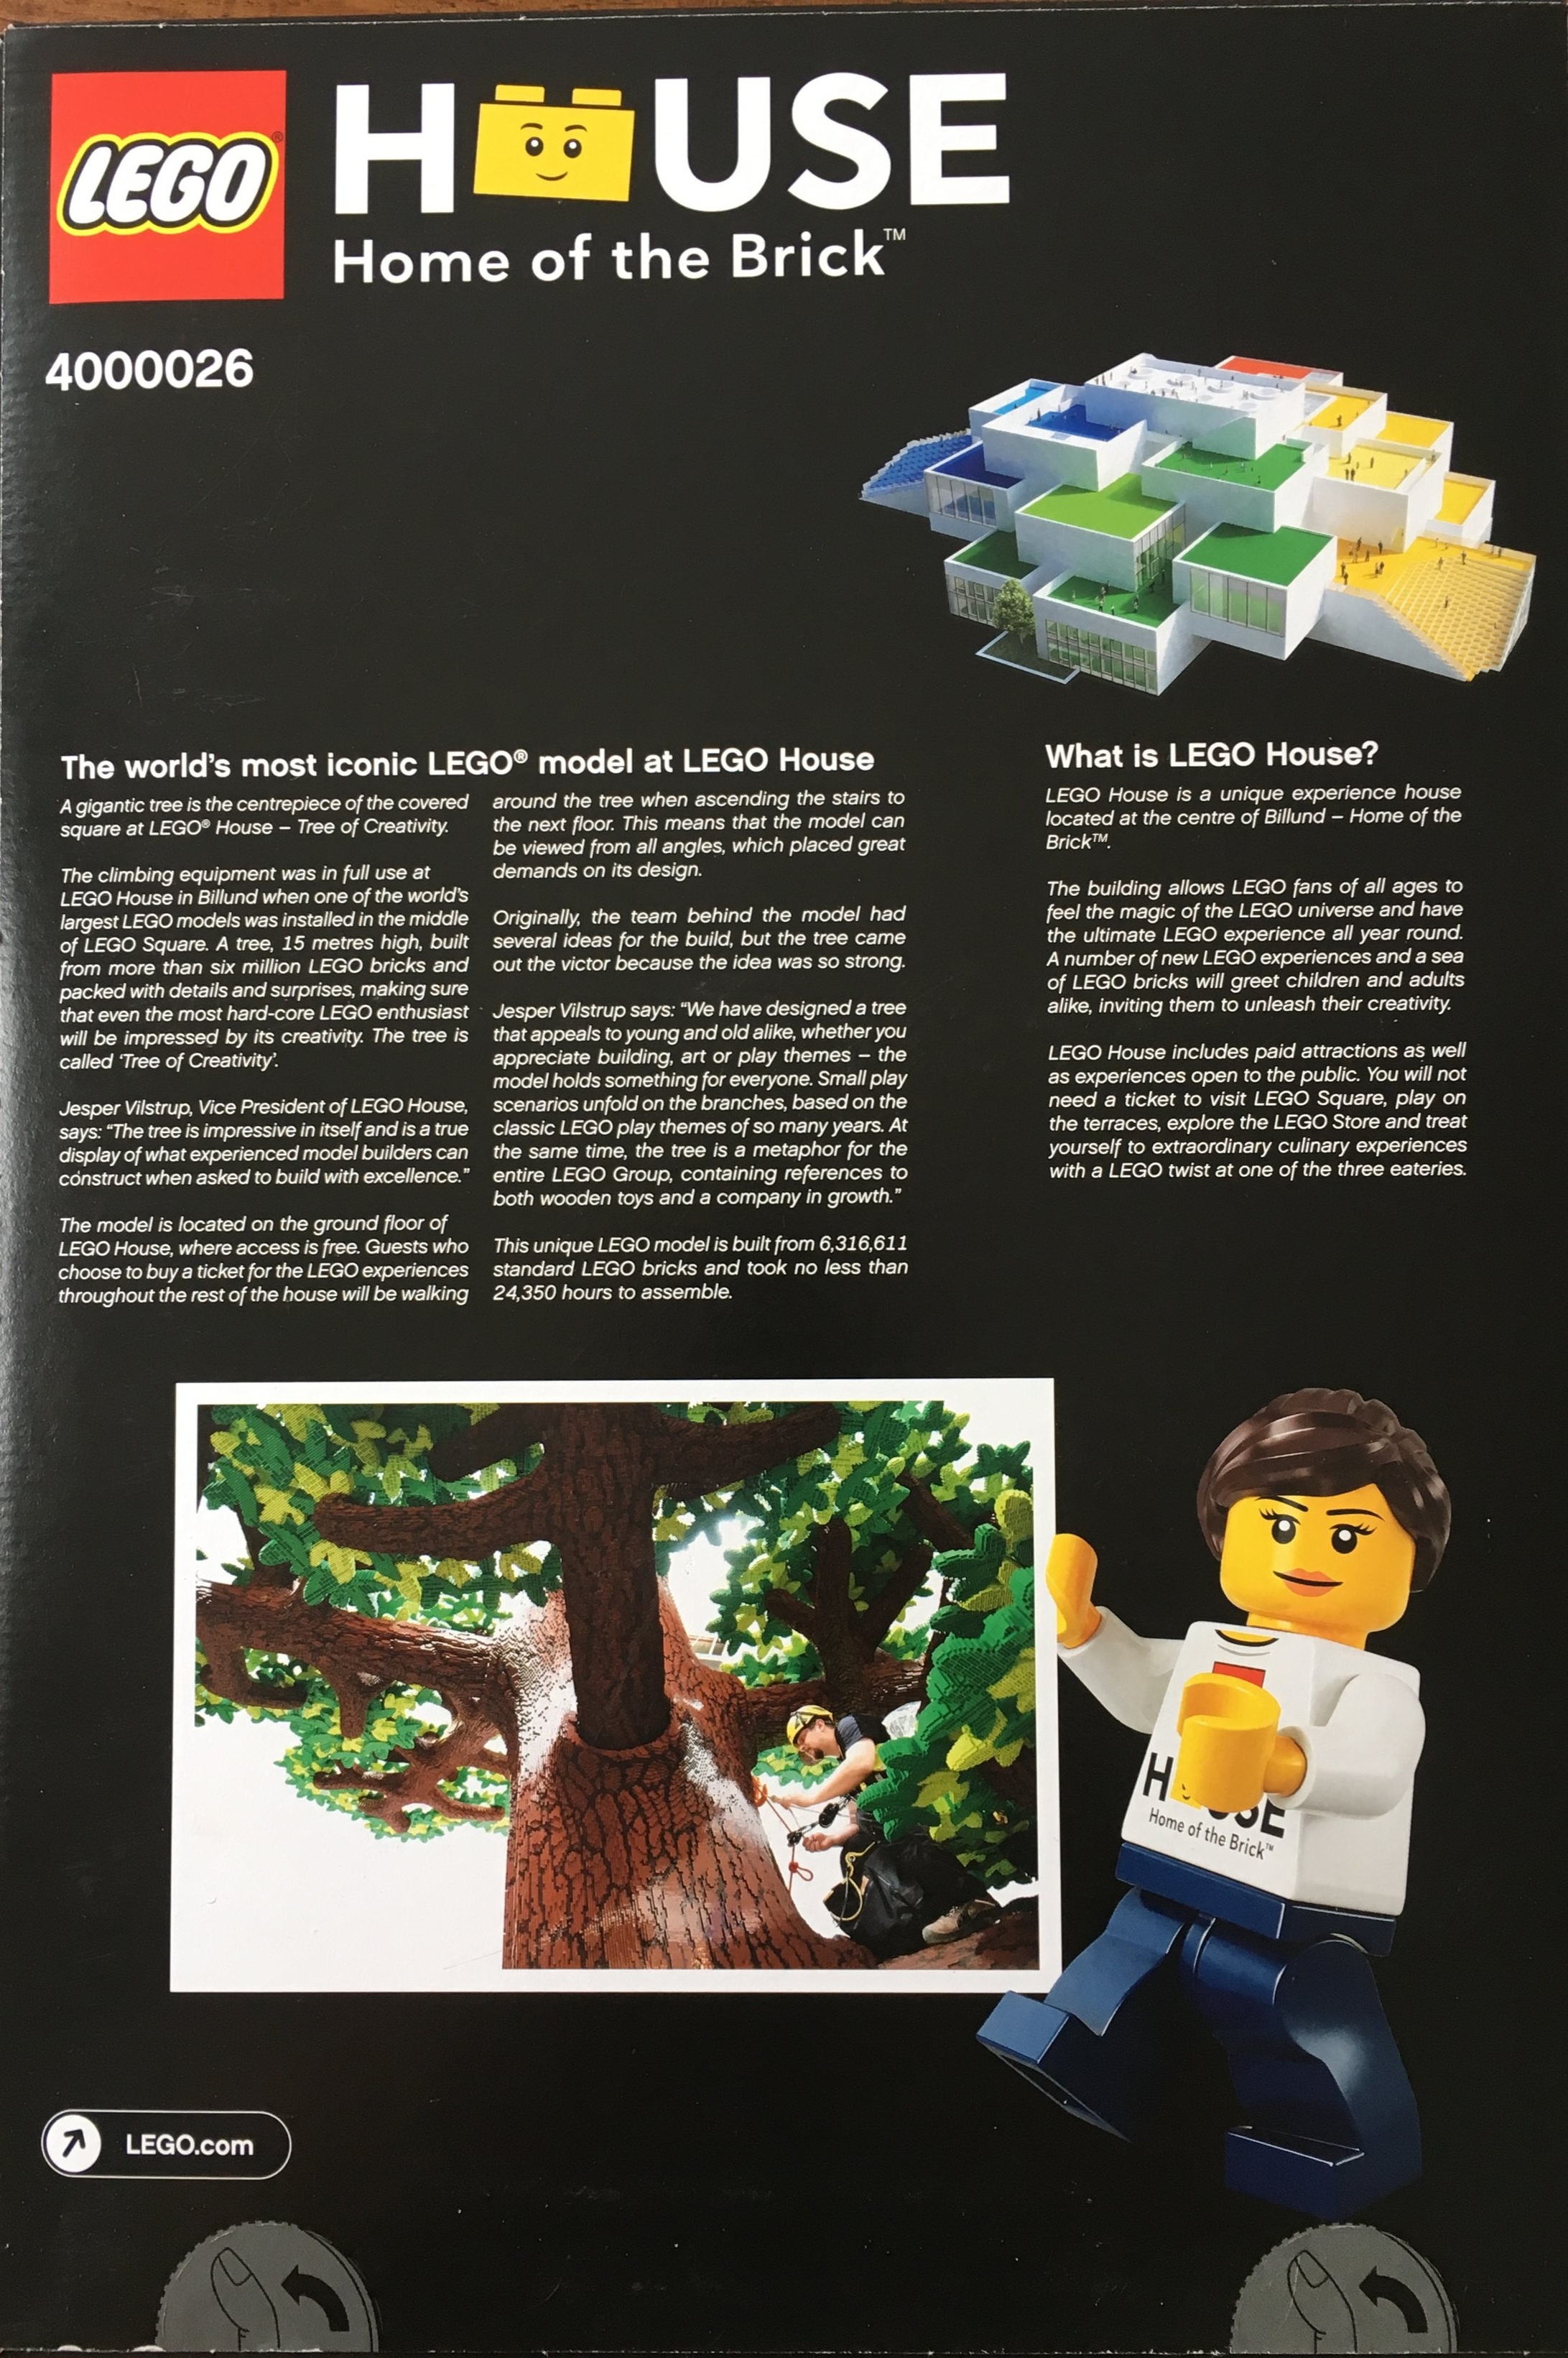
Here’s the final review of the LEGO® House sets. There was #21037: LEGO® House and #40366-1: LEGO® House Dinosaurs. Now there’s #4000026-1: LEGO® House Tree of Creativity. These three sets are only available at the LEGO® Brand Store in the LEGO® House in Billund, Denmark. This set was released in 2018. I couldn’t find the exact date and I’m not sure how long it will be out.

The set contains 837 pieces and is priced at 599 DKK. The day I went, the exchange rate made it $89.63 total. That’s $0.107 per piece so a bit on the high end in my opinion. Keep in mind that the price includes 25% Value Added Tax (think sales tax in the US) so if you buy it with the VAT form that you can take to the airport then it will be cheaper. I didn’t have that option since I was just driving back to Germany so I ate the tax.

Keep in mind when you go that there is a limit of three per family. As mentioned in other reviews, I didn’t try and play any games and have my NLS buy some too. I did have a car so it made bringing back the extra sets much easier than trying to get them on a plane or shipping them back to the US.

Onto the review…

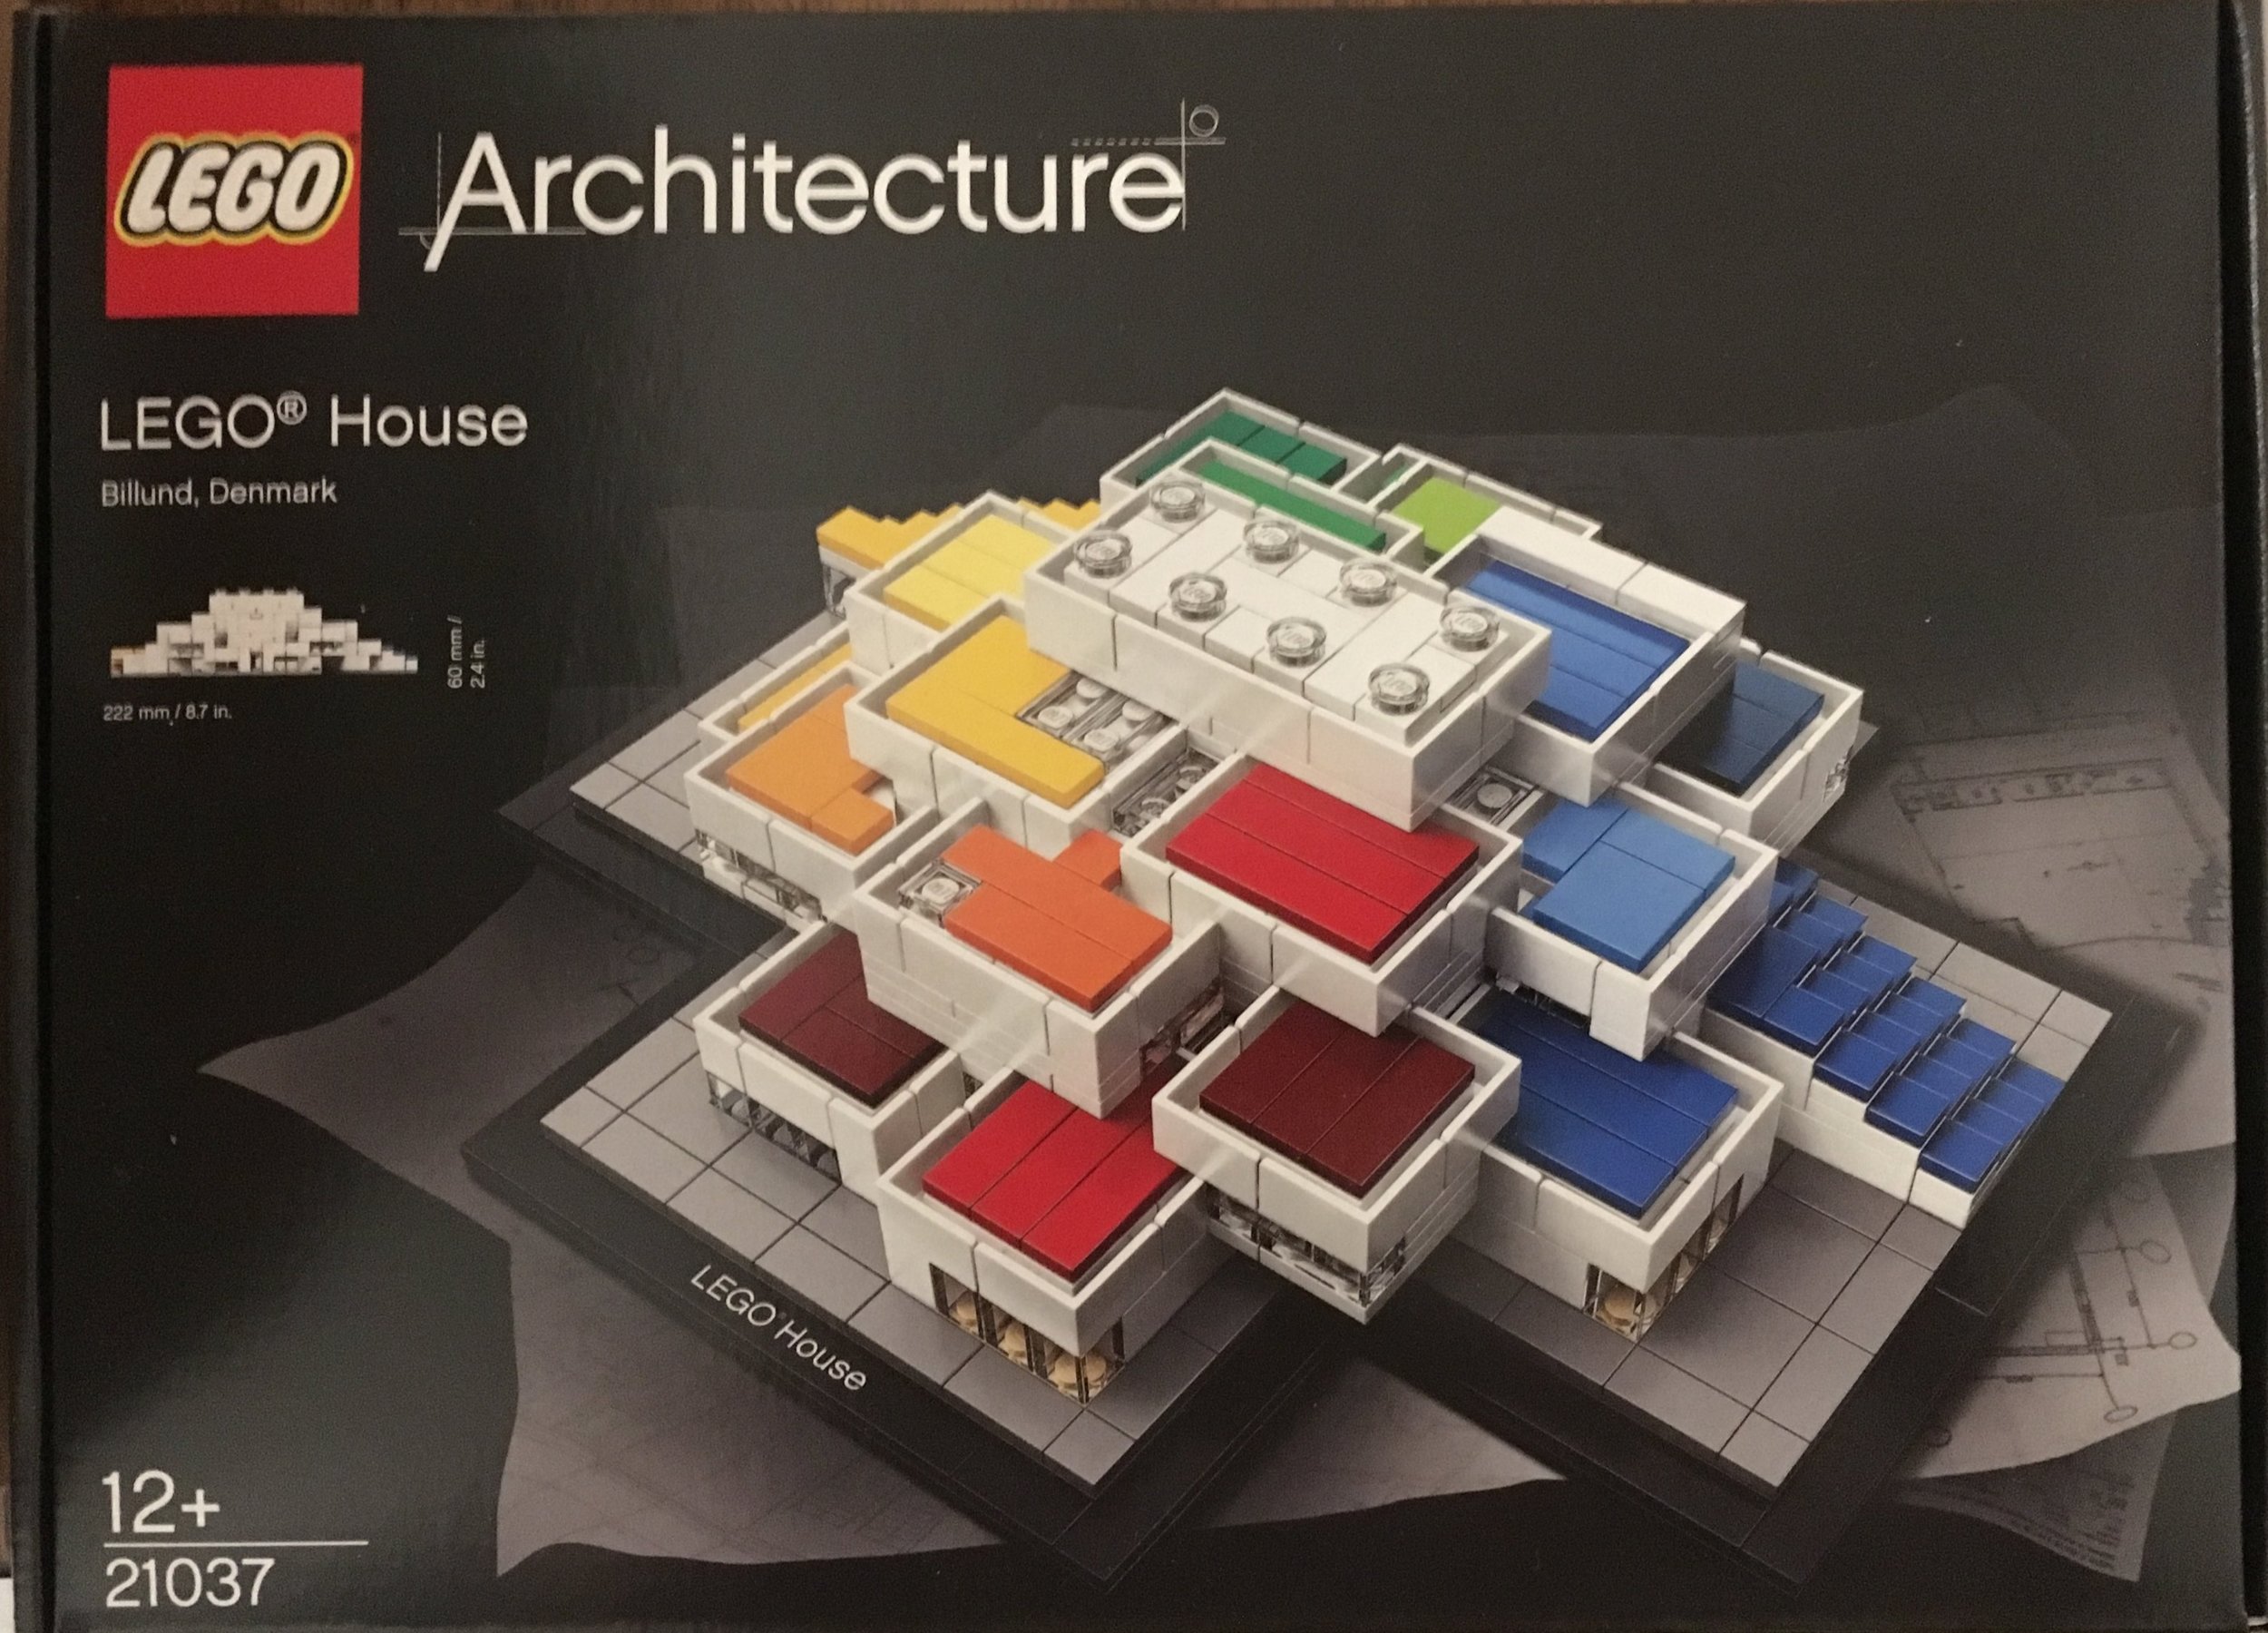
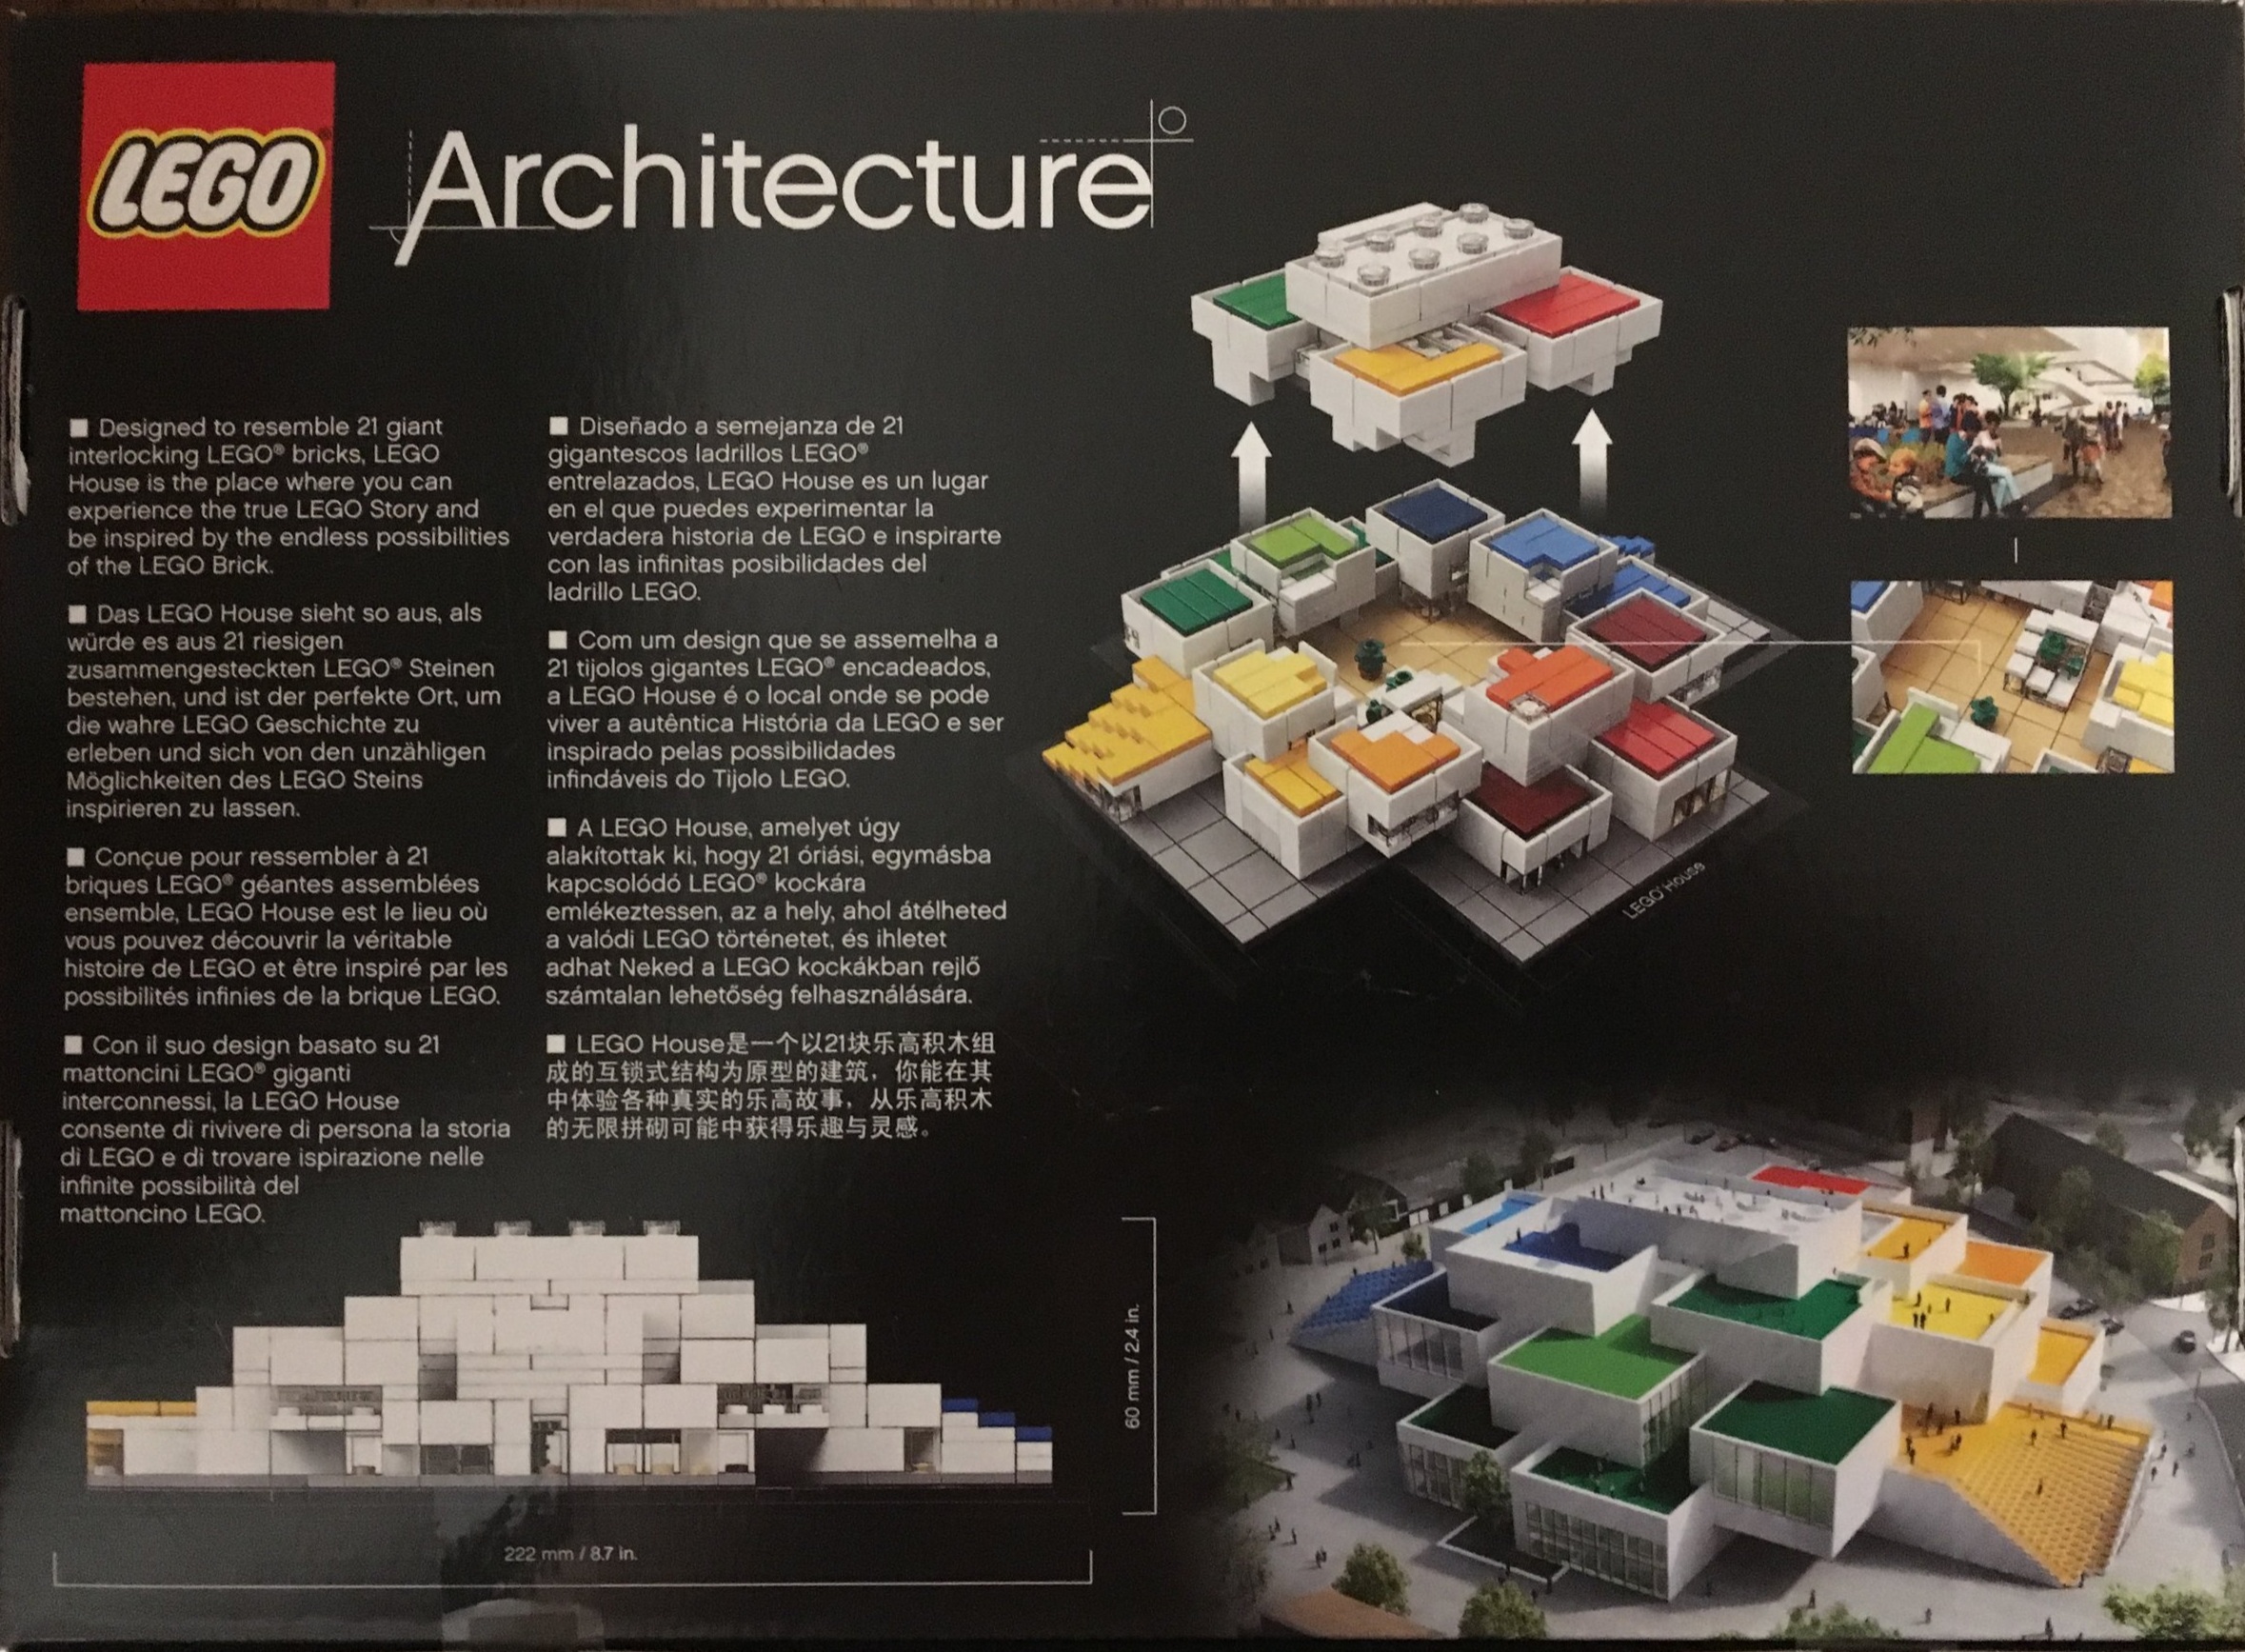
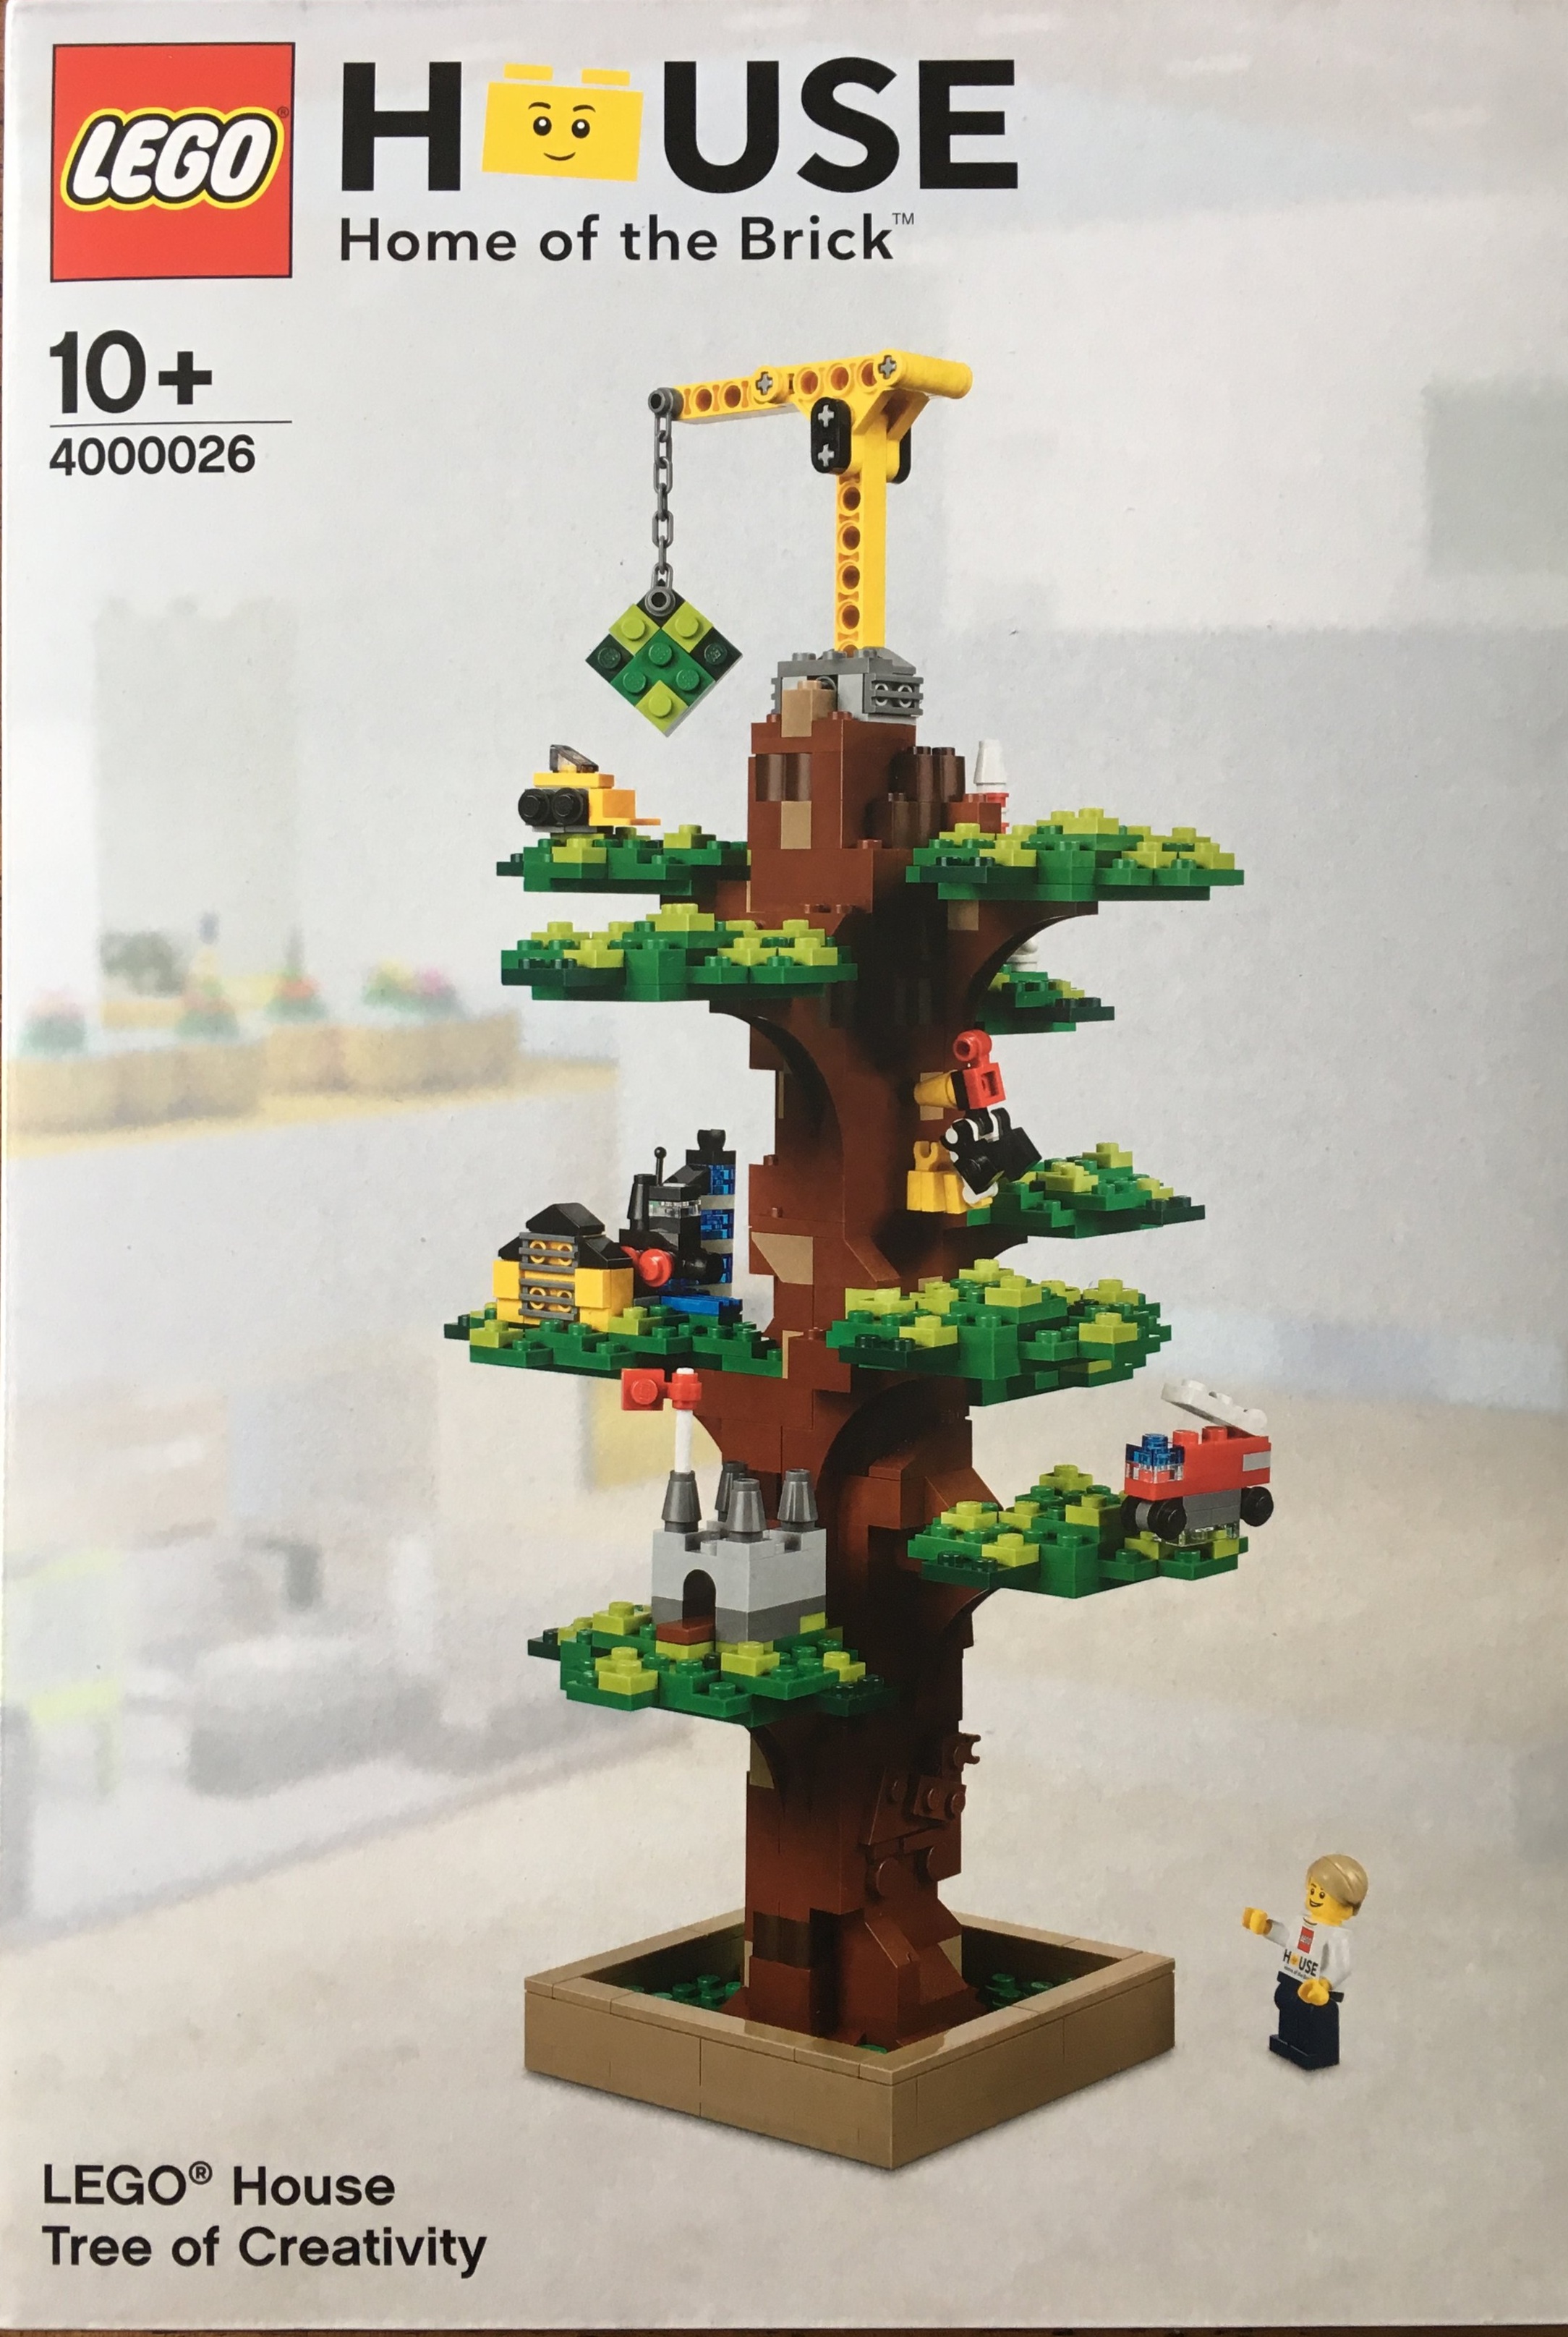
The box is not a normal size that I recognize from other sets. Or maybe it is and I just can’t tell the difference. The front shows the set with the minifigure included nearby. The back gives some information on the LEGO House and the actual Tree of Creativity. I also included a picture from the side of the box of the LEGO® House logo and then some stats on the actual model.

4000026_front.jpg
4000026_box1.jpg
4000026_back.jpg
4000026_box2.jpg

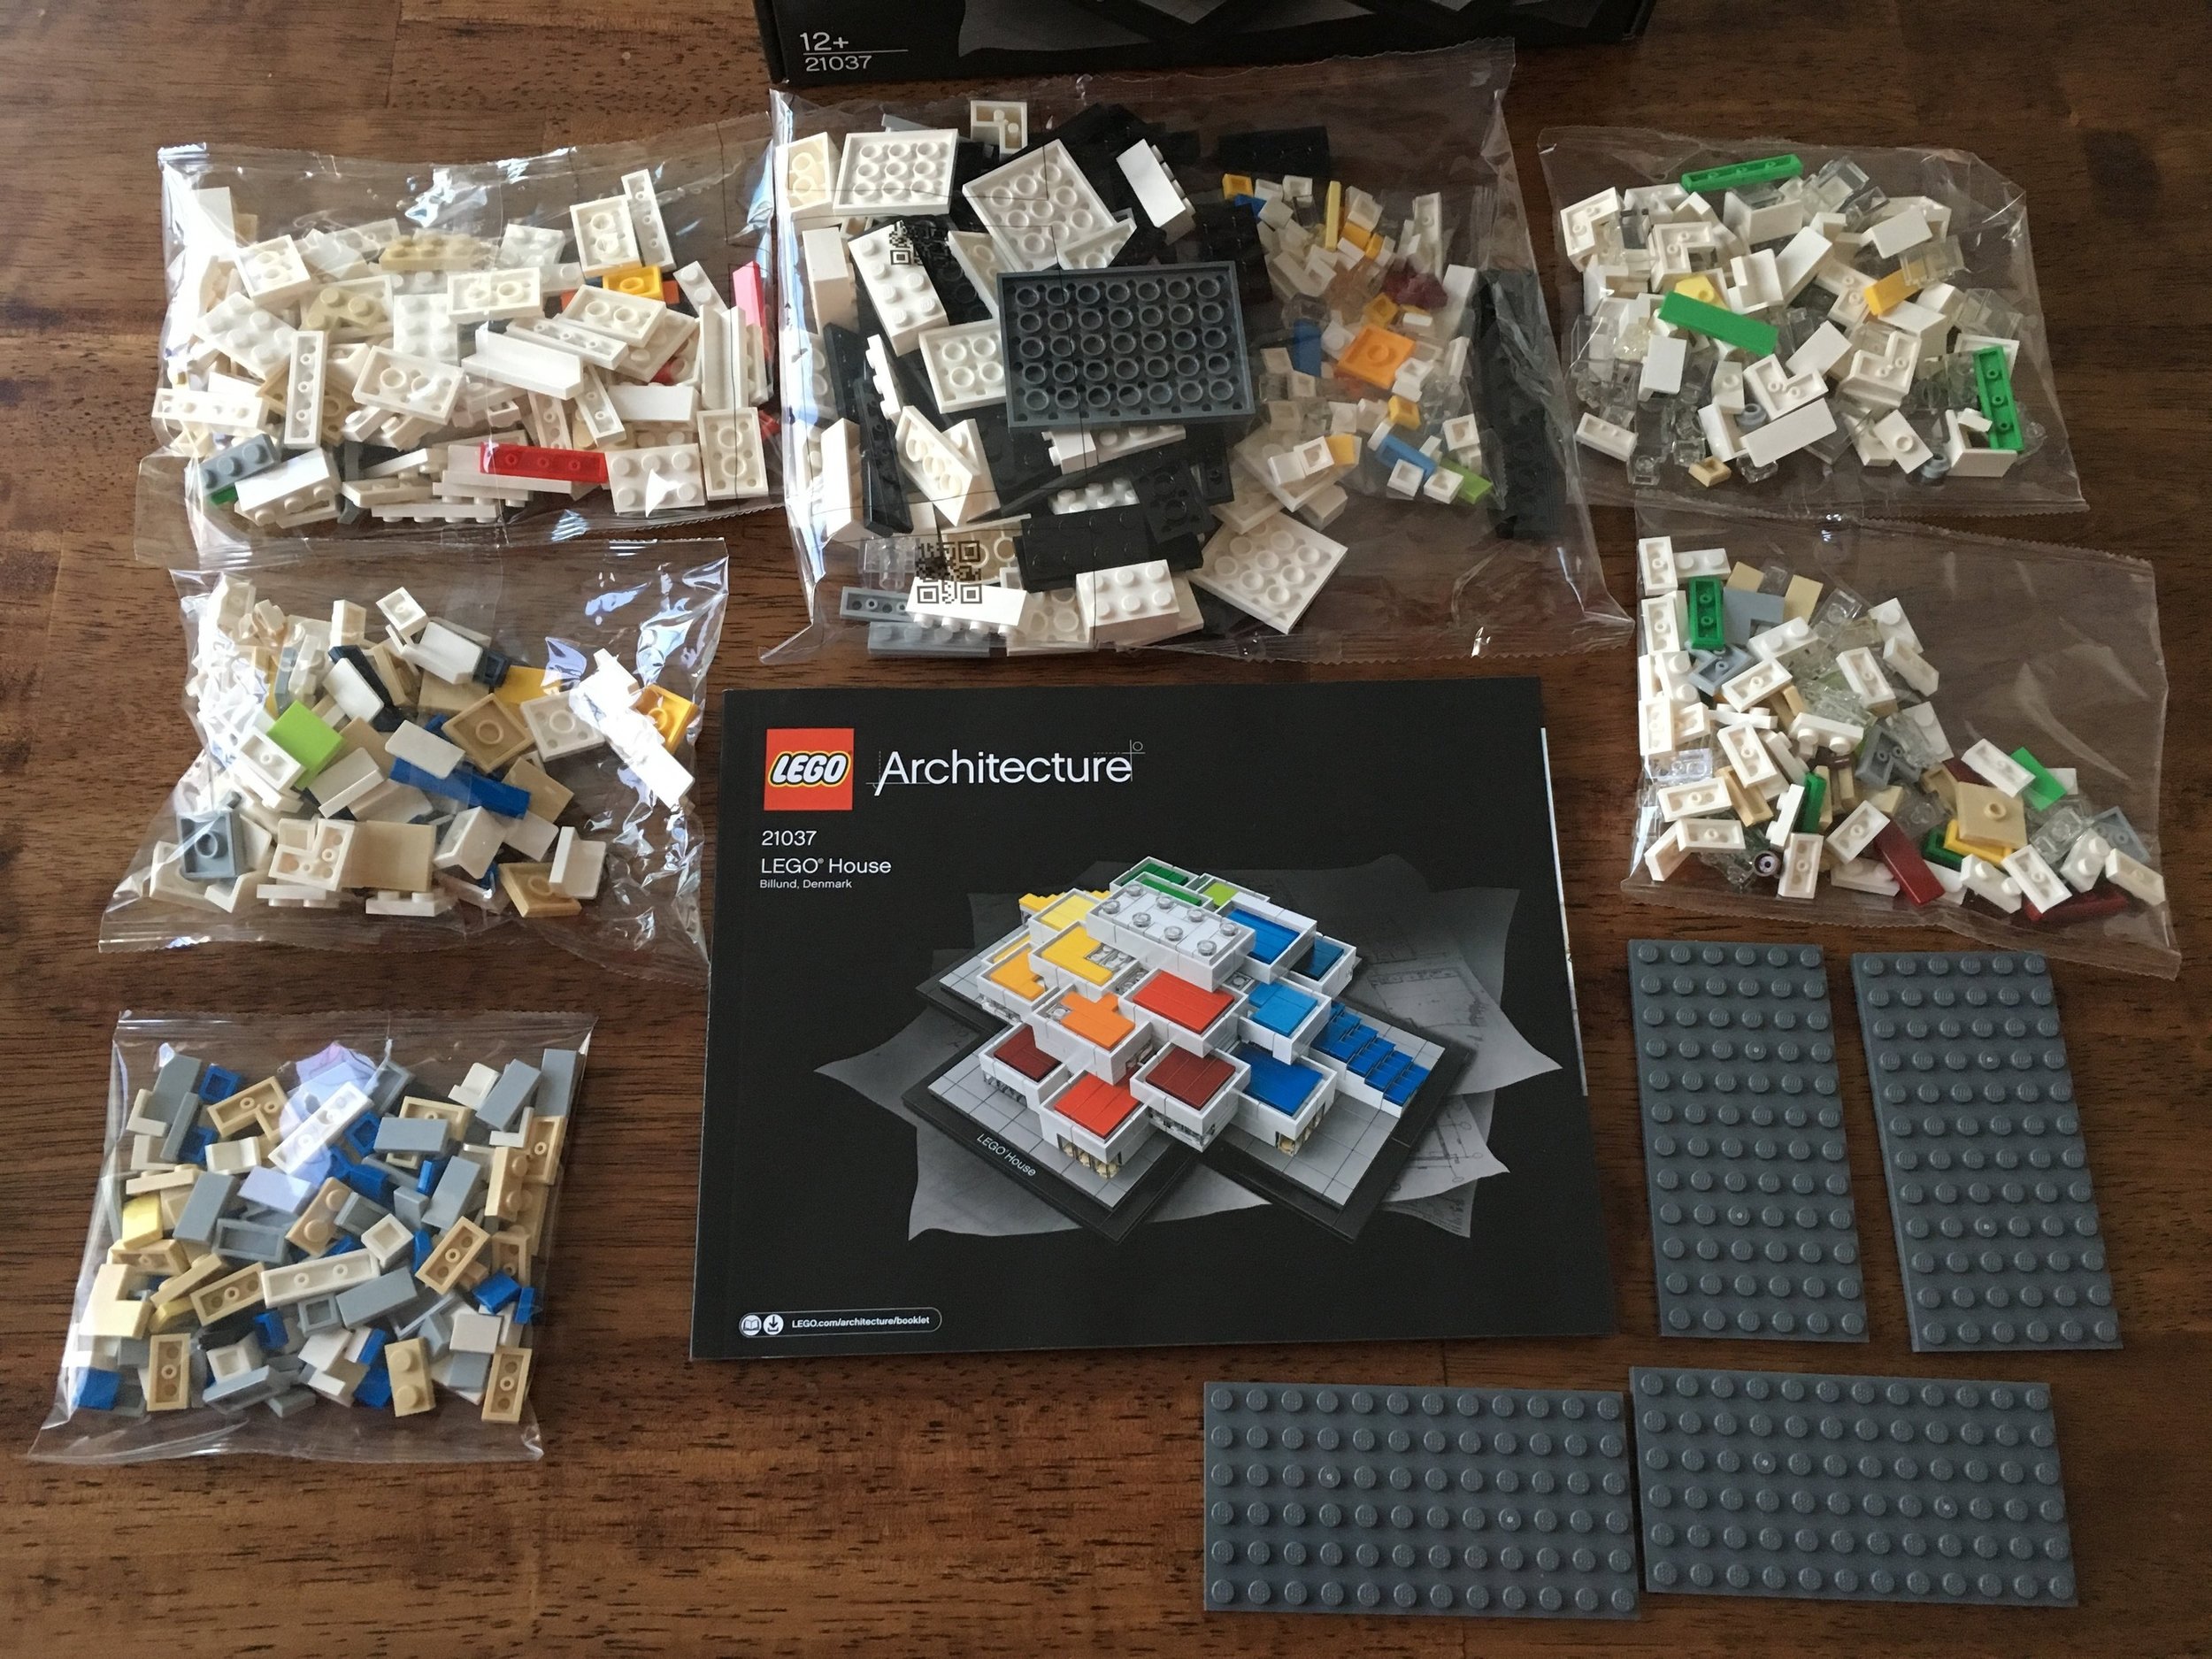
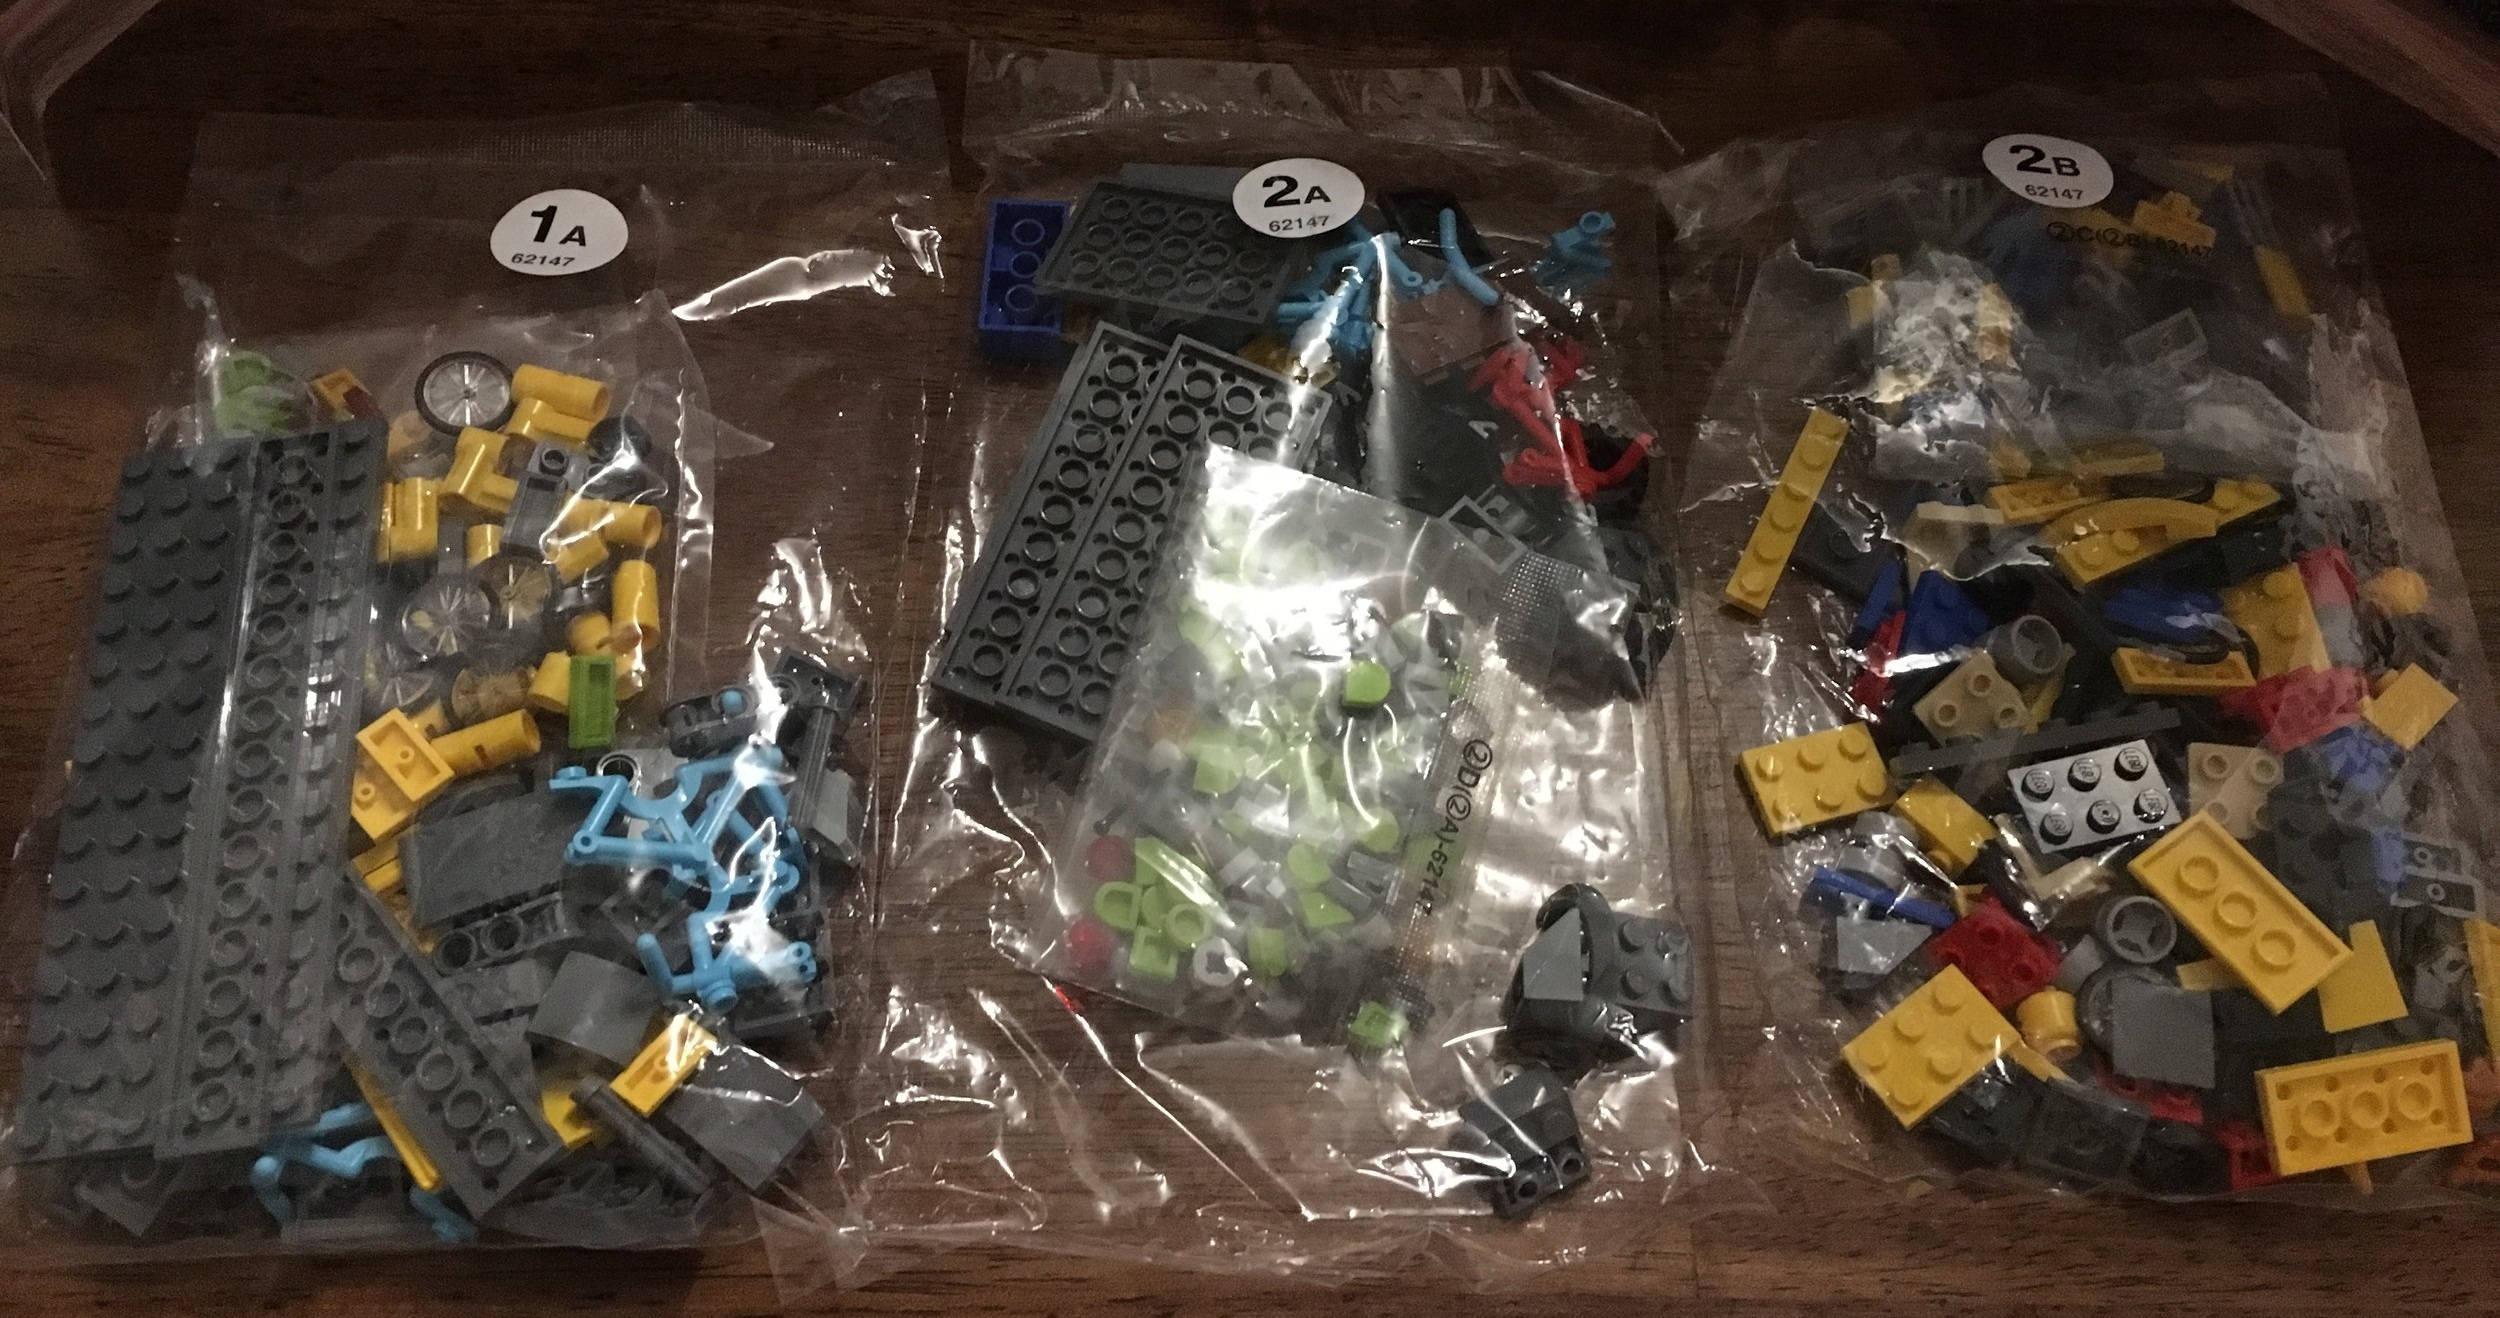
The set comes with six parts bags that are not numbered and includes a piece separator. The instructions are not wrapped, but they were not jammed in the box. No stickers!

4000026_contents.jpg

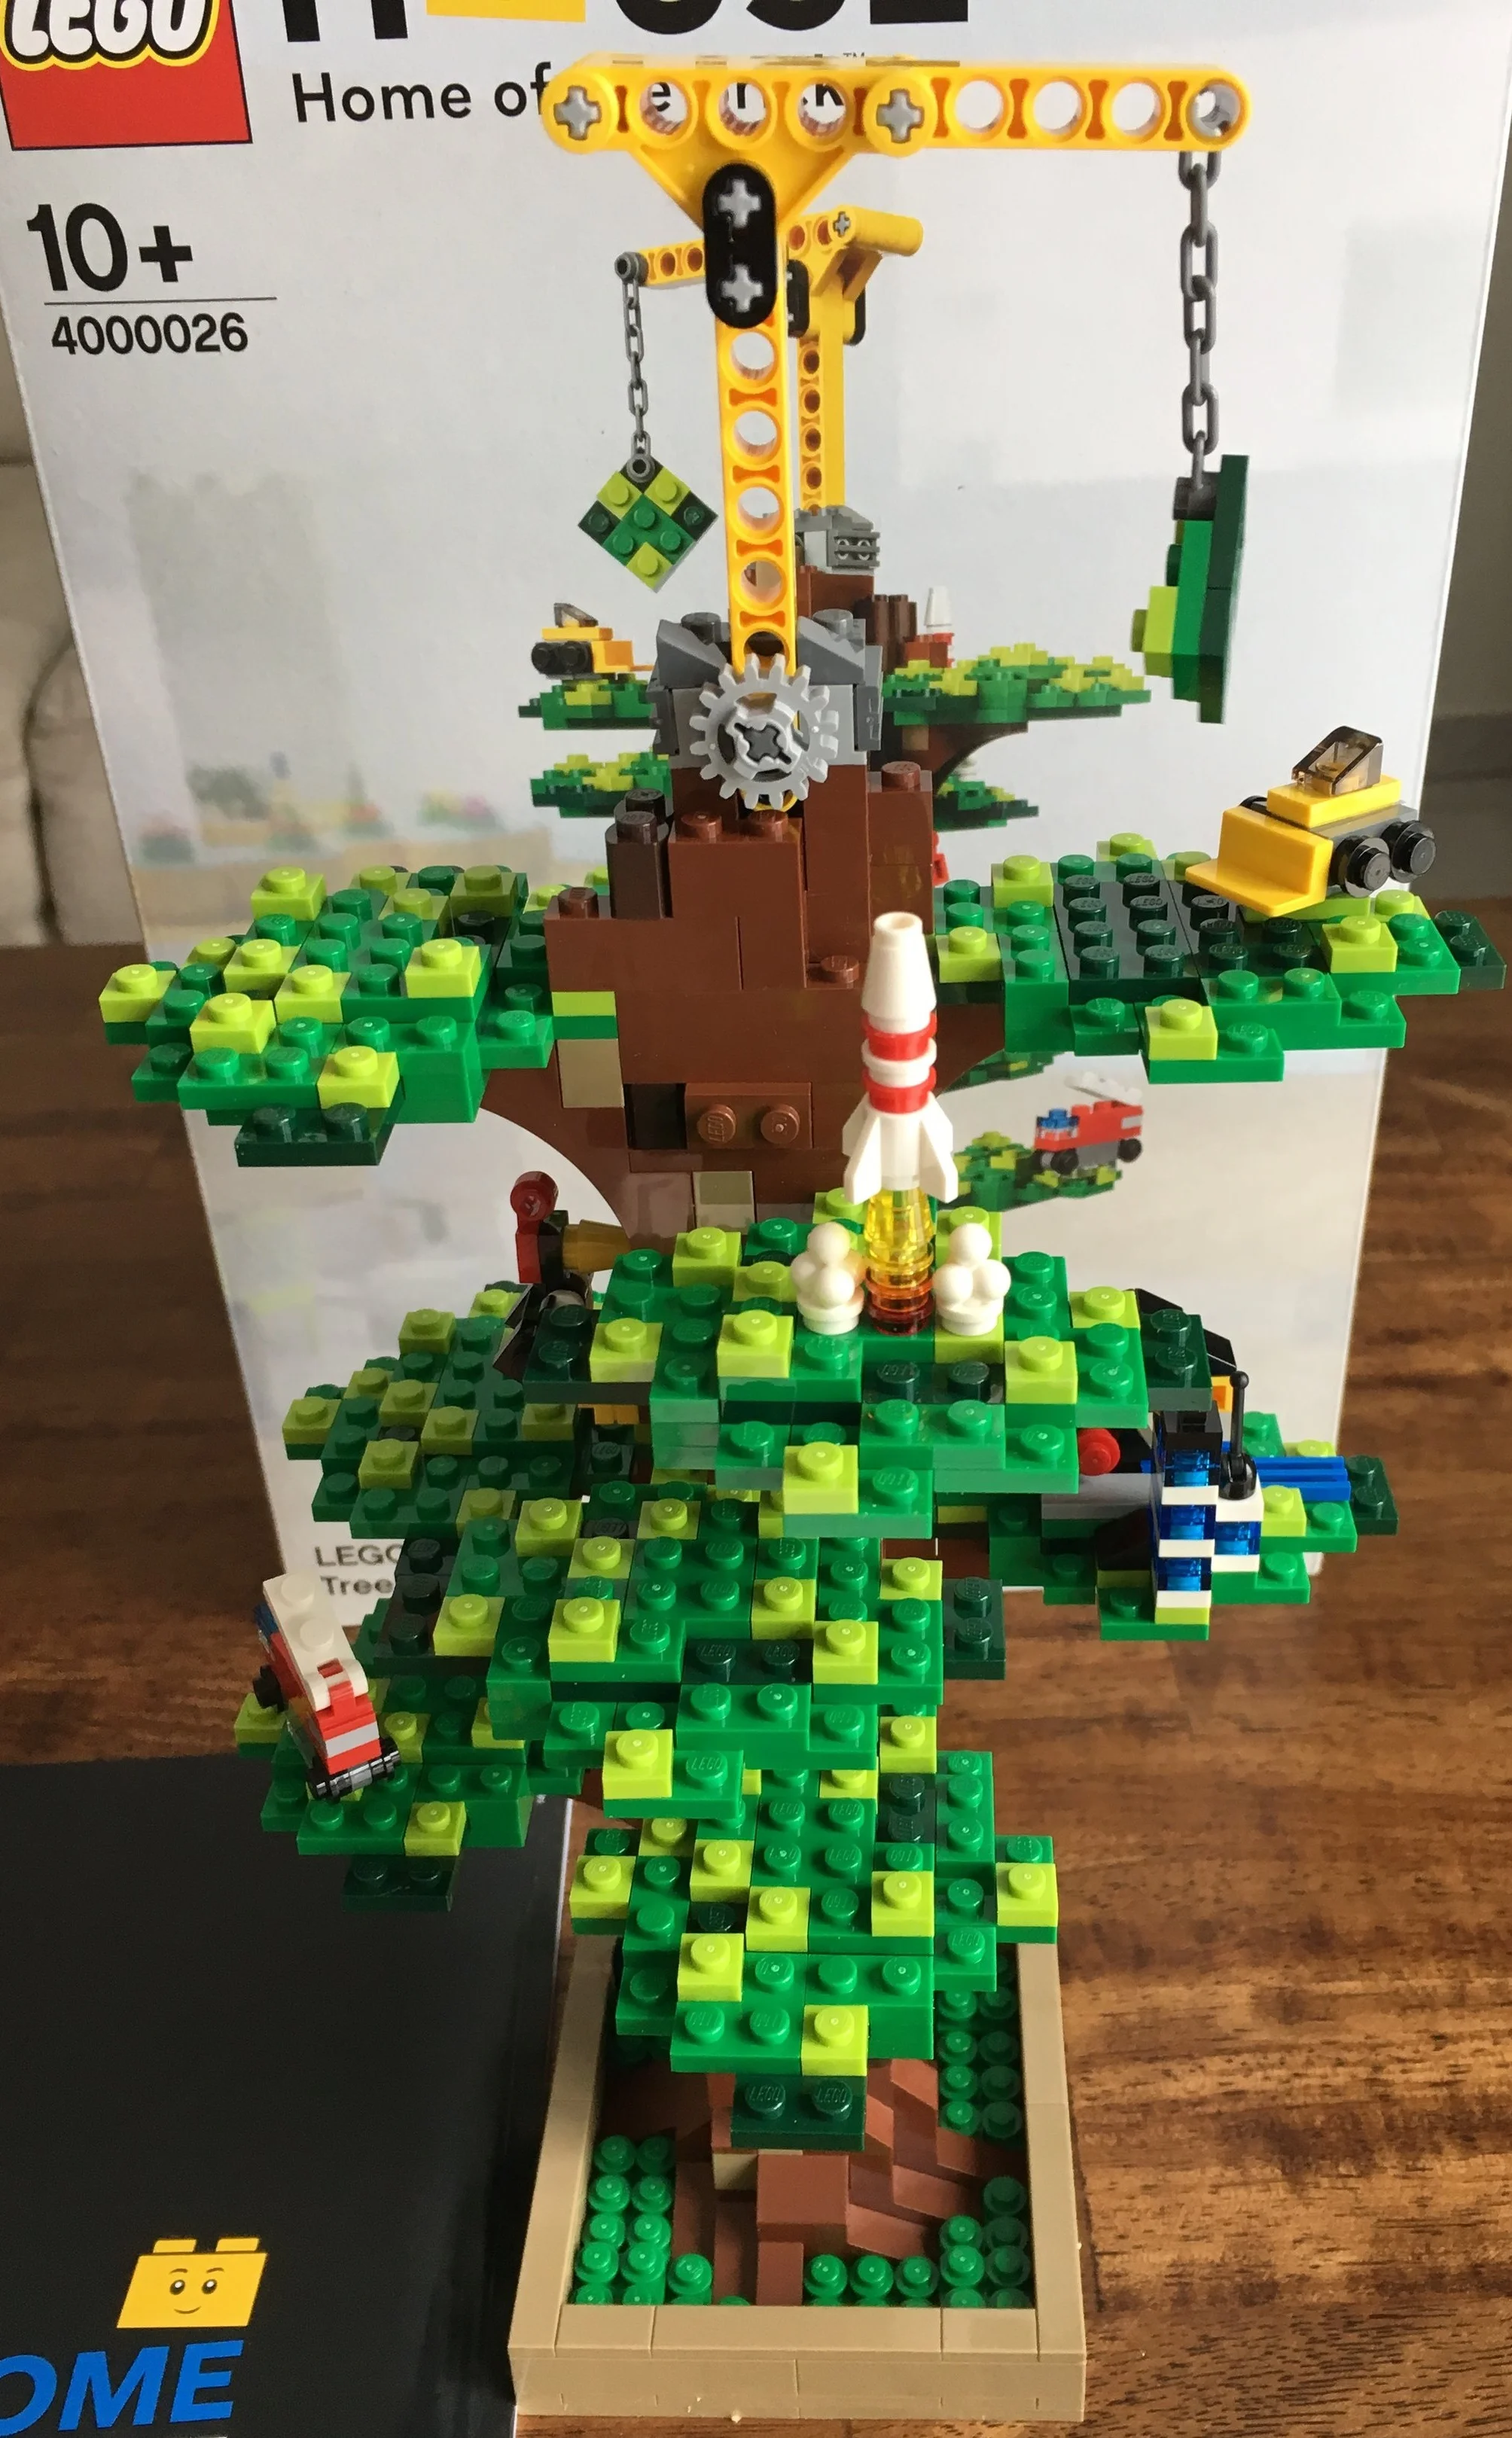
The build doesn’t have any natural break points where you open new bags or switch to a new instruction book so I just took pictures as I went. The build starts off with the base of the tree. The actual base is a 3 foot high or so barrier and the bottom is filled with various green parts. Obviously the trunk of the tree starts there too.

4000026_build1.jpg

The tree is built around a square pattern with various pieces thrown in to mix up the shape and made it non-uniform. The middle of the trunk is filled with two Technic parts that hook in throughout the tree with pins. This occurs throughout the build as you’ll see and helps to make it more structurally sound. On the actual tree trunk are various designs. The set has the wooden duck toy built in similar to how the actual tree has the wooden duck built in.

4000026_build2.jpg

Continuing on is the first branch with a castle on it to represent the castle theme. You can also see the Technic parts continuing their journey upwards.

4000026_build3.jpg

Continuing on with the trunk rising up around the Technic parts. Another branch is added with a fire truck resting on it.

4000026_build4.jpg
IMG_9081.jpg

As the build continues, there is a branch with a train, a train station, and a building. The train is one of the larger mini-builds on top of a branch. A few of the branches are added on without any items on top. If you go to the actual Tree of Creativity, you can see that the LEGO® House builds new things across time to remain permanent or to just be part time additions. During my trip, there were some monkeys hanging out on the various branches.

4000026_build6.jpg
4000026_build7.jpg

Instruction #162… this includes a branch with a rocket on top. Up to #192 includes some branches with nothing on top and a branch with a bulldozer on it.

4000026_build8.jpg
4000026_build9.jpg

Topping off the build is a crane with a new part of the tree to attach. The tree is meant to be a story of the LEGO® Company’s journey and the crane shows how it will continue to grow. It will be interesting to see if over the years they add new branches and new sections.

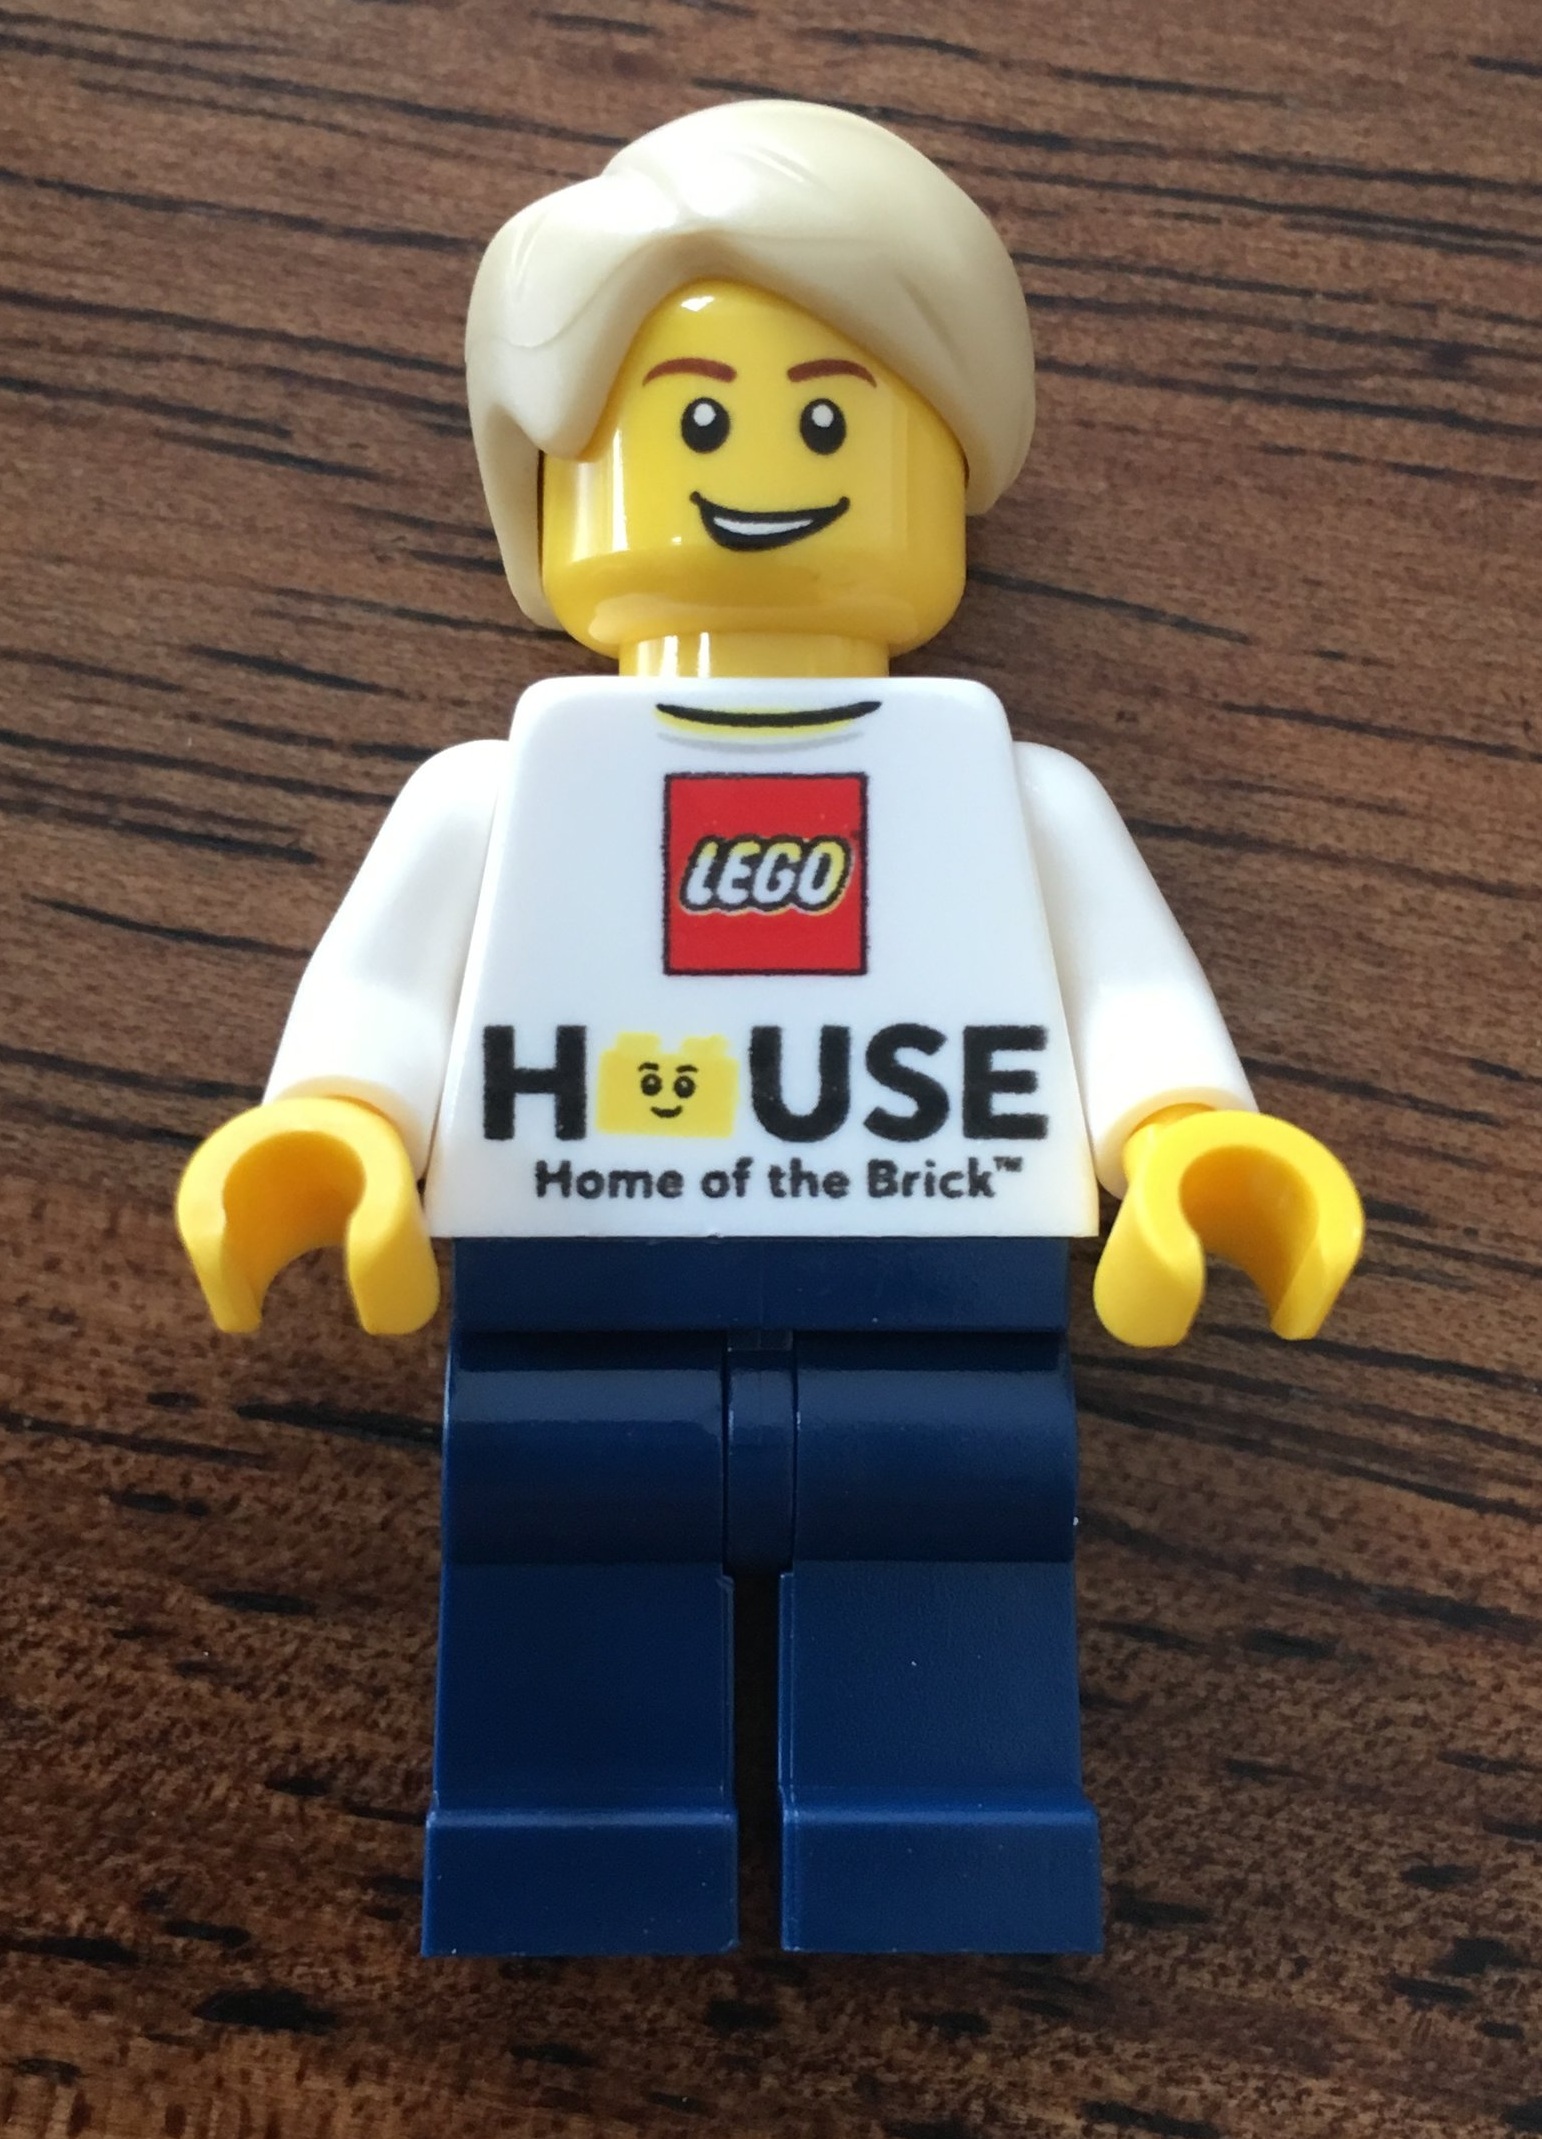
This set comes with one minifigure. It’s a male minifigure with blond-ish colored hair in a LEGO® House shirt. The LEGO® Store there has other figures with this shirt, but they all appear to be key chains. So unless there is another way, this is your only option to get one like this. In my opinion, it would be nice to build your own figure with the shirt or if the set had multiple versions and you could pick which one you wanted based on the minifigure it had. That would probably be harder to produce so I’m sure the set would be more expensive it they did that.

4000026_build10.jpg
4000026_fig.jpg

A few extra items that I haven’t highlighted… on one side of the tree is a brick built wood pecker. Considering the scale, I think the designers did a good job capturing a bird.

Also, I included another shot so you can get a closer look at the train station, rocket, and bulldozer.

4000036_bd.jpg
4000026_top.jpg

We’ve reached the end of the build. Overall, it’s a good set and captures the real model pretty accurately. The build uses some good techniques and there are some decent pieces in the set. In my opinion though, I would pick one of the other LEGO® House exclusive sets over this one if I was limited in luggage space or funds. The other 2 are better display pieces. This one doesn’t fit as much as it looks weird as a stand alone tree. The actual tree in the building fits the architecture right by the stairwell. It doesn’t look as thin because it is surrounded by the stairs and then approaches the top of the building. Additionally, it is a bit pricey for what you get. ~$90 for 837 pieces and the pieces aren’t all that big. As a collector, I’m glad I got it, but that’s really the only audience it applies to. What are your thoughts?

4000026_lastf.jpg
4000026_lastback.jpg

Set Review - #10266-1: NASA Apollo 11 Lunar Lander - Creator Expert

It’s the 50th anniversary of the first moon landing and LEGO decided to put out a set to recognize the event. This one has received a lot of press on the fan media so there probably isn’t a whole lot I can say about this set that people haven’t heard so I’ll focus on the review. The basics are that it was released 12 June 2019 in the US. The price is $99.99 for 1087 pieces. This works out to $0.092 per piece. You can see the official LEGO Designer video here. You can see my review of #21309-1: NASA Apollo 11 Saturn V Ideas set here.

Onto the review…

The front of the box shows the set on a lunar surface with the Earth in the background. The back shows the assembled set with close ups on some of the details.

10266_box_front.jpg
10266_box_back.jpg

The contents are 8 parts bags with 7 of them being numbered and one of them containing larger pieces. The instruction book is in a plastic sleeve and the stickers are there as well to make sure they are protected. Bag 1 includes a part separator.

While I am not a big fan of stickers, I like how these stickers provide a chrome look to the set to re-create the heat shield. So maybe they’re not all that bad. I still hate applying them though. I never seem to be able to line them up right.

The instruction book starts off with an interesting introduction that repeats in Spanish and French. Throughout the book, there are various references to the design and what part of the actual lunar lander it relates to.

10266_contents.jpg
10266_stickers.jpg
10266_instructions.jpg

Bag 1 completes the base of the model. It is very similar to an Architecture theme build with the black tiles around the outside and the printed tile with the name of the set. While Apollo 11 actually landed on a much smoother surface, the designer tried to replicate his version of the lunar surface. The minifigure footprints are a nice touch.

Along the corners are where the landing gear of the model sit which helps you to display the model itself.

Bag 1 includes one of the minifigures. Not sure which astronaut it is, but that’s okay. There’s also a US flag (sticker) to attach to the surface of the moon.

10266_bag1.jpg

The second bag starts the construction of the actual lunar module. The initial build includes some of the main structure to include the start of the heat shield. It also includes the oxidizer (white) and fuel (red) tanks. The first 2 pictures I posted show the one heat shield folding down to reveal a camera. As I understand it, this is the camera that recorded the astronauts as they reached the surface of the moon and walked around.

10266_bag2a.jpg
10266_bag2b.jpg

The next 2 pictures show the other side. This includes one of the shields that folds down to reveal one of the laser reflectors. The “laser reflector” is a separate assembly that you can remove and place on your lunar surface if you want. Fun fact… they still use the laser reflectors to this day for experiments.

10266_bag2c.jpg
10266_bag2d.jpg

Here is a top view of the build after bag 2. The build is not your normal build of stacking bricks as you would expect from a Creator Expert set and includes some good building techniques.

10266_bag2e.jpg

Bag 3 adds on the landing gear and finishes the heat shield. When initially building the landing gear, they seemed pretty flimsy to me. Once they were finished, they are actually pretty sturdy. In looking at pictures, the designer did a good job recreating the actual gear. I have said this before, but I’m a fan of mixing System and Technic parts into a model. This set is no exception to that statement.

The gold colored pieces help to match the coloring of the heat shield. Even if you don’t like the model when you are done, getting so many of this color in a set is pretty rare so there are lots of opportunities to use the gold color in MOCs elsewhere.

10266_bag3a.jpg
10266_bag3b.jpg

Bag 4 completes the crew compartment or Ascent Stage. The outside contains various antennas as well as some of the thrusters for maneuvering. The inside doesn’t have a lot of space for minifigures, but then again I don’t think it was designed for play. There are some details inside to include some stickers that I assume are the various control panels, but the 2 minifigures with their gear on will definitely have to squeeze in here. As you can see from my pictures, the designer built it so you can take a side off to see inside or put a minifigure in.

There’s a lot of SNOT use on this section and it is a pretty fun part to build in my opinion. I like the techniques used to capture the design of the actual section of the craft.

This section snaps into place onto the Decent Stage of the lander. Thankfully it snaps in easily and you don’t have to force it in or yank it out. I didn’t break the set while attaching or removing these parts.

10266_bag4a.jpg
10266_bag4b.jpg

Here’s the final model. Overall it was a fun build with some challenging techniques, but it went pretty quickly. I believe the designer captured the design of the original system well and still added some features that you would expect in a LEGO set like being able to disconnect the stages and being able to see inside the crew compartment. Someday when I have a nerd cave, this set will definitely go on display next to my Saturn V rocket.

The price isn’t too bad. I bought when the patch and #40335-1: Space Rocket Ride were being offered so that helped. If you’re looking for a better price, wait for double VIP points or maybe towards the end of its life we’ll see discounts on Amazon or at Walmart. Have fun building this one if you buy it!

10266_final1.jpg
10266_final2.jpg

Set Review - #71024-1: Disney Minifigures, Series 2 - Collectible Minifigures

The Disney Series 2 minifigures were released back on 1 May 2019. While most the the big fan sites have covered these a long time ago, I am a normal fan and it took a while to get all 18. I finally got them all and here is my review. So sorry it’s late, but I don’t get a free shipment from LEGO or go out and buy them right away to have the first review out there.

As mentioned previously, LEGO has limited the purchases you can make from Shop @ Home to 18. With that being said, you can go to a LEGO Brand Store and buy as many as they have in stock. The retail price is $3.99 per bag. I purchased mine from Amazon and they were $3.92 at a time. In checking today, they are listed at $2.99 each. I’m not sure if it’s an ongoing sale or a permanent drop in price, but sweet! Walmart shows the same $2.99 price as well. Hopefully this will become a trend and you can take advantage of waiting to get the minifigures by getting them at lower prices.

The bag size matches the larger size used for #71023-1: LEGO Movie 2 Minifigures.

Onto the review…

71024_1.jpg

Next up is Hercules and Hades from the cartoon movie “Hercules.” Unlike Ursula from series 1, Hades has a bottom half and top half versus a larger bottom piece that the torso fits in. Another change is that Hades hair piece is permanently attached to the head piece. I initially was shocked that the hair was attached and thought it somehow became assembled during shipment. Then I realized it was permanent. Odd… Hades was one of the lease popular in the orders I made.

71024_3.jpg

I had to make sure I got it right. Chip has a brown nose and Dale has the red nose. These weren’t as popular in my purchases. I think I got one extra of Dale only.

71024_5.jpg

Series 1 Disney had Genie and Aladdin. This series includes Jafar and Jasmine.

71024_7.jpg

The last bunch are Scrooge McDuck, Dewey (blue), Huey (red), and Louie (green). I had to look them up to verify I got them all right. These were the least popular in the orders I made and I was concerned I wouldn’t get any. It did bring back some good memories of watching “Duck Tales” as a kid. Anyone else remember that cartoon?

I have never seen “The Nightmare Before Christmas,” but this series includes Sally and
Jack Skellington. Sally comes with two black flowers and Jack comes with a gift with 1x1 round tile snowflakes inside. In my purchases, these were not hard to find, but I did not get a lot of extras.

71024_2.jpg

The LEGO Ideas set has some that are slightly different than Vintage Mickey and Vintage Minnie. I think the steering wheel is a bit too big and the life raft looks more like how I see it used regularly… as a toilet seat. There were a lot of extras of both of these minifigures in my purchases.

71024_4.jpg

I don’t think they could get away without doing Anna and Elsa from “Frozen.” They already appear in the Disney sets, but these are the first in true minifigure form. These minifigures were very popular in the purchases that I made and I got a lot of extras.

71024_6.jpg

The last series had Mr. Incredible and Syndrome. This one includes Edna Mode and Frozone. Edna is my favorite in this series. I like how they did the giant glasses that make her eyes look bigger. It’s a great representation of the movie character in my opinion.

71024_8.jpg

Overall this is a decent series. The representations of the actual characters in minifigure form were done well. In my opinion, it’s a good mix of characters from the Disney universe and I’m sure in a year or two we’ll see Series 3 with even more if the license with Disney continues.

If you’re a sucker for collecting these sets like me, the lesson learned here is to have patience and wait for better pricing. Hopefully this will become the trend and companies like Amazon and Walmart will cut the price to $2.99 or lower after a while. If you are going to buy them, you might as well wait for them to be at a better price than go through LEGO and their higher pricing. When the LEGO Movie 2 minifigures were discounted on Shop @ Home, they were only $3.19 so still a better deal to get them elsewhere.

Should there be a Series 3 or should they just move on? I’m hoping we can have more original minifigures versus licensed ones, but the licensed ones probably sell better. What are your thoughts on this series?

Set Review - #21037-1: LEGO® House - Architecture

Onto the second of the three LEGO® House exclusive sets I picked up while in Billund. This one is #21037-1: LEGO® House from the Architecture theme. It was released in 2017 and is still available today. The brief history behind this set is that #4000010-1: LEGO® House - Architecture available back in March 2014 was the first round. It was in all white and was released prior to the opening of the LEGO® House in Billund. This set was released after the LEGO® House opened.

This set has 774 pieces and retails for 449 DKK. I was at the LEGO® House for two days and I bought sets on each of the days (2 and then 1). I paid $67.19 and $67.27 when translated. I don’t think the US Dollar to Danish Kroner exchange rate fluctuates a great deal so my guess is you can expect to pay about the same amount. The sign at the store says you are limited to three sets per family. I bought three and didn’t try to scam the Brand Store there over by having my NLS buy some or buying without my VIP account.

Onto the review…

The box looks like a standard architecture set. The biggest difference is that this one is very colorful while most of the sets are usually full of grays, tans, and whites. It’s a nice change to have some color.

21037_box_front.JPG
21037_box_back.jpg

The contents are 6 parts bags, an instruction booklet, and four 6x12 dark gray plates. Like most architecture sets, the bags are not numbered. The instructions have a section about the LEGO® House, its development, information on the architecture firm, and some facts throughout the instructions.

21037_contents.jpg

Like most architecture sets, the bags aren’t numbered so there aren’t good break points for a review. I just picked a few points I thought to be useful to discuss the build.

The base of the building is completed at step 15. It’s just the dark gray plates with black plates underneath to hold them together. The edge is completed with black tiles to include one that is printed with the “LEGO® House” name on it.

21037_base.jpg

Step 33 of the instructions completes the first layer of plates on the base. It is made up of light gray for the sidewalks and tan for the floor inside the LEGO® House. There are a few spots where there are no plates and then a few colored tiles for where the stepped portions of the house begin.

21037_a.jpg

My next stopping point is the completion of the first floor or layer. The first floor includes some windows along with the yellow and blue steps on the two opposite ends of the building. The inside of the house includes a plant to represent one of the plants in the house and then the steps leading up into the house along with the tree of creativity. They don’t include all of the detail, but given the limited space, I can understand why.

21037_level1.jpg

Onto the second level… each of the sections fit in just so to create the various upper sections of the house. So far I’m impressed with the build and how it is arranged.

IMG_8760.jpg

The top level with the masterpiece gallery is easily removable and does not attach with clutch to the other layers of the house. This feature is nice as you can view the “inside” of the house. The very top includes the 8 clear windows that look like the studs of a 2x4 brick.

21037_top.jpg

Here’s the final build. I think they did a great job representing the LEGO® House given the scale of the architecture theme. I’m a big fan of this set and recommend picking it up if you are able to visit the LEGO® House. To be fair, I might be biased since I was actually there. I wonder if I would have the same opinions if I hadn’t actually been there.

Does anyone else have this one? What are your thoughts?

In the meantime, happy building!

21037_final

Set Review - #BL19012: Bikes! - BrickLink AFOL Designer Program

I did a few posts on the BrickLink AFOL designer back in March and April 2019. You can see the first one here and the update here. As mentioned, I ordered two sets and the first one arrived a few weeks back. I finally got done with my LEGO® House and Billund, Denmark posts so this post is next in the cue.

The first one to arrive was #BL19012: Bikes! by designer MDT.Maikel from the Netherlands. The cost was $49.99 for 519 pieces or $0.096 per piece. I bought it during the pre-order period so it was free shipping. I don’t live in California so no sales tax either. Woohoo!!

Onto the review…

When you buy from LEGO® Shop at Home, the boxes that arrive are very plain and do not have a LEGO logo on them anywhere. The shipping label says LRI I believe. BrickLink wants you to be sure you know what’s in the box when you get it. As you can see, the logo is proudly displayed on the box.

BL_outer_box.jpg

The box inside has a printed covering on it. The front of the set has the BrickLink logo, the 60th anniversary logo, and the printed numbering (my set was #617). The back shows another view of the set. The side of the box has the designer info, the total pieces, and the total unique pieces.

box1.jpg
box2.jpg
box3.jpg

The inside of the box cover can be set up as a backdrop for the set. I didn’t straighten it out or hang it up so it still has the folds, but it’s a cool idea. I didn’t see anywhere that said where exactly the picture was taken, but I would guess in the Netherlands somewhere. Does anyone know?

inner_picture.jpg

Inside the covering is the box with the goods. The top has the BrickLink logo and the bottom has some information about the AFOL Designer Program. I took a picture of the BrickLink logo on the side just because and then the box has a seal for when you open it. Once you pull the sticker away, it says “void” and you can’t try and re-sell or scam someone into saying it’s a new build for purchase.

inner_box1.jpg
inner_box_side.jpg
inner_box2.jpg
box_seal.jpg

The box was actually a bit big considering the contents. The contents are 3 parts bags, the instructions, and 2 cards. This is what it looked like when I opened the box. Everything was well organized and you can tell it was hand packed versus machine stuffed.

inside.jpg

The first card as you open the set has a note from BrickLink and from LEGO. Happy reading!

thank_you_card.jpg

The second card has pictures of all of the sets that were selected as finalists in the program.

card2.jpg

Inside the instruction booklet is a note from the AFOL designer. His name is Maikel de Vries and it’s cool that they let him plug some of his other work.

designer_note.jpg

The instructions are similar to what you would find in an official LEGO set other than they skip a lot of steps and details. They get that adults are building these and they don’t need to get into every little detail. If you want to follow the instructions, then it’s on you.

instructions.jpg

The contents were 3 parts bags labeled 1A, 2A, and 2B. The instructions are set up so that you open bag 1 and then bags 2A and 2B at the same time. My guess is that BrickLink did a lot of this by hand versus using LEGO’s giant automated systems so the 2A and 2B helped people realize that they were separate. Don’t quote me on this one… does anyone have any insight into this?

Additionally, you get an Exclusive Element. It is the Technic, Brick 2x4 with 3 axle holes. I didn’t grab a picture of it, but the side of the brick has the 60 Year logo on it.

contents1.jpg
unique_brick.jpg

Onto the build…

The first bag completes the stand where you pick up your bike. It comes with 3 bikes and 6 slots for bikes. There are 6 light blue bikes that come with the set in total so that makes sense. The one side of the stand has a register for renting the bike and the other has an air pump (I think). The base has the “Bikes!” logo on it made out of lime green tiles. The roof is held on by a Technic parts design that is pretty cool. Unlike an official LEGO set, this stand is not very solidly constructed. If you’re used to just picking up an official set and moving it, don’t try it with this one. The roof part disconnects very easily. It’s not a bad thing… just a difference to be aware of in my opinion.

BL19012_bag1.jpg

The second set of bags builds the truck, 2 minifigures, and a bike with a cart in front that carries some brick food. The truck isn’t too detailed other than the design in the back uses some SNOT techniques to have the mirror image “Bikes!” sign on both sides. The bike with cart is a cool idea… definitely something I saw a lot when I went to Amsterdam. It’s not a very stable build with the basket being held on by one small stud, but as it’s not meant for a kid to play with, They can get away with it for this set.

The minifigures are rather plain and come with the 2 dots and a smiley face. If BrickLink repeats this effort, I’d work with LEGO to expand the available minifigures. If I were to have a complain about anything from this set, I think the minifigures would be it.

BL19012_bag2.jpg

Here’s the final build with the 3 extra bike wheels. There were a few small extra parts too.

Overall, I like how BrickLink and LEGO handled this and the finished product. The packaging was high quality and the set build was on par with what I’d expect from an AFOL build. Having ordered back in late March, they thankfully didn’t charge me until the set shipped in June. I have one other set on the way and have not been charged for it yet which is good. I think that’s a reasonable way to run the program. BrickLink has done a good job getting me updates on the status of my orders. Not charging me until it ships is good. I have done a brick related gofundme type program before. I paid up front and ended up not getting the final product as the effort was delayed substantially. I contacted the folks running the effort and still didn’t get anything.

Back on track though… this was well executed and the final product is great. I’m on board with BrickLink doing this again. It would be great to see more AFOL models come through the pipeline. Maybe some of the rejected IDEAS sets?

Well done BrickLink!

BL19012_final.jpg

Set Review - #40366-1: LEGO House Dinosaurs

If you’ve been reading my blog, you’ve seen my posts about my trip to the LEGO® House in Billund, Denmark. I hinted that I would be reviewing the exclusive sets and now here I am with the the first of three. Starting with the newest one first, #40366-1: LEGO House Dinosaurs was released on 1 May 2019 (I believe… someone correct me if that is wrong). It is only available at the LEGO® House in the Brand Store there. There is a sign by the set along with the other exclusive sets saying that you are limited to three per family. I assume they track by your VIP points and I didn’t try to scam them by buying more on the second day without my VIP points number. The joy of driving to Billund was that I had a car and didn’t have to cram my haul into suit cases. So I got 3. The set has 864 pieces and retails for 599 DKK. I bought 2 sets on day one and 1 on day 2. The first day I paid around $89.63 and the second day was around $89.73 with the exchange rate. That works about to about $0.104 per piece. So right around the average for a set if you assume 10 cents per piece is the going rate.

Keep in mind that this includes VAT or Value Added Tax. In the US, you pay sales tax which is factored in above the listed price. In Europe, VAT is already in there. So really, on day 1 I paid $22.41 in tax and the set was only $67.22. The Brand Store at the LEGO® House says you can do VAT free shopping. It means you get a form and take your receipt and form to a stand that is usually at the airport. They process it and then magically you get a refund on your credit card a few months later. Since I live in Germany right now, that wasn’t an option for me, but had I flown back to the US, I could have done that. So something to consider if you fly from the US to Billund.

Onto the review… The front shows the set build in a digital recreation of the Masterpiece Gallery. It also shows the LEGO® House logo. The back provides some background on the LEGO® House Dinosaurs and shows a picture of the actual models. It also had a small write up about the LEGO® House itself.

40366_box_front..JPG
40366_box_back.jpg

The box contains 9 parts bags, a bag of white flex rods, and 3 instruction books packaged up with a sticker sheet. Bag one contains a teal colored piece separator.

40366_contents.jpg

The first bag begins the DUPLO® T-Rex. You start by building the arms, tail, and body. There are a few stickers on this one, but nothing too major.

Without the legs it almost looks like it could be a sea monster…

40366_bag2.jpg

The third bag adds the display stand found at the LEGO® House. The stand includes 2 eggs, which as of this year, one has hatched. This model is of the original design when the LEGO® House first opened. The stand has a spot for you to attach the feet so it doesn’t fall over.


40366_bag4.jpg

Bag 5 wraps up the System brick dinosaur. The head is built in a somewhat similar method with the teeth and eyes looking similar to the DUPLO® version. The legs are built differently. It still stands up on its own well once you balance it.

40366_bag6.jpg

The seventh bag starts the Technic parts built dinosaur. Like bags 1 and 4, this one builds the body, arms, and tail. As to be expected, it is heavy on the use of Technic parts.


40366_bag8.jpg

And the ninth bag is a stand that is similar to the other 2.


40633_bag1.jpg

The second bag finishes the DUPLO® dinosaur. The head and legs are finished. I like how they did the teeth and it includes a tongue too. The use of the ball joints for eyes is also a nice touch. The brick flower pieces do a good job replicating the flowers found on the actual build.

With the weight being distributed around, it is easy to get the dinosaur to stand up on its own without falling over.


40366_bag3.jpg

The fourth bag starts the System bricks dinosaur. Like bag one, this bag builds the tail, arms, and body of the dinosaur with some slight changes. There are fewer stickers here to apply which is good in my opinion.

40366_bag5.jpg

The sixth bag builds the stand for this dino. Like the DUPLO® version, this one has a spot for you to attach the feet. This allows you to change the position and not worry about it falling over if it isn’t balanced.

40366_bag7.jpg

The eighth bag finishes up the Technic T-Rex. It uses a lot of Technic pieces, but the main construction is with system bricks and the Technic pieces are strapped on the outside. Only 2 stickers on this one so not bad. The head is built slightly different than the other 2, but it still has similar eyes and teeth.

40366_bag9.jpg

Here are all three together as a completed set. Overall, I’m a big fan. I think they did a great job capturing the big models at a smaller scale. The builds are somewhat similar, but each have small changes that make the build more interesting. They are a good display set and they have some play features too.

The price is a bit high, but that’s what you get for an exclusive set sold at one place only. Maybe when I re-open my Bricklink store, I will sell the other 2 I bought to help make up for the cost.

40366_final.jpg

Here’s the set next to a picture I took during my visit in May 2019. Obviously not exactly alike, but I think they are close considering it’s only a few hundred pieces for 3 versus many hundreds of thousands of bricks for the real ones.

Has anyone else built this set yet? What are your thoughts?

40366row.jpg
lego_house_dinos.jpg

Set Review - #10264-1: Corner Garage - Creator Expert - Modular Building

The modular building line for Creator Expert started in 2007 and is back this year with #10264-1: Corner Garage. It was released on 2 January 2019. This one cost $199.99 and with 2,569 pieces, it works out to be $0.078 per piece.

You can see the previous Modular Building reviews at the following links:
#10246-1: Detective’s Office (2015)
#10251-1: Brick Bank (2016)
#10255-1: Assembly Square (2017)
#10260-1: Downtown Diner (2018)

A lot of the reviews I’ve read or watched have been negative towards this modular set. They’ve said it’s rather plain and doesn’t have a lot of the detail others have had. So we’ll see…

Like others, the front shows the full build with the different floors on the right side. The back shows some of the inner details and then how it looks next to some of the previous modulars. The box shows it next to the Assembly Square and Downtown Diner. I think it looks pretty good there.

10264_box_front.jpg
10264_box_back.jpg

The contents are six sets of bags, an instruction booklet (that comes wrapped), a 32x32 stud tan base plate, and two 8x16 light gray plates. I’m not sure why the 2 light gray 8x16 plates are separated as there are also some in bags too. Oh, and no stickers! Whoo-hoo!

10264_contents.jpg

The first set of bags starts the first/ground floor. It includes quite a few 2x2 light gray tiles for the floor and road portion. You can see the start of the garage as well as the lift. There is a tool box in the garage for the mechanic to use and a broom and dolly outside. This set of bags come with a dog and a male mechanic minifigure (I’ll hit on the minifigures later).

10264_bag1.jpg

One thing out of the ordinary for this portion of the build is the lift. There is a simple function that allows you to have the lift go up and then down. As you can see in the 2 pictures, you slide the piece out and it goes down and then you push it in and the lift goes up. Nothing to challenging, but it is cleverly integrated in the build without taking away from the aesthetics too much. So far I have only tried it with the vehicle that comes with this set and it works with that one, but that one is slightly heavy. I have yet to try it with a lighter vehicle.

10264_lift_down.jpg
10264_lift_up.jpg

The second set of bags mostly finishes the ground floor. Internally, there are some items for sale to include tires and maybe motor oil. There is also a cash register and counter. Then there’s a door entrance opposite the garage to go up to the higher floors. On top of the garage door is a small sign for the shop with a wrench on it.

This set of bags include a small Vespa type motor bike and a male minifigure who is the rider.

10264_bag2a.jpg
10264_bag2b.jpg

The garage has a door that can be opened and closed. It is the standard door used in some of the CITY sets, but it does not have the same attachment. There is a wheel on the outer wall that you spin to open or close the door. When you open it, the door parts roll up. When it closes the door goes down in a track along the walls. Some of the CITY fire stations just have the garage doors stay on the track the whole time. When the door goes up, it just slides up above the vehicle stall versus rolling up like it does in this set. I had a bit of trouble putting this together correctly, but eventually figured it out so it works fine.

10264_bag2_door.jpg
10264_garage.jpg

The third set of bags builds the gas pump, the covering over the pump, and the tow truck. The gas pump is an old fashioned pump with a cool Octan logo on it. The covering over the pump has a sign that reads “Jo’s Garage” with the catchy and clever saying of “By Accident We Meet.” A blue tow truck is included too. It’s in the older style… maybe 1930s or 1940s… and has a simple mechanism to raise and lower the hook. This parts bag also has a female minifigure who is a mechanic.

Also included in this parts bag is a small tree that uses one of the newer leaf pieces to make the branches.

10264_bag3a.jpg
10264_tree.jpg
10264_bag3b.jpg

The fourth set of bags builds the second floor which is a Veterinarian’s Office. The front window says “Dr. Jones Animal Care - No Snakes.” Yet another clever graphic by the designers.

10264_bag4a.jpg
10264_bag4b.jpg

The waiting room has a small waiting area to wait for your animal to be taken care of. There is a girl minifigure who can’t actually sit on the couch or chair and a parrot who hangs out there. The waiting room also has a small table with a coffee mug, some flowers, and a fish tank with a fish in it that is build into the wall that divides the office with the waiting room.

The Office has an examining table, a work desk for the vet, a lab station, and a table with some equipment for the vet to use. The instructions have the vet examining a rabbit on the table.

Despite the size of the floor, the designers were able to squeeze a decent amount of detail in. I’m impressed.

10264_bag4c.jpg
10264_bag4d.jpg

The fifth set of bags completes the third floor. This floor is a studio apartment with one male minifigure that lives there. The apartment has a small kitchenette, a bathroom, a bed, a TV, a couch, and some decorations on the wall (a truck and a record). The front of the building continues with the brownish color (I’m not sure of the official term used by LEGO) with the blue-gray colored window frames. The third floor has some flowers growing on the window sill. You can also see some of the design done by the 1x1 pizza slice tiles (my name, not the official name) on the second floor.

10264_bag5a.jpg
10264_bag5b.jpg

I wanted to make sure the windows get captured because I like the way they were designed. The ones on the second and third floor above the garage door are made using SNOT techniques with one of the clear pieces used for truck windshields. I like that the windshield pieces are still framed by the same blue-gray color as the other window frames. The side above the front door has a balcony on the second floor and a window on the third floor. I’m not sure why the vet’s office needs a balcony versus the studio apartment, but you can always swap them if you want.

10264_bag5c.jpg
10264_bag5d.jpg

The sixth set of bags finishes up the build and completes the roof. The roof has some flowers growing, a lounge chair to relax on with umbrella overhead, and the doorway to get up there from the stairwell. This floor also completes the facade on the front. The facade design is pretty simple, but I still think it makes it look a bit more elegant and fancy versus just a plain corner on the top.

10264_bag6a.jpg
10264_bag6b.jpg

I added pictures of both sides so you can see the designs above each of the side windows. I like the use of the new-ish 1x1… um… it looks like more of an equilateral triangle or isosceles triangle versus a cheese slope… piece.

10264_bag6c.jpg
10264_bag6d.jpg

This set comes with six minifigures. On the top there’s the vet (Dr. Jones we assume) and 2 mechanics (a female and male). On the bottom are the “cool guy” who has a helmet to ride the motor bike, the girl who brings her pet to the Vet, and the man in a sweater who lives in the studio apartment. In my opinion, it’s a good mix of minifigures and I think having facial expressions adds to the set versus the original smiley face they used to have in the original modular building sets.

10264_minifigs.jpg

A closer shot of the vehicles… The tow truck has 2 tones of blue which gives it a nice look and then the motor bike.

10264_truck.jpg

Overall, this is not my favorite modular building, but I don’t have as many complaints as I saw in other reviews. I like how the angled wall in the front was done to create a corner building. There are a lot of pieces in great colors you can use in MOCs if you decide to tear your building down. The signage is clever with some of the humorous clips and the old fashioned Octan logo should become pretty popular on the secondary market. I’m a fan and I can’t wait to add it to my other modular buildings some day.

As for downsides, I think the garage portion could use a bit more detail. Maybe some more equipment for fixing cars or more things to sell. Also, the color transition from the white and green to the tan-ish and blue-gray on the second and third floors doesn’t go well with my untrained eye. I’m not sure what to recommend, but it seems to clash slightly with me. To be fair, if I’m going to complain, why don’t I just redesign it myself, right?

What are your thoughts? Is this modular building really awful? Or maybe just not as good as some of the ones in the past? Or maybe it’s just different from some of the ones we’ve had in the past like the Parisian Cafe or Grand Emporium. Let me know what you think.

Happy building!

10264_final1.jpg
10264_final2.jpg

Set Review - #60222-1: Snow Groomer - LEGO CITY

I tend to avoid some of the repeating CITY subthemes like police or fire, but I find some of the less repeating sets interesting sometimes. The last CITY set I reviewed was #60204: City Hospital (the previous City Hospital was 11 years prior). Today we’ll go through the smaller #60222-1: Snow Groomer. I’m not sure where this set fits in as it doesn’t really fall into the Arctic subtheme and there aren’t any other similar sets in the lineup and I don’t recall there being a skiing set out there unless I’m missing something. It’s an interesting concept nonetheless.

This one was released in the US on 1 January 2019. It contains 197 pieces and retails for $19.99 or $0.101 per piece. I got mine for this review from Amazon.com for 20% off or $15.99 ($0.089 per piece). It definitely pays to wait a few months to save a few dollars as the trend seems to be the Amazon.com, Walmart, and Target run sales soon after release these days versus having to wait for the end of a set’s life to catch it on clearance before it retires.

Here’s the box. The front shows the set with its snow cannon feature and the back shows the snow cannon again along with a minifigure happily building the set. It also shows that you can set up the snow cannon on the ground.

60222_box_front.jpg
60222_box_back.jpg

The contents include two parts bags, a small sticker sheet, and an instruction booklet. I was happy to see that the instruction booklet was nicely placed inside and not jammed in with a massive crease in it when you take it out.

60222_contents.jpg

The first bag builds the base. Some Technic pieces make up the main portion and then you attach on the treads. Then there’s a spot for you to attach the cab and the plow. But let’s focus on the wheel in the middle for a minute… I’m not a fan. It makes the set slightly off balance and a little unrealistic in my opinion. However, with an age range of 6+ for the set, I’m pretty sure the concern was that kids would be frustrated that the treads don’t move easily. The table surface I built on is a good example. With the wheel, the treads move great. To be fair, it is easy to build this without the wheel in the middle. It is there for the play factor and that makes sense to me.

60222_bag1.jpg

Bag one also comes with the two minifigures. One is a male in a bright orange jacket with a winter cap and gloves on. He has some long side burns and a mustache too. The other is a female skier. She’s got a helmet, goggles printed on versus attached to the helmet, a ski jacket, two poles, and two skis. Both have no designs on their pants. I remember growing up and playing with LEGO with my sister. We would argue over who got the limited number of female minifigues that we had. Most were male and it made for a pretty lopsided town. I’m thankful that LEGO has changed and we now have a very diverse crowd. My town today has a great mix of the two genders.

60222_minifigs.jpg

The second bag assembles the cab on top and the snow cannon. It also adds the plow in front. The cab is pretty simple and comes with a coffee mug so the worker can drink and plow. The cannon feature has been seen before only this one shoots snow (white 1x1 round plates). I don’t think I’ve ever tested the feature before, but these things go pretty far when shot. I’m sure some parents will be vacuuming up some 1x1 round plates in the near future. You do get a few extras in the set though so a kid hopefully won’t lose them all right away.

The plow needs a redesign. I’m okay with how it looks, but the attachment is very awkward. You can see a lot of the Technic axles sticking out and the plow just slides in and is not held in place. My suggestion for a redesign would be to either modify the attachment of the plow or to cover it up somehow so it doesn’t look so awkward. I would also make it so that it stays on. If a kid is playing with the plow down and decides to back it up, the plow slides off. It needs to stay on. I would think the LEGO designers would have caught that when designing the set.

Overall it is a pretty neat set that we haven’t seen in the LEGO CITY range before. There are a few minor design flaws in my opinion, but an AFOL with a large parts stash could easily refine this set to make some improvements. The option to pick this set up on sale makes it a little easier to swallow so look for it at some of the big retailers at a discount. It may get discounted more closer to the Christmas season.

I think this one is a win. What are your thoughts?

Happy building!

60222_bag2.jpg

Set Review - #71023 - LEGO Minifigures - The LEGO Movie 2

I fully admit, I am way late to the game with this review. All of the major fan sites have released their Disney series 2 collectible minifigure reviews and here I am just wrapping up the previous set. Better late than never I guess.

This set was released on 1 February 2019 in the US. It takes me a little over a month to get small packages (read USPS Retail Ground) over here in Germany so hence the delay. I don’t want to pay the exchange rate and VAT here so I wait for the cheaper minfigures I order from the US. Like previous Collectible Minifigures, these are $3.99 per bag. There are 20 minifigures total in the series.

A few changes this time:
-The size of the bag the minifigures come in is slightly larger in size from previous versions.
-A number of the figures have a clear plastic bag with parts inside the main bag. In most cases, the minifigure itself was in the clear plastic bag. Then that was inside the main bag with the instructions and any accessories on the main bag.
-The instruction sheet and minifigure picture list is folded up much smaller.
-This is just from my limited experience, but in the orders I placed with Shop @ Home, they all arrived with a wider variety of minifigures. In the past, I’d open up the first 10 or so and already have a lot of duplicates. This time I felt like I’d open up 10 and they were all different. I’m curious if LEGO made an effort to disperse the minifigures a little more or if it was just by chance with my orders.
-The base piece is white. While not the first time it’s been different from the black bases, it is the first time it’s been in white.

Onto the minifigures…. and keep in mind that I have still NOT seen the movie as of the writing of this post. Hopefully that doesn’t qualify me for banishment from the AFOL community.

71023_1.jpg

Hula Lula is the minifigure with the light green hair. She has a vinyl record and a microphone. Her grass skirt is a fabric piece that you have to insert into the leg studs while assembling her.

Candy Rapper has pink hair and is holding a microphone and cassette tape. She has the skirt similar to many others. She’s also giving an eye wink. I’m a fan of the different colored hair pieces on both of these minifigures.

Kitty Pop comes with a guitar and microphone. Her hair piece has ears and she has a tail.

Flashback Lucy has a microphone and gold record award plaque for “Everything is Awesome.”

71023_2.jpg
71023_3.jpg

Apocalypseburg Abe has the steampunk look and comes with an ax. His outfit is pretty creative and i like the goggles attached to his top hat.

Sherry Scratchen-Post & Scarfield are repeats from the first LEGO Movie minifigure series only in Apocalypseburg style this time. Scarfield’s mohawk haircut style is great.

Again, I have yet to see the movie yet so I don’t know why the “Wizard of Oz” crew is in this series, but we have the Cowardly Lion with his bravery award and the Tin Man holding his ax and his heart.

71023_4.jpg
71023_5.jpg

And then we have the Scarecrow with his certificate and then Dorothy Gale & Toto.

Awesome Remix Emmet with his overpriced coffee, smart phone, and headphones.

Vest Friend Rex comes with his mini-velociraptor.

71023_6.jpg
71023_7.jpg

Gone Golfin’ President Business has the standard yellow hand and then a hand with what I assume would be a golfing glove. I’m waiting for someone to make a golf course with the club from this minifigure. Or maybe a mini golf putt-putt course

Apocalypse Benny has a mech arm and a tool box. Other than that he looks the same as the last movie.

Battle-Ready Lucy has a brown hood with goggles. She has some arrows in her quiver and is holding binoculars.

Uni Kitty comes in her happy form versus Angry Kitty.

71023_8.jpg
71023_9.jpg

Swamp Creature is holding a whip and has a fun print on his chest. The head piece is pretty cool too.

Watermelon Dude is holding a slice of melon and has an over-sized slice on his head. This one ranks right up there with many of the costumed minifigures from past sets.

And finally, more costumed minifigures!

Giraffe Guy is holding some leaves and has a giant giraffe head costume on.

Crayon Girl is holding a 2x2 tile drawing of a minifigure head.

Both of these are great. I’m a big fan of all of the costumed minifigures. I think it’s partially because you can easily mix them into a larger city scene display as Easter Eggs for people to find.

71023_10.jpg

Overall, I think LEGO didn’t disappoint with this series. The characters from the original series were done up well, the Apocalypseburg style is fun, the costumed characters are a win in my book, and the “Wizard of Oz” gang look pretty good too. My preference is the more free form Collectible Minifigure Series sets versus the ones attached to a licensed theme, but I think this time LEGO did a good job of matching the theme and giving the fans a bit more.

I’ll be back (late) with the Disney Series 2 in a few months!

Happy building!

Set Review - #60204-1: City Hospital - LEGO City

The CITY theme has a bunch of re-release sub-themes every year. The Fire and Police sub-themes always seem to re-appear. Well the Hospital sub-theme (or is it medical?) is one theme that is not often repeated. The last version came out in 2007. It was #7892-1 and I actually have it. It’s not that great of a set, but I do like the sub-theme. Since then there have been a few other themes that have had hospitals to include Duplo and Friends. Thankfully it returned to CITY and on 2 June 2018, #60204-1 was released in the US. It retails for $99.99 and contains 861 pieces and 13 minifigures. At that price it is $0.116 per piece which is a bit high in my opinion. It does have some large pieces which drives up the cost of plastic and there is a light brick which adds onto the price as well. Onto the review…

The box is pretty big with the front showing the full set and the back showing some of the play features like usual. My container got a bit banged up on the way to my house, but I can’t complain. It was packaged well… just had a lot of opportunities to get beat up on the way to Germany.

60204_boxfront.jpg
60204_boxback.jpg

The contents include 9 parts bags, 5 8x16 light gray plates, the instruction books, and a sticker sheet. The instructions and stickers were in a separate bag. While it is extra packaging, I like that they are protected versus some of the cheaper sets where they get all folded up and jammed into the box during packaging. I was especially thankful given the damage the outer box received on the way to my house. At least the instructions and stickers didn’t take the brunt of any of it.

There are a bunch of stickers… 26 numbered in total to include some that have more than one per instruction number. There are quite a few, but in my opinion, they add to the detail of the set so I made sure to place them all.

There are 6 instruction books. One is for the helicopter and some minifigures. One is for the ambulance. Four of them are for the hospital structure itself. The picture on the outside matches what the build is as well.

60204_contents.jpg
60204_stickers.jpg
60204_instructions.jpg

The first bag includes a helicopter, helicopter pad, and 5 minifigures (4 full size and one baby. The minifigures are a man with flowers, a woman, a baby with a stroller, a figure who we assume is a painter or some sort of handyman who has a cast on his arm, and the helicopter pilot. There is also a wheelchair that can be used for the man who broke his arm I guess. Not a bad selection of figures to start. As for the helicopter, I am not a fan of CITY helicopters in general. If you’re going to do one right, it needs to be larger with a bit more detail. This one has a purpose of carrying a small container of important medicine or something in a bulky container that sits on one of the landing skids. Really? The main rotor is pretty unrealistic as well given that it’s just 2 1x8 plates. I’m sure it has to do with kids enjoying playing with helicopters built out of LEGO bricks and not at all for AFOLs who want details on all sets to include those designed for kids.

60204_bag1.jpg

Bag 2 starts off the ambulance build. It builds the frame and then the hood, doors, and some of the outer walls. It also includes a stretcher, a female EMT/driver, and what appears to be a miner who comes with hair, a helmet, and a bandage to put over his head. I guess he forget to wear the helmet so he has to wear the bandage due to his injury.

60204_bag2.jpg

The third bag completes the ambulance. It’s not a bad design. Nothing too out of the ordinary, but I think it looks a bit more realistic versus what some past versions have looked like. The only design change I would make would be to have 2 doors that open out versus one door that swings up. In terms of the play factor, I think this one is missing some EMT equipment. Maybe a few small bags of equipment or something for the EMT to use when going on a call. Could also be something to design later with your own parts.

60204_bag3.jpg

Bag 4 starts to build the hospital itself. The first floor includes a sliding glass door, a very small snack shop with a newspaper and LEGO set, a single seat waiting area, and what will end up as the Emergency Room entrance. I understand it is a CITY set meant for 6 to 12 year old kids, so instead of criticizing LEGO for poor design, I’m going to see it as an opportunity to make improvements. I see opportunity to add some floor tiles for decoration, expand the gift/snack shop, provide a true waiting area, and maybe even an information/check in desk.

This bag also includes 2 female medical personnel. They both have glasses on and blue scrubs for pants.

60204_bag4.jpg

The fifth bag completes the first floor. This includes the roof, the ambulance/Emergency Room entrance, a cart for the ER with some equipment, and a computer built into the wall. There’s a lot of potential here for expansion to include a built up ER with beds, monitors and medical equipment, a nurses station, a door for the ER entrance, maybe a covered entrance for the ambulance… lots of possibilities, not a lot of time.

60204_bag5.jpg

Bag six starts work on the second floor with an optometry section. There the… I don’t know what it is called… the optometrist gives you different lenses and always asks “1 or 2?” There is also a computer scan or some sorts and 2 eye charts. The charts are a kid version and then the adult version with letters. The adult eye chart cleverly reads “if you can read this, you have good vision.” I would have added in a chair for the patient to sit in versus the little lime green tile with studs on the floor for the minifigure to stand on.

60204_bag6.jpg

The seventh bag completes a lab of sorts for the second floor and the doctor or technician who works there. There is a microscope, a skeleton, a syringe, and then an x-ray viewer. The viewer isn’t super great, but it isn’t bad for a CITY set. There’s a red brick light that is set up on some pieces. You then have 3 stickered windows that you can slide in front to project the image on the wall. The one I show is of a broken minifigure arm. There is also one of a broken minifigure rib and one of a minifigure who swallowed a LEGO cherry whole. This section attaches to the second floor right next to the optometry section. It is oddly placed, but I think some work on the second floor on top of a re-designed first floor could provide much better detail.

IMG_7473.JPG
60204_bag9.jpg
IMG_7474.JPG

The eighth bag starts the third and final floor. This section is the Labor and Delivery section of the hospital. Bag 8 includes the start of the floor, and another medical staff minifigure, and a bassinet for the baby. The bassinet includes a baby bottle and at the end it has a picture and some sort of label scribbled on it.

60204_bag8.jpg

The last bag (#9) is the final bag and finishes up Labor and Delivery. It includes a delivery bed, a monitor of sorts, and a red and blue… I’m not sure what they are. Some sort of monitor attachment maybe. There is also a light attached to the ceiling. My favorite detail on the inside is actually the sticker on the wall. The fish design is fun and makes the room look very kid friendly (although that’s not what you are thinking when the kid is being born).

60204_bag9.jpg

Here are the minifigures. In my opinion, they help to make the set a bit more worth buying. Besides the sheer number, you get a good collection of city figures, another baby minifigure, the 4 medical staff members, and 2 EMTs.

60204_minifigs.jpg

Here are the front and back of the building. It’s designed for play versus display or detail so in my opinion it’s lacking in some detail. The third floor only takes up part of the floor versus the second floor. There could have been some different choices in they types of clinics available. Or maybe they could have built some patient rooms? Or maybe we just need to expand it on our own?

60204_final_front.jpg
60204_final_back.jpg

Overall, not a bad set. A bit pricey, but considering the number of minifigures and the length of time between hospital set releases in the CITY sub-theme, it might be worth it. Wait for double VIP points or a good free offer set before you get it from LEGO Shop @ Home. Or maybe Amazon.com, Walmart, or Target will have a sale?

If anyone has modified it or put additions onto the set, let me know. I’ll be happy to post your versions for people to see how you spruced it up.

In the meantime, happy building!

60204_final2.jpg