Set Reviews

Set Review - #21322-1: Pirates of Barracuda Bay - Build #15 - Ideas

I reviewed the first part of the build up through bag 14 here. It included everything to build the pirate ship turned living quarters set up which was very impressive. There is one more bag that comes with the set (#15) and it helps you convert the set into a ship.

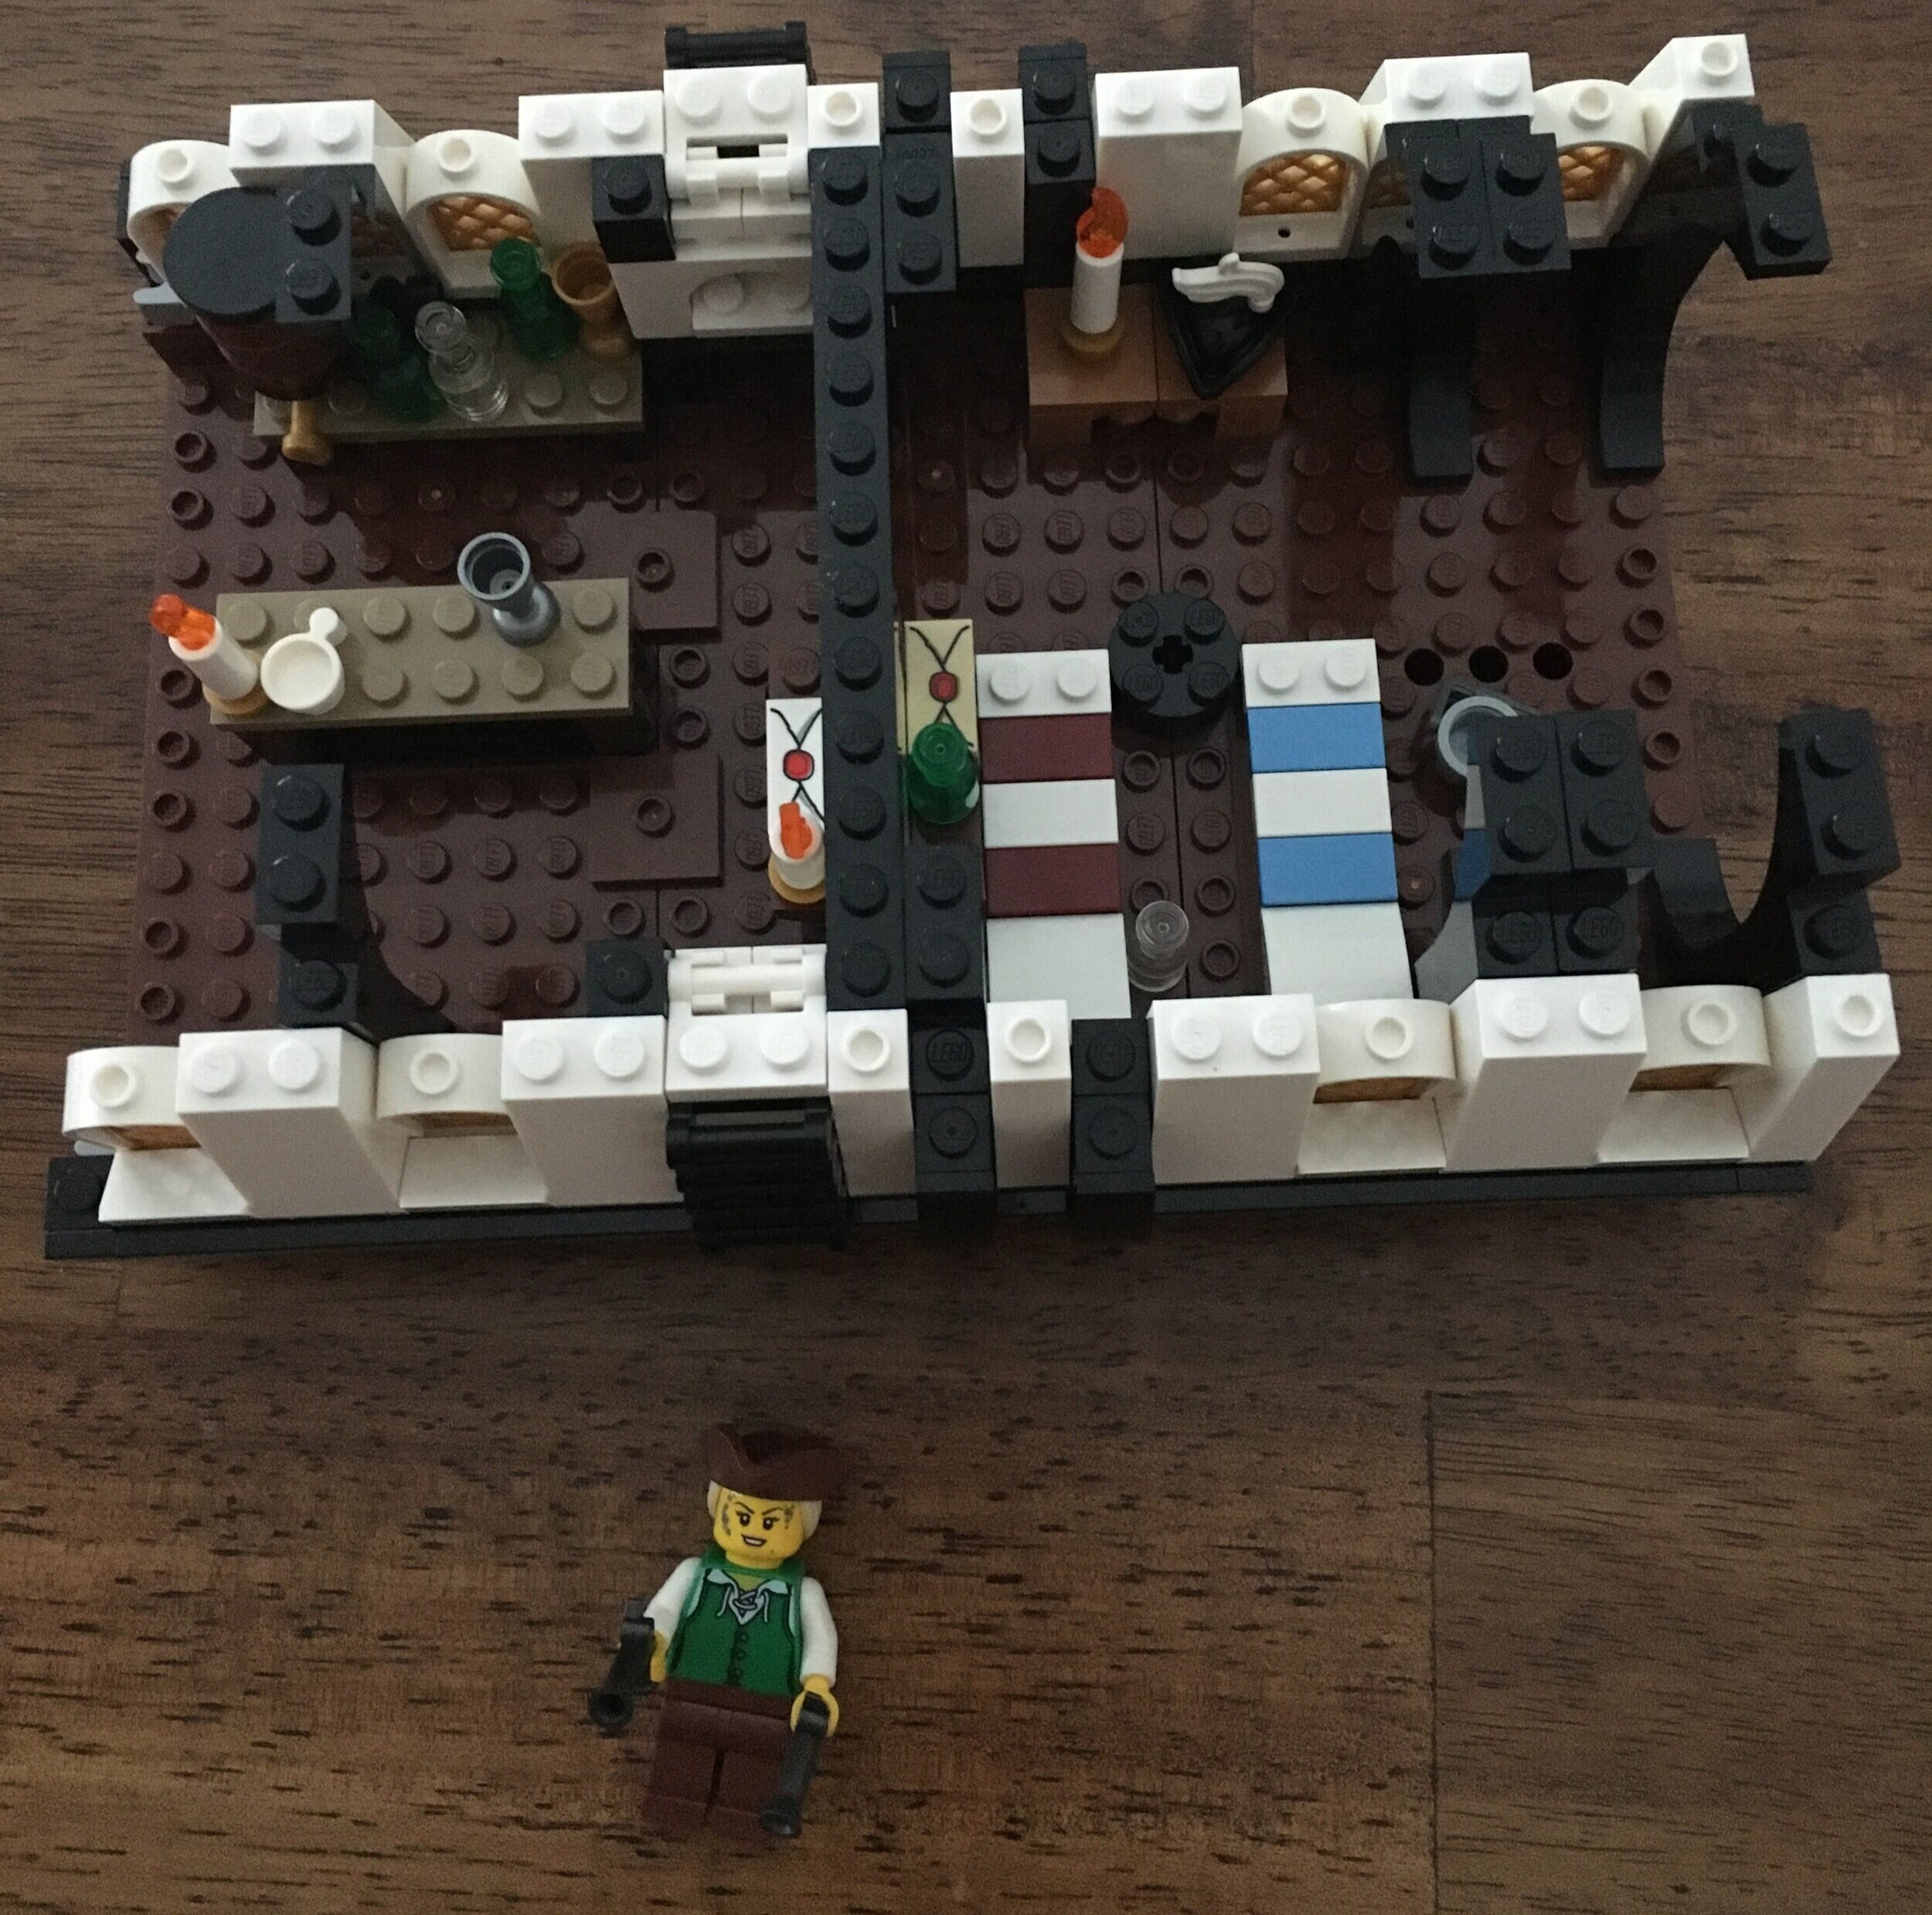
The instructions start with removing a lot of pieces. You take off the plant life and some of the boarded up parts of the ship. Then you fix up some of the windows. Next it is the sails which look great when unfurled! Then you can add some containers for supplies and done. It didn’t take too long to make the conversion.

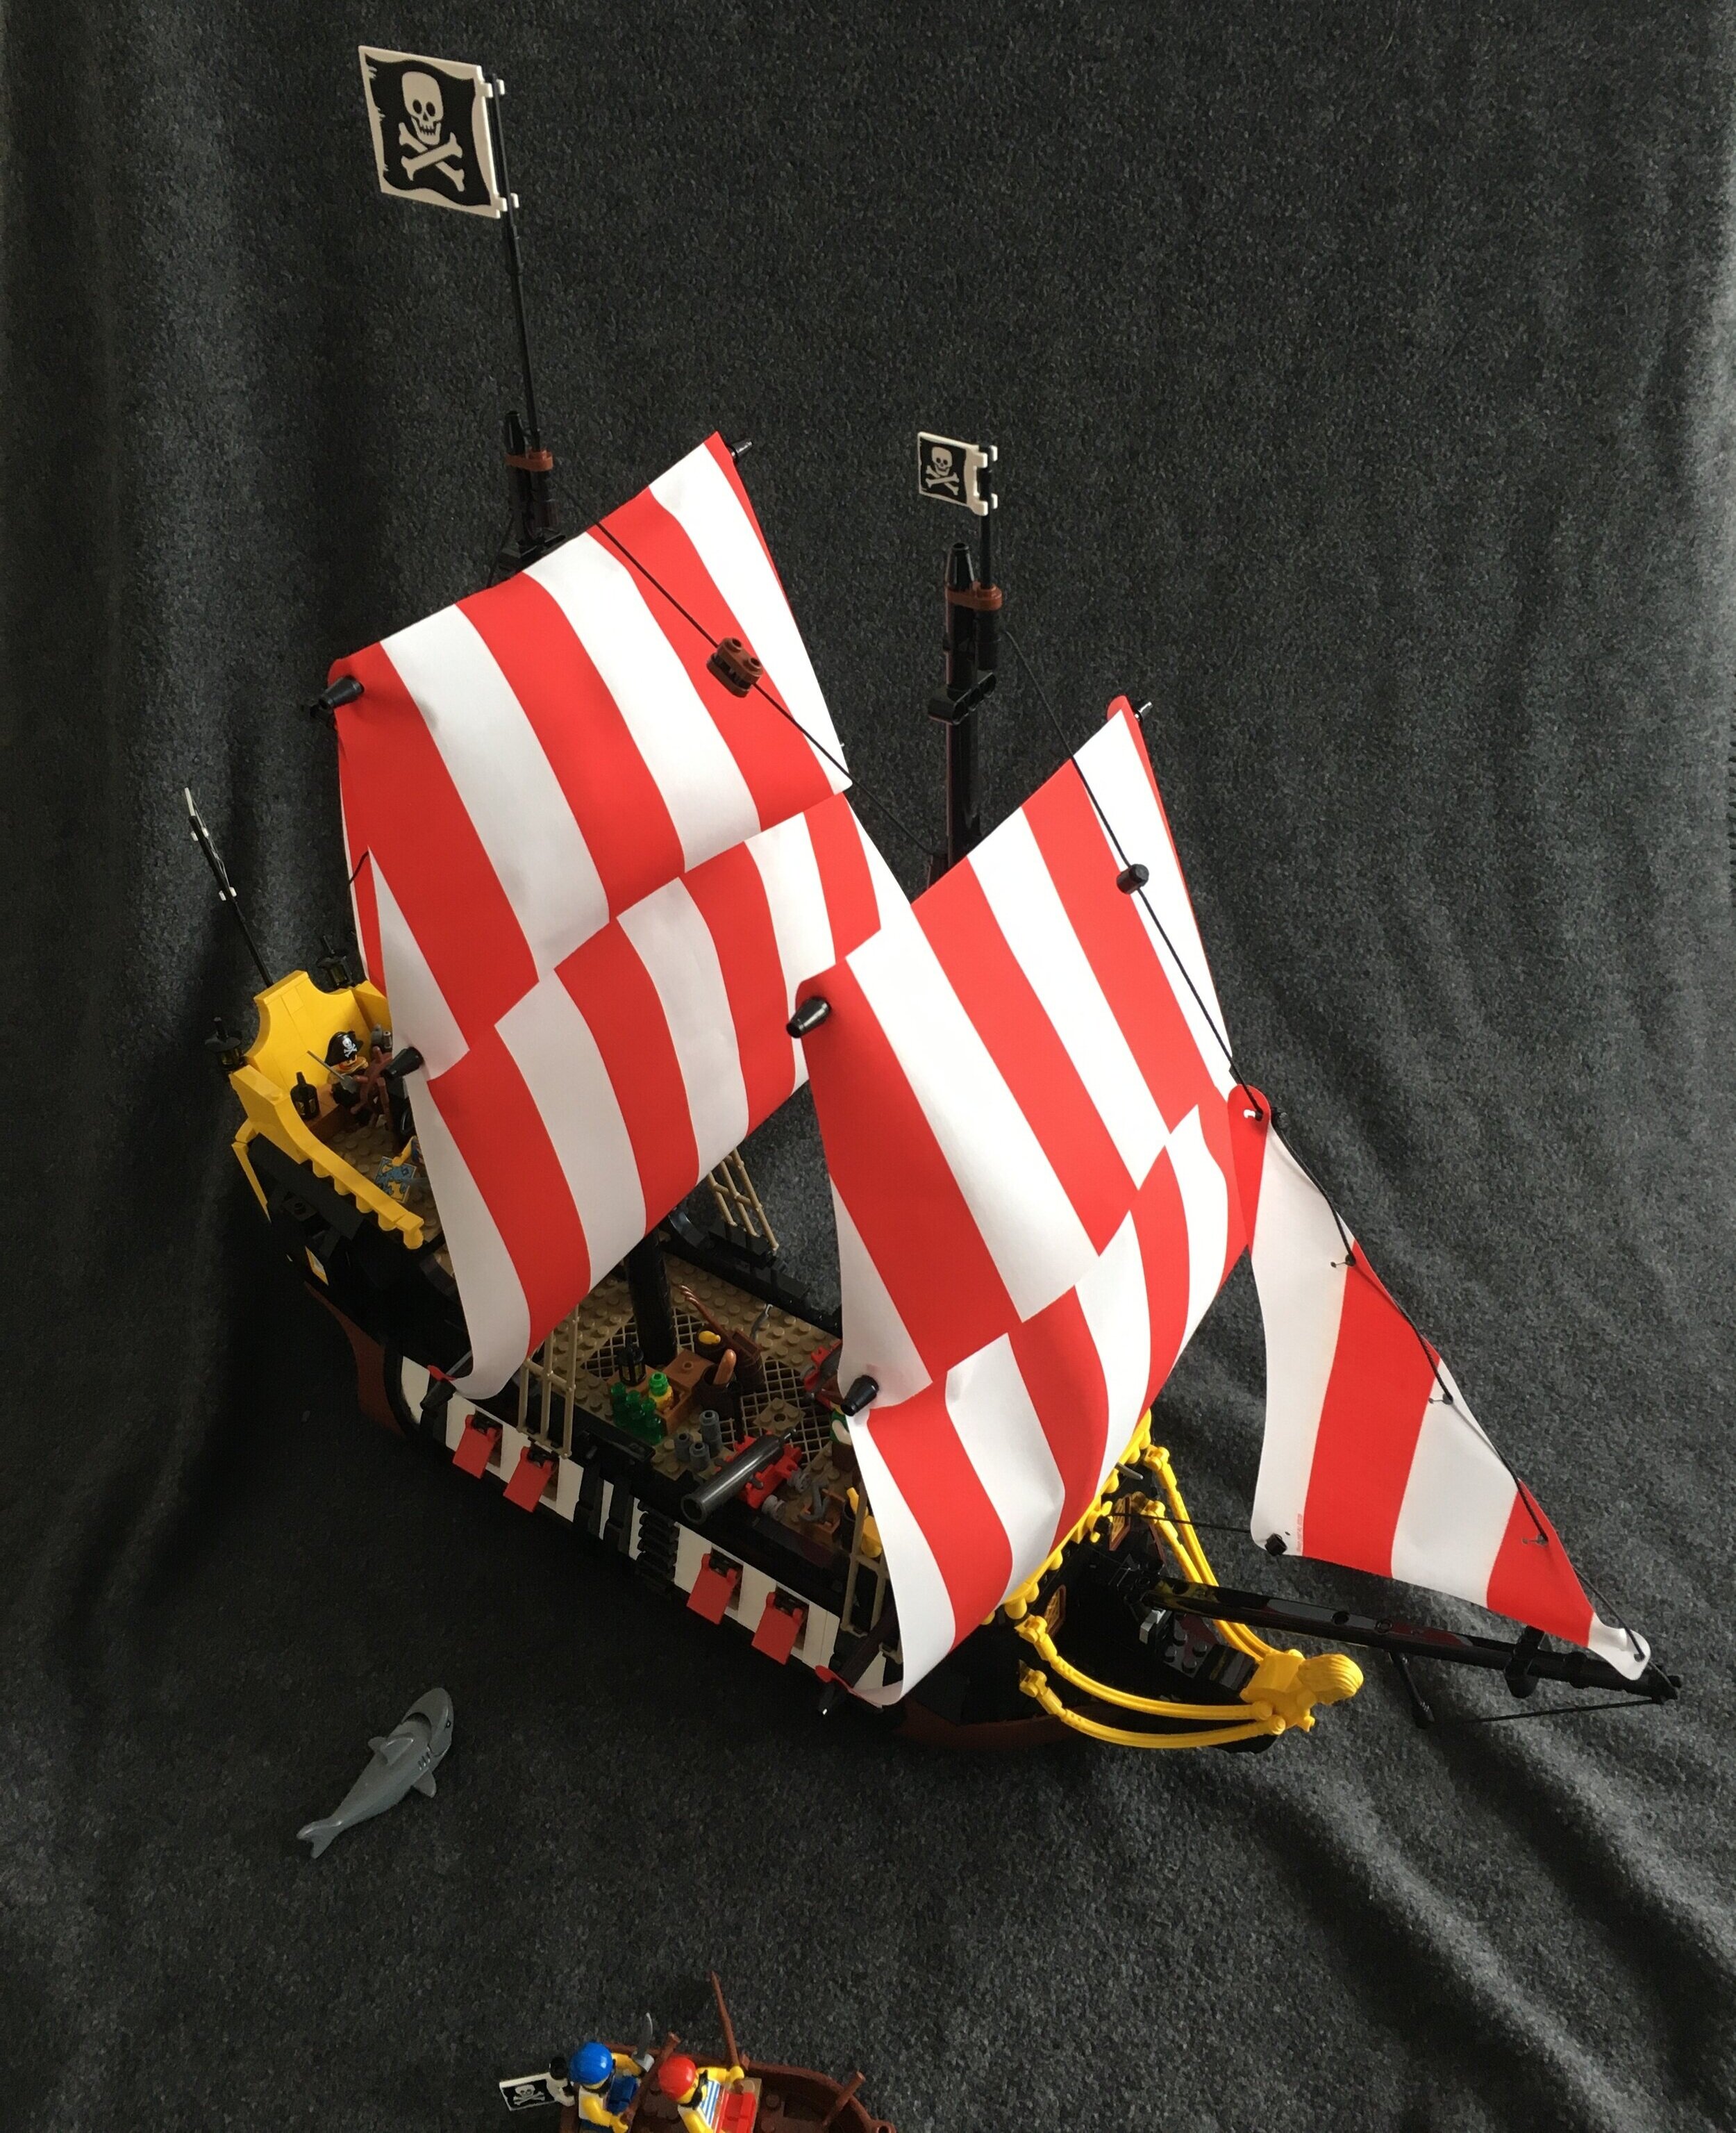
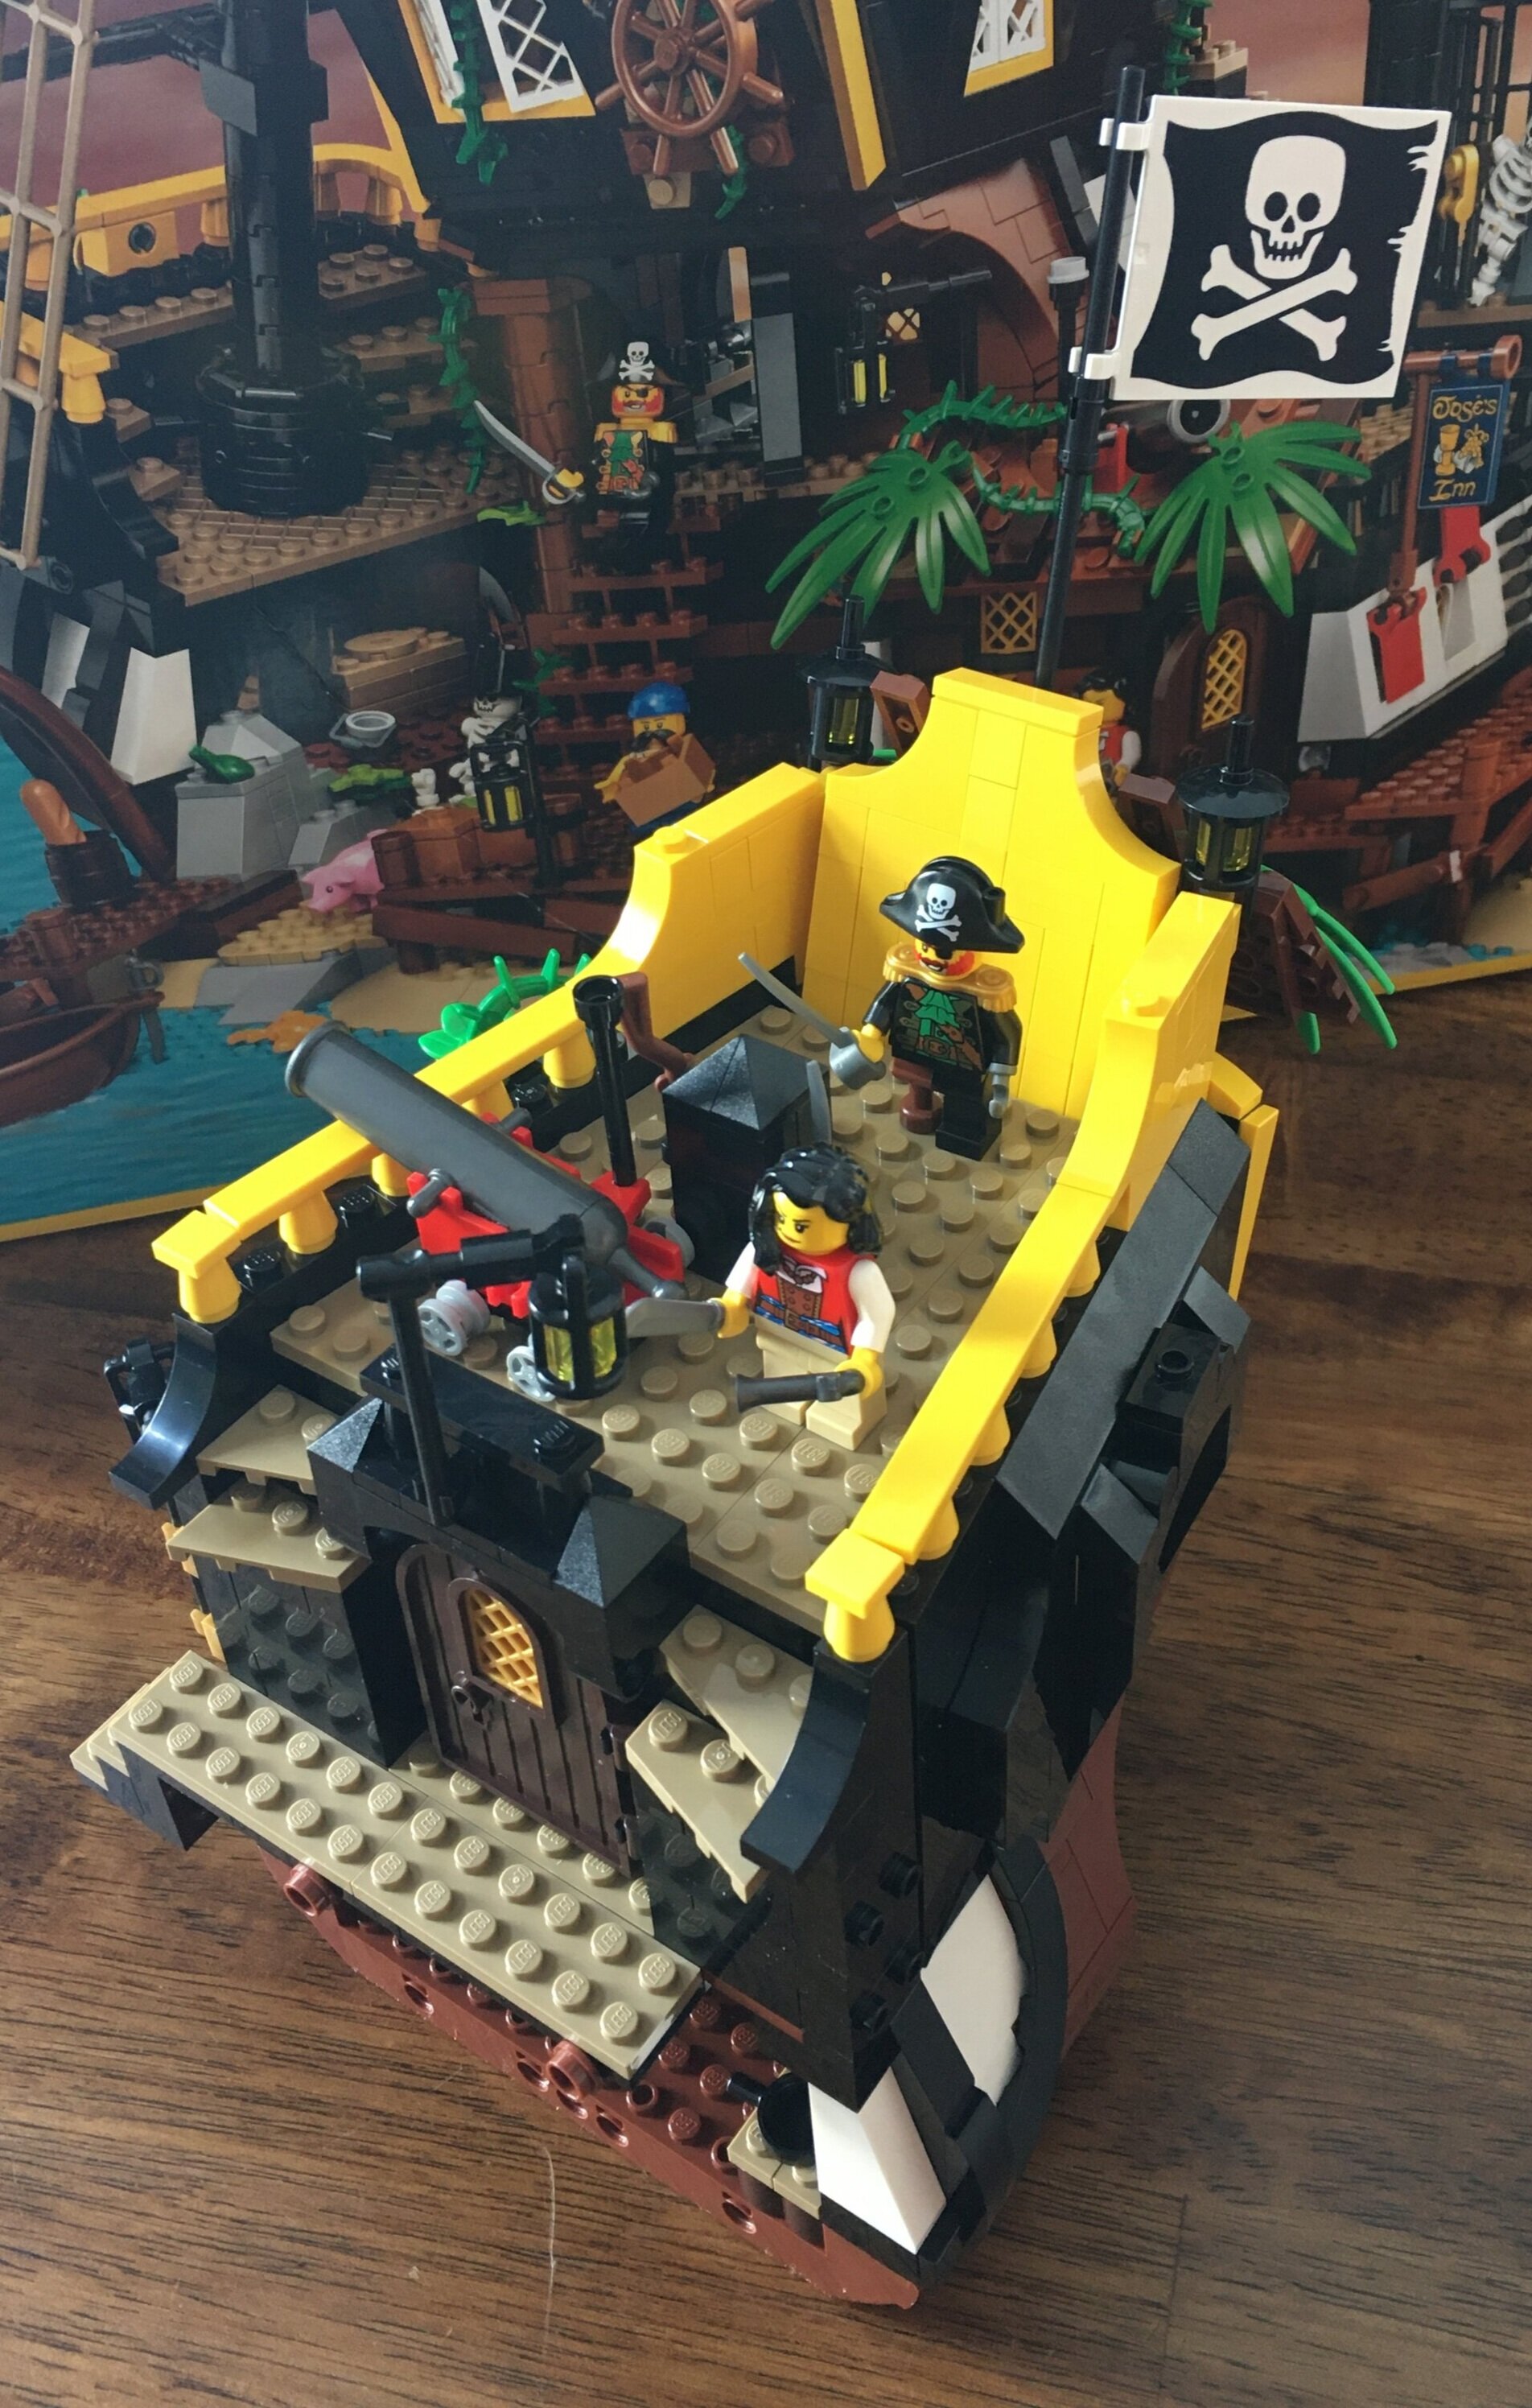
I put the minifigures on the ship and added the cannons for fun even though they’d probably be below decks. For the pictures I included the row boat and the shark.

Looking down from the top, it’s a pretty large ship.

21322_15a.jpg

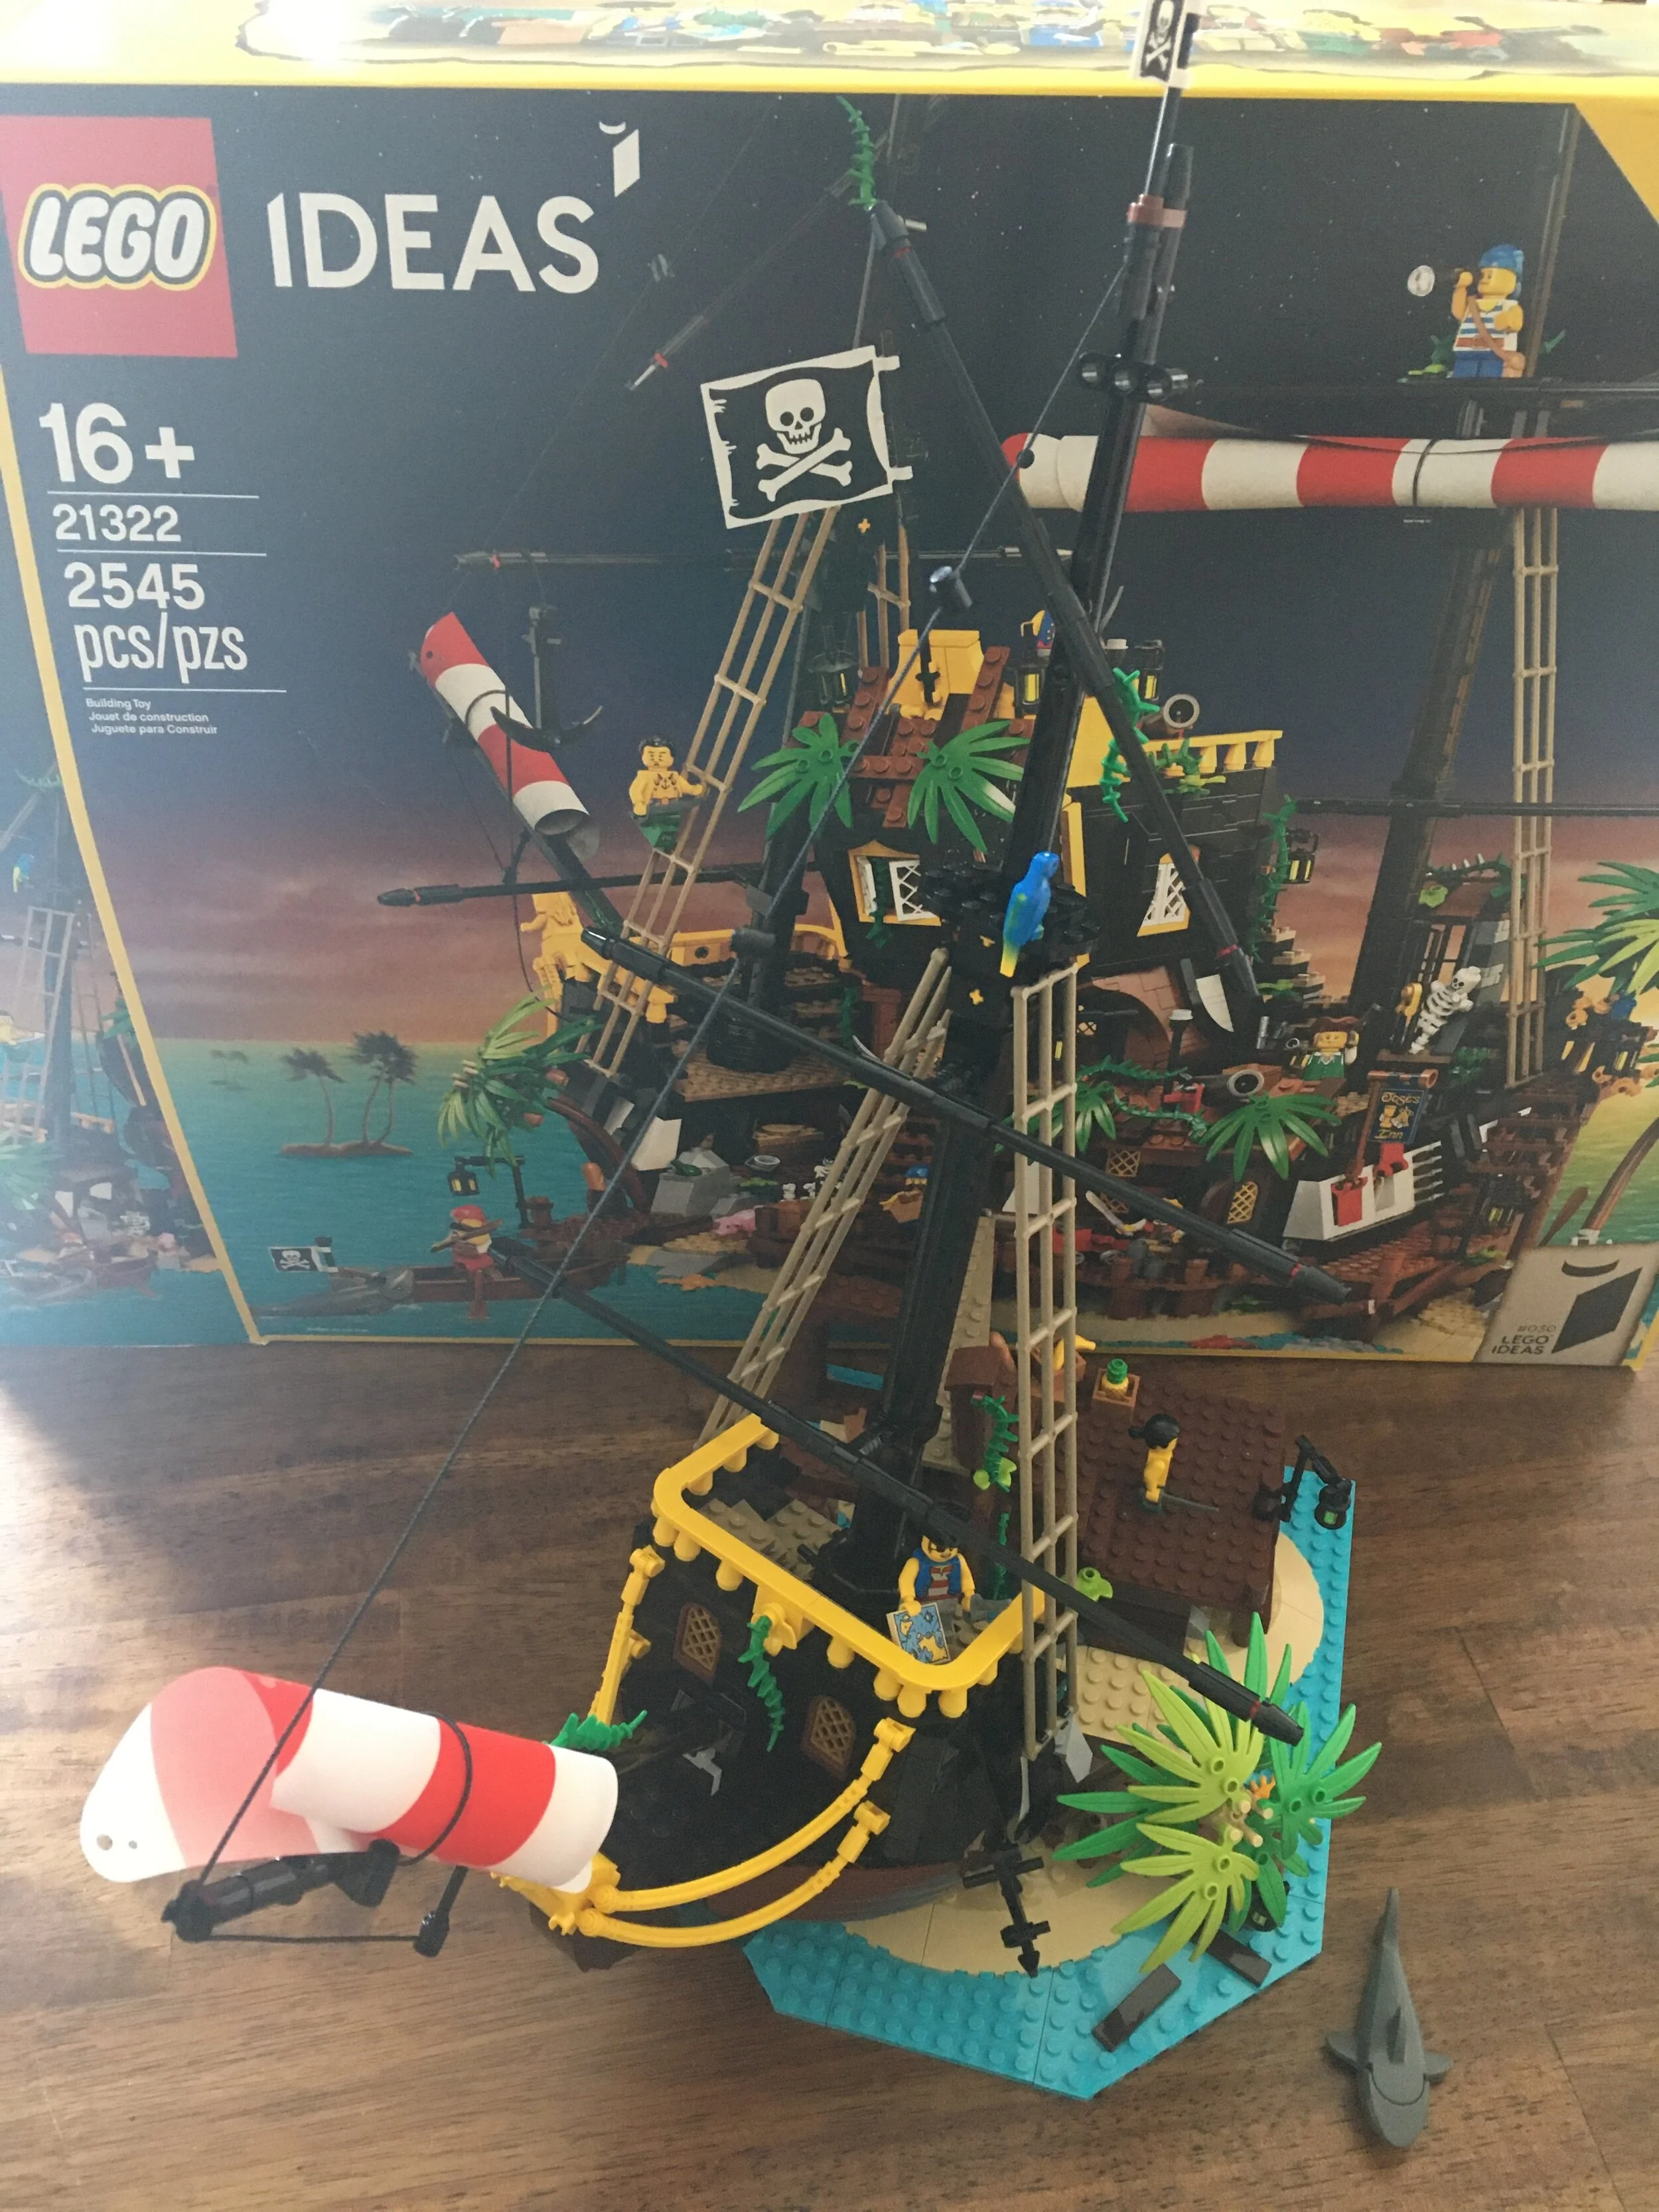
Here’s a side shot. The ship is made up of the three sections, but it is pretty sturdy to pick up and move. Between the Technic pins and ball and joint clips, you also add a few plates/tiles so help secure it. Having some of the strings are a nice touch to make it look like you have some rigging for the masts. I was glad the string has studs on either side and we didn’t have to tie knots or anything.

21322_15b.jpg

One last picture from a forward angle. The downside is the sails only have the color on one side. It looks great from the angle pictured, but from the other side it doesn’t look as good. Not a huge issue, but a bit of a nit pick.

Now I just need to decide how I want to keep the set. Should I have it as a ship or as the living quarters on the island? What are you going to do?

For now I’ll leave it as a ship for a reason you’ll see soon…

Happy building! ARRRR!!!

21322_15c.jpg

Set Review - #21322-1: Pirates of Barracuda Bay - Ideas

It’s the 30th LEGO® Ideas set and a throwback to the classic Pirates theme from the 1980s and 1990s… The Pirates of Barracuda Bay was released in the US on 1 April 2020. It contains 2,545 pieces, contains 10 minifigures and retails for $199.99. At that rate, it is $0.079/piece.

I recall playing with Pirate themed sets as a kid and this set played right into that nostalgia with similar minifigures, the skull and cross bone flags, and even the parrot. The front of the box is even designed to look similar to the original Pirates sets. The fan designer for this set is Pablo Sanchez of Spain and he had that same idea for this set where it would be a chance to highlight the past theme that he played with as a kid.

Before I move on with the review, you can see the LEGO® Designer video here.

Onto the review… as mentioned the front of the box has the Ideas branding, but also looks like the historical Pirates sets from back in the day. Awesome! The back shows some of the details of the set, gives dimensions, and shows that you can assemble the set into a ship.

21322_boxfront.jpg
21322_boxback.jpg

The sides of the box… the US version gives the French and Spanish names and includes a grouping of the minifigures.

21322_side.jpg
IMG_1243.jpg
21322_box.jpg

I counted 25 numbered bags labeled one through 15. There are three unnumbered bags and then two large axles not in bags. There is a 459 page instruction book. It includes info on the story behind the set, details on the fan designer, details on the LEGO® designers, details on the minifigure crew, and then the instructions.

21322_contents1.jpg
21322_contents2.jpg

The sails are included in a separate package, but mine was shoved in the bag. This didn’t seem to be a problem as you roll up some of the sails for the initial build anyways. Also, and I haven’t tried it yet, I read on another blog that you can use an iron to flatten out the sails when you want to attach them to the ship part of the build. I’d recommend placing a towel or another cloth over the top first before ironing just to be safe. I wouldn’t go super hot either. Has anyone tried this yet?

21322_sails.jpg

I’m not going to go into great detail about each bag, but I tried to put pictures of most of the steps in so you could see how it comes together.

Bag one builds part of the island and includes a small boat and Port (one of the Broadside Brothers). I like the new palm tree design which includes minifigure heads as coconuts. There are also a few brick formations which appear to be ancient native sculptures from whatever island the crew has landed on.

Bag two adds some decking and starts to assemble the first part of the ship (middle section). The ship comes with some large BURP type pieces (Google it if you don’t know BURP). While some may prefer to build out a ship, I’m okay with the larger pieces as it makes the ship structurally more sound in my opinion.

21322_build1.jpg
21322_build2.jpg

Next up is the interior of the center part of the ship. It includes a few beds, an eating area with some extra cups and bottles, and some candles for light. This bag comes with the first female member of the crew named Robin Loot. Back in the day they were full up male crews so I like the addition of female pirates.

21322_build3.jpg

Bag four finishes up the interior and mostly covers the top. It also adds some of the plants that have grown since the crew has been stuck there. The cannon port holes are now windows. It works for the island build, but it would have been cool to have enough cannons for the ship when you re-build it later.

Of note, there is a printed flag piece that says “Jose’s Inn” in reference to the fan builder’s father who introduced him to the Pirate theme back in the day.

21322_build4.jpg
21322_build4a.jpg

The fifth bag finishes up the center section of the ship. It adds the masts and rigging for the crew to climb up. I am a big fan of the large sized pirate flag. This section of the ship attaches to the island section and the set starts to come together. This bag also includes Jack “Dark Shark” Doubloons who is a small minifig (short legs) member of the crew.

No complaints so far and it has been a great set to put together. I sadly didn’t have a lot of time to sit and crank it out so this was built over a few days. I learned that this is not a set to pick up and put down multiple times. Easy to put back together though.

21322_build5.jpg
21322_build5a.jpg

The sixth bag builds the other part of the island with another palm tree, some decking, another crab, and a pig eating some 1x1 round plates. It also includes a shark which seems to match the design of the original sharks from back in the day.

21322_build6.jpg

The seventh bag finishes up the island portion. It adds some food storage with a baguette, some bananas, and a pineapple. It also includes some tools and extra oars. This bag includes a skeleton wearing the original imperial army hat who is hidden under one of the decks. The minifigure here is Tattooga according to the instructions.

On the building technique front, There is a wall built with a window and the builder angled the window so it is not square with the bricks. It is slightly angled and the spaces are filled in well with bricks. You can see the window in the second picture below.

21322_build7a.jpg
21322_build7b.jpg
21322_build7c.jpg

Bags eight and nine build the bow of the ship (front). It starts with a BURP piece and that is built up with some additional pieces to make it more ornate. The yellow railings with the black really make it stand out. An anchor is attached here and you can move it up or down which is a fun detail.

21322_build8.jpg
21322_build9.jpg
21322_build9b.jpg

The tenth bag finishes the bow with another mast, a parrot, the minifigure "Quartermaster Riggins, and a partial minifigure as the front figurehead. You get a smaller pirate flag on the top of the mast.

You also finally use up the last of the long Technic axles. This was a good thing as I was done digging through the box to try and find them.

21322_build10.jpg

Bags 11 and 12 build the stern of the ship. Bag 11 includes the pirate Starboard.

21322_build11.jpg
21322_build12.jpg

Bags 13 and 14 wrap up the stern build. This includes Captain Redbeard’s office which is rather ornate and includes a bust statue, a treasure chest, a fancy desk chair and desk, and a map. There is a fold down bed which doesn’t seem to fit with the rest of the office, but we’ll take it. There is another large pirate flag on the back of the ship which is great. Bag 14 comes with the pirate Lady Anchor. It adds a top to Capt Redbeard’s office and a door. The steering column is on top, but the wheel itself is dangled off the ship on the back. There’s also another cannon on this section of the ship.

21322_build13.jpg
21322_build14.jpg

And then you put the stern on the second island section and connect the two sections and it looks awesome! I will do a separate post for bag 15 and the ship, but up to #14, this was an incredible build. I enjoyed the techniques, piece usage, the creativity in some of the things hidden in the set, and the story behind the set. The set has a lot of pieces and the price per piece isn’t bad, but $200 is a bunch to spend on a set. I used VIP points I’d been saving up so it was easier to swallow the cost, but something to consider going forward (especially if you have your eyes on some of the other bigger sets recently released).

This set has a lot of potential for expansion, re-build, and adding to larger pirate scenes. Well done LEGO and thank you!

You can see my post on build 15 and the island hideout turned ship here. .

21322_14d.jpg

Set Review - #21319-1: Central Perk - LEGO® Ideas

LEGO® Ideas set #27… #21319-1: Central Perk… cue the intro theme… and roll it!

Okay, I don’t do videos and I don’t have rights to stream that music, but you get the idea.

Released 1 September 2019, this set contains 1,070 pieces. It retails at $59.99 in the US. That works out to $0.056/piece. This set is based on the TV sitcom “Friends” which aired from 1994 until 2004. It captures the coffee house the gang used to meet up at very often. And for whatever reason, after 27 LEGO® Ideas sets, this is the second one of a TV studio. The first was #21302-1: Big Bang Theory (LEGO® Ideas set #10 from the 2015 to 2016 time frame).

The front of the box shows the full set with the minifigures highlighted on the bottom. The back provides a few close ups of some of the details. For fun, I included pictures of the sides so you can see some of the details to include “how you doin” and smelly cat.

21319_box_front.jpg
21319_box_side.jpg
21319_box_back.jpg
21319_box_side2.jpg

The set contains six parts bags, a small sticker sheet, and the instruction booklet. Like some of the previous Ideas sets, the instructions contain some information about the TV show, details about the fan designer, and details about the LEGO set designer and graphic designer.

21319_contents.jpg

Five stickers total. Not too bad. There are a bunch of printed elements so I can’t complain too much.

21319_stickers.jpg

Bag one builds the base of the TV studio. Nothing overly exciting here other than it’s great that it is not just a rectangle or square, but they included some angles.

21319_build1.jpg

The second bag builds the wall where the coffee bar is located. Lots of small little details are included with different cups and containers which helps it to match the scene. The menu board is printed versus a sticker which was a bonus.

21319_build2.jpg

Bag three builds another wall and starts to build the wall that goes around the angle with hinge bricks. The interior has some decorations to include the standard 1x2 tile with a bridge picture used in numerous other models. Brickset says it is in seven sets to include four modular buildings and then #21302-1: Big Bang Theory.

I was curious how the angled wall would be created. The designer used a mix of tiles and studs on the floor. Then the wall uses hinge bricks. The geometry was done just so in order for the hinge bricks to line up on the spots where there are studs in the base. Clever design in my opinion.

21319_build3a.jpg
21319_build3b.jpg

The fourth bag includes the coffee bar counter, some additional decorations, and a table and chairs. What stood out to me was how the patterned rug was made. Many of the modular buildings use tiles to create patterns on the floor. Here the designer built a design using plates and bricks and then you lay that on its side. It does not attach to the set in anyway, but it fits perfectly and won’t come out unless you tip the set over. They also included some SNOT pieces so you can connect the furniture or minifigures to the rug.

21319_build4.jpg

The fifth bag completes the wall in the “front” of the cafe. It has the angled wall, two doors, and the window with logo. The window with logo is printed and thankfully not a sticker. This part of the build also includes a couch for Phoebe or others to perform at with a microphone, stand, and keyboard. The keyboard is made with a 1x4 tile with printed keys. This section includes another “rug” with bricks placed on their side.

I also found it interesting how the wall hooked into the floor with clips to achieve the angle. A cool building technique I wouldn’t have thought of for sure.

21319_build5a.jpg
21319_build5b.jpg

The last bag builds the main part of the cafe you are used to seeing on the show… the couch and chairs where a lot of the discussions are held by the main cast members. This section of the build includes another “rug” built by laying bricks on their side. On top is a couch, an arm chair, two other chairs and a coffee table. The table has a reserved sign (with a sticker), a newspaper, and some studs to put cups or whatever else you want on the table.

This bag also includes three poles that would hold up the ceiling (if it wasn’t a studio) and then two brick built studio lights.

21319_build6.jpg

This set comes with seven minifigures. The top row from left to right in my picture is:

Chandler Bing (with laptop)
Phoebe Buffay (with guitar)
Gunther (with broom)

The bottom row of my picture from left to right is:

Joey Tribbiani (with pizza box, pizza slice, and a bag)
Monica Geller (with a chocolate pastry as I guess they didn’t have anything else for her to hold)
Rachel Green (with tray and mug)
Ross Geller (with… nothing)

I didn’t do a deep comparison between pictures of the actors and the minifigures, but from a top level I think the designers did a good job capturing the cast. You can easily discern which minifigure is which character and they are wearing outfits you remember from the show.

21319_minifigures.jpg

Here’s the full set with the minifigures inside. Overall it’s an interesting build with some good techniques. The piece count is high considering the price although a lot of the pieces are smaller. Otherwise, the price isn’t too bad. I would have preferred to pick this one up on sale, but it has yet to go on sale (that I have seen). The good thing is that the initial rush that led to this set being out of stock is over and it is pretty easy to find or pick up online.

From a LEGO fan standpoint, there was a great post on thebrickblogger.com about custom Central Perk sets. A number of fans took the set and then built full up buildings to go with the set. I don’t think you ever see the full outside of Central Perk so it’s cool to see what some people think it looks like. It’s something I will add to my long list of buildings to come up with someday.

If you’re a fan of “Friends,” definitely grab this set. It definitely meets the intent of the show and captures the likeness of each of the characters.

This might not be the set for people who aren’t fans of the show, but thankfully there are some great pieces for MOC builders to use elsewhere.

What are your thoughts on this one?

Happy building!

21319_final.jpg

Set Review - North Eastern Style Caboose - Brick Model Railroader

I enjoy building different LEGO themes, but when it comes down to it, I really trains make it to the top of the list. LEGO hasn’t offered much for a while and hopefully the new Crocodile Locomotive is a start towards more brick trains. Despite LEGO not diving into trains, the fan community has done their best to pick up the slack. One such group has a website called Brick Model Railroader. The site has been built by a group of LEGO train fans from around the world. You can read about them and find links to some of their work here. The team is trying to promote the hobby. They want to show other model railroad fans that the “L Gauge” is a real thing. They’ve built a standard for everyone to follow so people collaborating on a train display can build separately and then assemble it all at a show and have it fit together.

They’ve also done something great for fans like me who are not good at building MOCs. They’ve turned their detailed MOCs into sets that you can customize. You can peruse their shop here. I purchased a few of the sets and today I’ll take you through one of them.

Let me back up a bit. I purchased four sets and three decals. I received an order notification and shipping notification rather quickly. The package arrived promptly and was possibly one of the best packed items I’ve ever received. The box size was right and the sets were wrapped in bubble wrap. There was zero damage. Props to the BMR team! An order sheet specified that I would be receiving one of the decals in the mail directly from OKBrickWorks. It showed up a few days later.

Onto one of the sets. I ordered the North Eastern Style Caboose for $40. It arrived in the box pictured below. It is a plain white box with a BMR sticker affixed to the top.

bmr_caboose.jpg

Inside were the parts, an instruction book, and the decals I ordered. No bricks? Correct. You are buying the instructions, but they aren’t just any instructions. They provide the design for you to match multiple historical versions of the car based on what you want to build. Then you can use your own collection or purchase bricks to build one or multiple versions of the set. So not as easy as buying a LEGO produced set, but lots more options.

BMR_parts.jpg

The LEGO purists will freak out at this point, but the set includes some custom parts. GASP! It includes the train wheels with ball bearing axles and then some custom clips. I have not tested out the wheels yet, but BMR advertises that they run much smoother and cause less friction than standard LEGO train wheels. So we’ll see…

BMR_wheels.jpg
BMR_parts.jpg

The instructions are the key to the set. They come in an individually wrapped bag and weren’t crammed in like they usually are in LEGO sets. The first few pages contains some details about the actual caboose to include when it was first built, where it was used, and some of the stats about the caboose itself. The actual build instructions compare with ones you would see in a LEGO set where it shows you the pieces you need and a picture of where you are at with the build. I haven’t actually built the set so I can’t verify that they are good or not.

The back of the instructions comes with a bill of materials stating all of the pieces you will need for the set. For customization purposes, the bill of materials lists what pieces go on the inside, what goes on the outside, and which pieces should be specific color (mostly black). This way you can build based on actual cabooses or come up with your own color scheme. If it wasn’t helpful enough, the instructions also list the part numbers on BrickLink for your ordering purposes.

Last bit of usefulness to report… included in the instructions are details about replacement pieces to use if specific pieces aren’t available in another color. I found that useful on another set I purchased as the color I picked didn’t have a few of the pieces available in that color.

BMR_instructions.jpg
BMR_instructions2.jpg

The last bit of detail I ordered were some decals. These are printed by OKBrickWorks and cost $7.50. I purchased a Conrail version as I remember Conrail trains going through my town as a kid. I didn’t buy decals for all of the cars I purchased, but I figured I’d try them out on a few. As a kid, I built plastic model aircraft. I was never good at the decals that went on them so we’ll see how this goes.

decals1.jpg
decals2.jpg

Overall, I’m impressed with the set and look forward to building it. I’m holding off on the build process as most of my collection is in storage. I want to raid my own parts before I go out and buy more. I’m excited to see what the final end product looks like and can’t wait to someday run it on a train display somewhere. The set is a bit pricey considering you aren’t getting all of the parts, but you are paying for the time and effort to put a custom build into instruction form with a bill of materials for you to repeat as you desire. The ordering and shipping process was smooth and Cale took the time to make sure the sets showed up in pristine condition. Props to the BMR team for a great set!

Have you purchased a BMR set before? What are your thoughts?

Happy building!

Set Review - #10277-1: Crocodile Locomotive - 18+

The Crocodile Locomotive was released in the US on 3 July 2020. If you follow what I write, it took quite a while for it to finally get shipped here, but thanks LEGO for the extra 1,000 VIP points. This set contains 1,271 pieces and retails for $99.99. That works out to $0.079/piece which isn’t too bad in my opinion.

You can watch the official LEGO Designer video on YouTube here.

If you want a review from someone who is a big train fan and into LEGO trains, you can see the Brick Model Railroader’s review at their site here.

Finally, one last plug. There have been a lot of comments about this set in terms of its design. JANGBRICKS has a video where he explains some of the fixes he’s made. You can give your own opinion, but feel free to use his fixes or modify your set as you desire.

Onto the review!

Here is the box. It is the new 18+ designed box. It no longer shows the play features or minifigures. Instead it highlights the design with some shots showing the detail. The title of the set is listed on the front with a design around it. Finally the bottom of the box has a dark gray stripe of greebling which lists the 18+, set number, and number of pieces

10277_box_front.jpg
10277_box_back.jpg

The box contains nine numbered parts bags (2 one, 2 two, 2 three, 3 four), an bag without a number containing the large plates and train wheels, and then the instructions and sticker. The set has mostly printed elements, but the data plate has a large sticker for you to place.

10277_contents.jpg

The first set of bags builds the base. The base reminds me of the bases on Architecture themed sets with the one stud wide black tile around the edge. Instead of using the standard LEGO track, you build the track yourself which takes a bit of time repeating the steps and placing a lot of 1x1 plates. It is interesting that they chose to put tiles in the center, but plates on the outside of the rails. I wonder why that was?

There are two 1x4 bricks in the center for you to attach the locomotive to for display purposes. Also, you can see the sticker on the ramp piece which describes the set.

10277_build1.jpg

Here’s an up-close look at the sticker. I think I was mostly able to center it and I didn’t get any large air bubbles. There might be one small one, but it is not noticeable at a quick glance.

This set comes with two minifigures. A male with the old style had and a female with black hair (no hat with hair?). They both have the same torsos and legs. As shown, they have some tools available to hold which can also be stored inside the train. Nothing super exciting about these minifigures, but no complaints from me on them either. They go well with the set.

10277_build1a.jpg
10277_minifigs.jpg

The second set of bags completes the center section of the locomotive. The build starts with the Technic elements needed to motorize the locomotive (if desired). You then build the cabin area and the control areas for the minifigures.

While the set is an 18+ set, the build was not overly challenging. This part went together pretty smoothly for me. I was thankful to not have stickers to place. From this picture you can see the fans in the compartment and then two printed tiles on the side of the section which repeat on the other side.

10277_build2.jpg

Two more pictures… first is a closer shot of where the minfigures sit. Each figure has a wheel, two dials, and a brake handle. There is also a clip directly behind them to store the toolbox and wrench. Not a lot of comfort here and don’t lean back or let the train stop fast to have a tool hit you.

The second is the crew seating area. This section pulls out easily so you can place the motor and Powered Up Hub inside the compartment. I like how easy this is as compared to the Emerald Night (#10194-1) which required some decent overhaul to motorize it.

10277_build2a.jpg
10277_build2b.jpg

Here’s a peak inside the compartment without the crew positions in place. You can see the Technic elements where the motor will go. Everything went together pretty easily and seems to run smoothly without the motor connected so we’ll see what happens with the motor.

10277_build2c.jpg

The third set of bags completes the front and back of the compartment as well as the top. Most noticeable are the pantographs on the top. I placed one in the up position and one lowered. The pantographs took a bit of time to piece together and were a bit challenging to do given all of the small connections you have to make. They are pretty fragile as well so not something you’d want younger kiddos playing with. The top also had a bit of color with the red whip pieces as wiring and then a few spots of dark green to liven up the gray and brown color scheme.

The front and back have a one piece window frame that you insert a one piece clear window into. It makes the model look smoother and I can see why they did it, but it would have been interesting to see how you could have brick built the window screens.

10277_build3a.jpg

Here’s a side view of the center section.

10277_build3b.jpg

The last set of bags finish the set. They also build the front and back sections of the locomotive. These builds are identical and I built both sections at the same time. It was a bit repetitive, but for the most part this was the most advanced part of the build that provided a bit of challenge. Nothing crazy, but it seemed like more pieces and the use of different techniques.

I saw a few reviews where there were complaints about the black background of the instructions and the dark colored pieces. I concur that this was a bit of a challenge, but I managed to figure out the build okay.

10277_build4.jpg

Two more photos… one a side view of the whole locomotive and one is a front view so you can see the detail there.

Overall, I am pumped to have another train to add to the collection. It’s not my first choice for a set, but I can’t complain about having one. The build is not super challenging, but it was technical enough to keep me interested. The color is a bit bland, but that’s the least of my complaints. The price per piece is decent and the initial sell out seems to be over on Shop @ Home.

I can see why people have complained about the gap between the cab area and the front/back sections. It could have been easily fixed in the design process, but I agree that if it is that big of a deal to you, fix it yourself. For now, I’m okay with the locomotive as is, but I may look to change it in the future.

I have a motor and hub finally, but I haven’t installed it yet. Stay tuned for that post and I’ll give an assessment on how the locomotive actually runs. (here is my post on motorizing the train)

In the meantime, happy building!

10277_final.jpg
10277_final1.jpg

Set Review - #71027: Series 20 Collectible Minifigures

I just posted my review of #71026: DC Super Heroes and now once again I am late to the game. Series 20 was released back on 19 April 2020. The packs retail for $4.99 each. As I mentioned previously, I don’t want to pay that much so I have been waiting for discounts. I bought a few from LEGO.de here in Germany. The price here is 3,99€ so the few that I purchased there worked out to be around $4.30 to $4.50 after the exchange rate kicked in. Not the best price, but I’ll take the slight discount. I then found some locally for $3.45 and then Amazon.com had them for $3.44.

The bottom line is if you enjoy collecting the collectible minifigure series sets that LEGO produces, be patient with your purchases and you can get them at lower prices.

I’m not going to spend time talking about each minifigure. Instead I will give some overall comments.
-I’m a fan of the non-licensed collectible minifigures and I like the creativity that goes into them and the ability to use them in MOCs or with other sets.
-The costumed minifigures have been great through the years and LEGO didn’t disappoint with Series 20.
-I’m still frustrated with the dispersal of minifigures and how it always seems like you get extras of the ones you’d want least. I don’t need that many Super Warriors!
-Good to see that half of the series is female characters. As a kid, I remember arguing over who got to play with the few female minifigures that we had because they just weren’t made a lot. Now we have a bunch which is awesome!

That’s it on this one. I look forward to a late review again on the next collectible minifigure series.

Happy building!


Piñata Boy and Drone Boy

Piñata Boy and Drone Boy

Viking and Tournament Knight

Viking and Tournament Knight


Martial Arts Boy and 80s Musician

Martial Arts Boy and 80s Musician

Breakdancer and Athlete

Breakdancer and Athlete


Pajama Girl and Brick Costume Guy

Pajama Girl and Brick Costume Guy

Super Warrior and Pirate Girl

Super Warrior and Pirate Girl


Sea Rescuer and Space Fan

Sea Rescuer and Space Fan

Llama Costume Girl and Pea Pod Costume Girl

Llama Costume Girl and Pea Pod Costume Girl

Set Review - #71026: DC Super Heroes - Collectible Minifigures

This series was released on 1 January 2020 yet I’m releasing a review in late July 2020? Why the lag?

The retail price was too steep for me at $4.99 per bag. No thank you!

As the series nears retirement (I assume), the sales have started. I picked some up from Amazon.com with a limit of three for $2.99 and a limit of 27 for $3.44. I also found some locally for $3.45. If you’ve held off, not is the time to start looking for sales. Avoid paying the full price. If you paid full price, wait for the price to drop for future Collectible Minifigure series so you can avoid shelling out $5 each.

The series contains 16 minifigures. The packaging is still the larger bags versus the original smaller bags. Additionally, some of the minifigures have parts that come in a separate plastic bag. For a company striving for sustainability, this doesn’t make sense to me…

Before I go further, I will fully admit that I am not a Super Heroes fan whether they be DC or Marvel. I am not into comic books, I rarely collect the LEGO sets, and I have only seen a few of the super hero related movies that have been released… well ever. So my review will focus on the minifigures themselves versus how well they depict specific characters or who the character exactly is in what theme.

Of note for this series, each minifigure comes with a 1x2 black jumper plate and the poseable clear piece to put your minifigure in different positions while on display.


71026_1.jpg

Metamorpho is definitely a multicolored figure with orange right hand, reddish/purple left hand, clear left leg, and brownish right leg. I’m sure someone creative can figure out how to reuse these parts. The giant hand has a space to clip it onto the minifig hand so it is a standard minifig arm just holding that piece. Not much else going for this minifig.

Green Lantern comes with the lantern and a clear holder to hold a green 1x1 circle tile. The lantern is quite large as compared to the minifigure, but I guess it has to be in order to fit into the LEGO world.


71026_2.jpg

Bat-Mite comes with a 2x3 tile of a comic book. he has a small cape and mask too. The interesting thing about this figure is it comes with the poseable piece, but since he has the small legs, they don’t bend so it limits his poses.

Huntress is next. She comes with a crossbow and black cape. The mask is printed on her face and the face has 2 expressions (mouth opened and mouth closed). She also has a utility belt and the package came with 2 so you can use the second one elsewhere. I like the darker purple color.


71026_3.jpg

Mister Miracle has two capes along with a large gray chain and the set comes with 2 handcuffs. Of the purchases I made, this one seemed the be the rarest one from my limited subset. I only got one of these in multiple orders.

Star Girl comes with an interesting translucent orange sparkly piece mounted on a gold colored staff. She has 2 facial expressions as well (mouth opened or closed. Her utility belt is printed on the outfit versus separate. Not sure how LEGO decides what to print versus how to outfit a minifig. Anyone?


71026_4.jpg

We’ve seen a lot of both of these so did we have to include them again? Joker has a giant pink beehive (I know, it is not really) and then a 1x2 joker playing card tile. Batman comes with a long rope and a batarang in blue. I would have rather seen some other figures than these again, but as a non-fan of DC Super Heroes it doesn’t matter what I think.


71026_5.jpg

Bumblebee comes with a set of wings and two yellow lightning bolt type things to hold. She has 2 facial expressions (mean and smiling). I don’t recall seeing a hair piece like that before either. I like this minifigure!

Flash has a fun hat and then this bolts coming out the back as he runs along. Nothing super exciting about this character as presented.


71026_6.jpg

More repeats we’ve seen before although I’m sure a big fan will correct me and say we have not seen this exact Superman or Wonder Woman in these specific forms. Superman comes with a copy of the Daily Planet which I think is new. Wonder Woman has her lasso which has appeared before.


71026_7.jpg

Cyborg has an interesting helmet and oddly printed head. I wonder if this costs more to build pieces that aren’t used elsewhere? He comes with a small purple chain.

To quote “The Big Bang Theory…”

“Aquaman sucks!”

I don’t know what he should look like, but the giant oddly green fish along with the Fabio hair and slightly unshaven face makes him look somewhat ridiculous. The left arm doesn’t do anything to save him. Sorry LEGO.


71026_8.jpg

Sinestro appears similar to Green Lantern with the over-sized lantern and a yellow 1x1 circle tile. Nothing too exciting here.

Cheetah comes with a green money bag. She has 2 facial expressions… both look mean, but one has an opened mouth. Replace the face and this becomes a fun costumed minifigure.

As a collector of these minifigures, my series is complete, but overall I am not impressed. Come up with something better next time LEGO!

Set Review - #60233-1: Donut Shop Opening - CITY

This review was a few weeks in the making as I had my helpers build this set with me. They don’t have the interest in cranking out a larger set and they want to play with everything as it is built (which is fine). So here is #60233-1: Donut Shop Opening. It was released on 2 August 2019 in the US. It contains 790 pieces and retails for $89.99. This works out to $0.114 per piece. A little steep… especially for a CITY set. I picked it up at Smyth’s here in Germany for around $55. So if you can be patient and wait for a better price, it’s worth it to wait to score a better price.

The box is pretty big for a CITY set. The front gives a picture of the assembled set, the set number, and the age range. The set was purchased in Germany and it does not have the standard US LEGO set markings like we are used to in the States. It just lists the age range and set number, but not piece count or set name.. It also highlights the police minifigure known as “Duke Detain.” I had never heard the name before, but the set is not meant for old people like me. The back shows some play features of the set.

60233_box_front.jpg
60233_box_back.jpg

The set contains eight numbered parts bags, a parts bag with some larger parts that is not numbered, and the instructions and stickers come sealed in plastic.

60233_contents.jpg

There are six instruction booklets and numerous stickers on a sheet. As mentioned, they come wrapped up so they were in good shape when I took them out of the box.

60233_instructions.jpg
60233_stickers.jpg

The first bag builds a police motorcycle with handcuffs and a paddle to direct traffic. Unlike the motorcycles I grew up with, this one requires some assembly versus being a one piece item. It also contains a few stickers.

I will say that I was horrible as a kid at applying stickers to sets and I’m still not that great at it. My 6 year old really wanted to put the stickers on so I agreed. I still have some of the sets from when I was a kid that have lopsided stickers on them. Well my kiddo showed me how it is done and they actually are pretty straight, mostly centered, and are probably placed better than I could ever do it. So after this part of the build, I sat back and watched.

Also in this bag is a taxi. The build of the car is very simple and there’s a 2x8 space for two minifigures in the car (driver and passenger). No ability to put bags or anything else in though.

My 6 year old asked why LEGO always has you assemble the minifigures first. I don’t know. Does anyone? Three minifigures in this bag. They include the taxi driver, “Duke Detain,” and your standard LEGO criminal minifigure. Duke has sun glasses and then eyes on the other side of his head. He also comes with a helmet for riding his motorcycle. The criminal comes with a standard issue crowbar.

60233_build1.jpg

The second bag builds a news van with two crew members. The van has some nice play features with a spot to place a minifigure by four different slope brick screens and you can raise the satellite dish on the back of the van. The roof raises up so you can easily access the bag. The two minifigures are a female news reporter with a microphone and a male camera operator. The camera is quite large and barely fits into the van with both minifigures inside. There is a storage box on the side of the van where you can store the microphone.

60233_build2a.jpg
60233_build2b.jpg

Bag three builds a small toy shop. It has minimal detail and is not fully walled, but it is a CITY set and is meant for play versus display. The opportunity is there to turn it into a much larger and fuller shop. This build is full of stickers and most of the front is just the clear plastic windows and doors, but it has some fun details. There is a small brick built train, a minifigure hat with a propeller, a bear, a net, and a guitar as options in the toy store. Two minifigures in this build. One is a female store worker and the other is a boy with a skate board.

The build includes a sticker sign to advertise a sale, a green bin to place the net in, and two brick balloons on top of the building. It’s all very simple, but could easily be incorporated into a larger scene and expanded upon.

60233_build3a.jpg
60233_build3b.jpg

Bags four and five build the CITY Coffee shop and the associated bike coffee cart. Bag four builds the two minifigures, the cart, and starts the Coffee shop. Bag five completes the shop. The shop is small, but has a decent number of details to include the use of textured 1x2 bricks, a dark blue Technic wheel cover piece (I’m sure there is a technical term), and some sticker signage.

Outside the shop is a small ATM which comes with some 1x2 cash tiles. On top is a small Technic build where you can tip over the donut once you install it into place. We have not tried it out yet as my 2 year old has absconded all of the vehicles to drive around and particularly enjoys the crane and donut it can raise up.

60233_build4a.jpg
60233_build4b.jpg

Something not often seen are errors in the instructions. We actually found two in this section. My 6 year old caught one and I caught the other.

My kiddo built the assembly as it shows, but didn’t check the number of pieces on the top. When she went to install it on the shop, it was one brick short as shown. The next page shows the correct height of bricks and uses for of the textured 1x2s as listed. You just have to figure that out because the instructions don’t do it for you. Not a major problem… more of an annoyance.

60233_error1.jpg

My kiddo caught this one that happened earlier in the build. It says there is only one gray slope brick, but the picture on the bottom shows two. The set comes with two and we went with two as well. Maybe someone at LEGO had trouble counting?

60233_error2.jpg

Bags six, seven, and eight build the truck, crane, and donut. Bag six builds the truck part with the cab and minifigure. There isn’t anything too special about this other than the front includes the fairly new triangle tiles which allow for a fun design that is not all at 90 degree angles. The minifigure comes with a coffee mug which I guess you need to drive a big truck.

Bags seven and eight build the trailer, crane, and donut. The trailer includes some supports that rotate out and fold down to stabilize the truck when you move the crane around. There are also some tools to attach the donut with and then the build to hold the donut. The crane part is fairly simple to assemble, but my six year old had me do it. You use a few Technic pieces and attach some bricks and then you can spin a piece to have it rotate up or down. The arm of the crane moves in and out, but there is nothing to stop it from coming all the way out. This isn’t a big problem as it can easily be placed back in. The crane comes with a brick chain versus having string and a hook. This works pretty well for the donut.

The crane has become my 2 year old’s new favorite thing to play with and he enjoys that he can lift, lower, and swing around something with the crane like he sees at construction sites nearby where we live.

The donut is a simple build for an adult, but my 6 year old had a bit of trouble lining it all up and following the SNOT build. Nothing she couldn’t tackle with a bit of help. Glad to see the pink side of the donut has printed sprinkles versus stickers. I’m also a fan of the use of SNOT to get both sides of the donut. It definitely makes it seem more realistic.

60233_build5.jpg

Overall, this set has a lot you can do with it and includes some great play features. While it could easily be integrated into a CITY scene, it doesn’t need to be as there is a lot you can do just within this set. The build isn’t anything special, but that is expected for a 6+ CITY set. The price is too much in my opinion. I recommend waiting for a sale on this set versus getting it at full retail. I found a good one in Germany and hopefully the same can be done in the US as well. This set will be a year old soon and I’m sure retailers will want it off their shelves.

My 6 year old had trouble with some of the build, but she was able to do most of it by herself. It was a good opportunity to build together. My 2 year old took anything we finished with wheels once we were done and tested it out to make sure it would fit with all of his other vehicles.

I’m not a MOC builder, but I enjoy trying to take simple CITY sets and making them better. I think this one has a lot of potential to improve on the buildings. Now I just need to get my brick collection back…

What are your thoughts on this set?

Happy building!

60233_final.jpg

(Struggling at) Building a Non-LEGO® Construction Set

The purists out there have decided to never check out this site again after that title. To be honest, this is not something I normally do, but my kiddo was given a set as a gift and asked me to help her build it. So we were off and building.

The set is made by the company First Gear®. I had never heard of them, but they are based in Iowa. Looks like they design them there and have them produced in China. The set specifically is a Wegman’s delivery truck. For those of you not familiar, Wegman’s is a supermarket chain in the northeastern-ish US. So let’s do a quick review (if you dare).

And a quick note, I am reviewing this on my own and am not receiving any compensation from any companies.

Here’s the box. The front does not even list the name of the company which made it. It does highlight Wegman’s and shows a picture of the set. The back gives a story of the Wegman’s company and shows more of the set. I didn’t take a picture of the contents like I normally do. The pieces were all just inside the box loose without any bags. There was an instruction booklet too (which I also didn’t get a picture of).

box_front.jpg
box_back.jpg

Building was not easy. Compared to the studs of LEGO® bricks, the tolerances were just not there. You really had to force some pieces together and I had to get a LEGO® brick separator to pry some pieces apart.

Additionally, the instructions made it challenging to decipher colors. Black, dark grey, and brown all looked similar. My kiddo started the model on her own and a few pages in, we realized she had used the wrong colors and had to take the set apart and start over. In the end I made at least one error with a 1x1 black plate and a 1x1 grey plate. Whoops!

The picture below shows the pieces and what they look like. You’ll see that some of the studs are not uniform and this was true throughout the set.

studs.jpg

Another issue…look at the pieces in the picture below. Believe it or not, they are different. The instructions do not specify the difference very well and I only figured it out when we were installing the side mirrors and the two pieces I had left were not the same size. So 1x2 cheese slope like pieces with different slopes… Should our favorite brick company try this or would it mess up the geometry too much?

pieces.jpg

Here’s the minifigure. Hands look somewhat similar, but that’s about it. The top of the head is actually hollow so glad there’s a hat.

minifig.jpg

The set itself doesn’t look too bad. It has some good play features and looks pretty realistic. There were a lot of stickers to include stickers that stretch across the entire trailer sides. The wheels don’t turn well and are full up ABS versus a rubberized type material. In the end my kiddos enjoy playing with it and it was a gift so we didn’t spend any of our money on a non-LEGO® set so I probably should limit my complaints.

Have you built non-LEGO® sets before? Any thoughts or opinions to share?

Happy building (with LEGO)!

truck_front.jpg
trailer.jpg

Set Review - #10270-1: Bookshop - Creator Expert

I finally completed my COVID-19 quarantine build and it took a lot longer than I planned. I think I’ve had the set for over a month now. It’s all good. I completed the 2,504 piece set released in the US on 2 January 2020 for $179.99 ($0.072/piece) and here’s my review.

It’s been out for a while, but here’s the designer video linked on YouTube in case you missed it.

The front of the box shows the set completed with some of the features inside like the ladder, the airplane toy, and the various minifigures. The back shows some of the details of the insides of the set and then what it looks like next to some of the other modulars. In my opinion, the 3 sets they show do not go together at all. #10264-1: Corner Garage and #10260-1: Downtown Diner seem to be different architectural genres and don’t look right next to the Bookshop. Not a big deal when you factor the set in by itself though. Moving on…

10270_box_front.jpg
10270_box_back.jpg

The set comes with 18 numbered parts bags numbered one through eight. There is one bag with some larger plates that is not numbered. There are two green base plates which are both 16x32 studs. The two instruction books are sealed in a plastic bag. No sticker sheet!!!!!! WOOHOO!!!!!!!!

10270_contents.jpg

The bookshop is the first part of the build. The first set of bags starts with the ground floor to include the sidewalk outside and the flooring of the shop itself. I like the colors of the tiles and if anything they are good for use in other builds if you don’t like the set. This bag includes a boy minifigure in a scarf and hat with a toy airplane. As with most Creator Expert builds, you get a piece separator.

10270_build1.jpg

The second set of bags finishes the first floor and the book shop itself. It comes with a male minifigure holding a book titled “Moby Brick” and a flower. The bookshop has a used bookshop feel versus a more modern mega store type shop. I like the style used and the various methods of making it look like there are different books on the shelves. The only trouble I had was trying to tell apart the sand yellow 1x1 plates and the warm gold ones (had to look up the color names in Brickset). Or maybe those aren’t the colors I confused? Either way, later on in the build I had to re-build a bookshelf as I realized I used the wrong colors. Not a big deal, I just didn’t catch the mistake earlier.

10270_build2.jpg
10270_build2b.jpg
10270_build2minifig.jpg

The third set of bags builds the living room area of the upstairs apartment. There is a chair, a grandfather clock, a lamp, and a patio outside in the back where minifigures can enjoy beverages together. Nothing super interesting about this floor. I like the clock and chair builds, but there isn’t much else to the floor. Not a bad thing… just that’s it.

10270_build3a.jpg
10270_build3b.jpg

The fourth set of bags finishes the book shop with the top floor. The facade on the front is awesome. I like the use of colors with the brick red and light gray. Using tiles to complete the facade detailing really helps it stand out.

I think this is a change from other builds, but don’t quote me… this build does not remove the entire roof to get to the room below. Instead it removes just the back portion so you can get to the room. It’s a fun technique to use and it helps with the details versus a flat roof you can pull off. The room itself is simple with a bed and a chameleon in a tank area. Not a lot of space to add other furniture, a bathroom, or anything else. I get it. We’ll take it.

Next is the birch tree. This is the first time we’ve seen this technique used and I like the addition of the fall colored leaves. The bird in the nest is a new detail I have not seen before either. Along with the fencing at the bottom, I like this method. I’m not sure it is super realistic, but it fits into the LEGO world well.

Finally, this bag includes a female minifigure with a large amount of hair on top. I can’t imagine having to tame that amount of hair on top.

10270_build4.jpg
10270_build4c.jpg
10270_build4_tree.jpg
10270_build4_minifig.jpg

The fifth set of bags starts on the apartment next door. There is a crawl space under the apartment with some storage and a mouse trap. Out back is a miniature garden with a pumpkin and some other greenery. I like how the designer used the shield tile to make the stairs curve. This is the first time I think we’ve seen this done. The front also includes a lamp post and some flowers.

This set includes a male minifigure. He appears to be older with his gray hair and he has some facial hair along with a red plaid shirt.

10270_build5.jpg

The sixth bag finishes the first main floor of the apartment. I am a huge fan of what Brickset calls the light bluish green bricks and tiles. The white outlining with tiles and the windows go well with that color. The inside has a bunch of detail with a fireplace, a table with a tea setting, some furniture to store various items, and a window seat type area.

Much like the bookshop build, the stairs take up a bunch of space. Not sure how to get around this other than adding in elevators. Not a big complaint, but an observation.

I’m a big fan of the rounded window on the front. This is not the first time it has been done, but I like the way this one was done.

This set of bags comes with another female minifigure.

10270_build6a.jpg
10270_build6b.jpg

The seventh set of parts bags starts the second floor. Inside there is a larger bed and a small dresser or chest for storage. Outside, I am a fan of the printed house number on the triangle tile with the white triangle slopes as the outline. I also like the use of the circular type pieces in the dark blue over the top of the rounded windows on the floor below.

10270_build7a.jpg
10270_build7b.jpg

The eight set of bags finishes the set out with the roof and patio area. The roof and windows are great and the dark blue with the bluish green go together well. The chimney picks up again after not continuing from the first floor into the second floor (oh well). Once again, the room is smaller and there is a patio area for the minifigure to hang out on. Like the bookshop, the back comes off versus the whole roof. I think this works although I would have preferred three full floors versus a crawl space and two floors.

10270_build8a.jpg
10270_build8b.jpg
10270_build8c.jpg

Here’s the final completed set. Overall I think the outside looks great. The inside doesn’t have a ton of detail, but for my purposes I usually have them either displayed or as part of a city scene so the inside isn’t as important. Also I could look to expand the inside or make the buildings taller. One of the joys of building with LEGO bricks!

I don’t have my #10243-1: Parisian Restaurant set with me, but I suspect this set would look great next to it. I can’t wait to some day be able to line up all my modulars next to each other. It should look pretty cool!

In terms of pricing, the modulars seem to keep creeping up in price, but thankfully the piece count has remained high. However, I will point out that this set contains a lot of smaller pieces so you’ll have to make the value assessment on your own. I do think LEGO has a strong fan base for these sets and they can continue to expect people to buy them if they keep them highly detailed and intricate. I took advantage of a Double VIP points sale as well as the free with purchase set #40370-1: Steam Engine so that made the purchase a bit easier. Typically these only go on sale at the end of their lifetime which will be a few years from now. Recently it has been over the Black Friday shopping weekend at a 20% off or so price and they go pretty quick.

In summary, keep these sets coming LEGO, but don’t jack the price up too high!

Happy building!

10270_finala.jpg
10270_finalb.jpg

Wrap up