Set Reviews

Set Review - #60262-1: Passenger Airplane - CITY

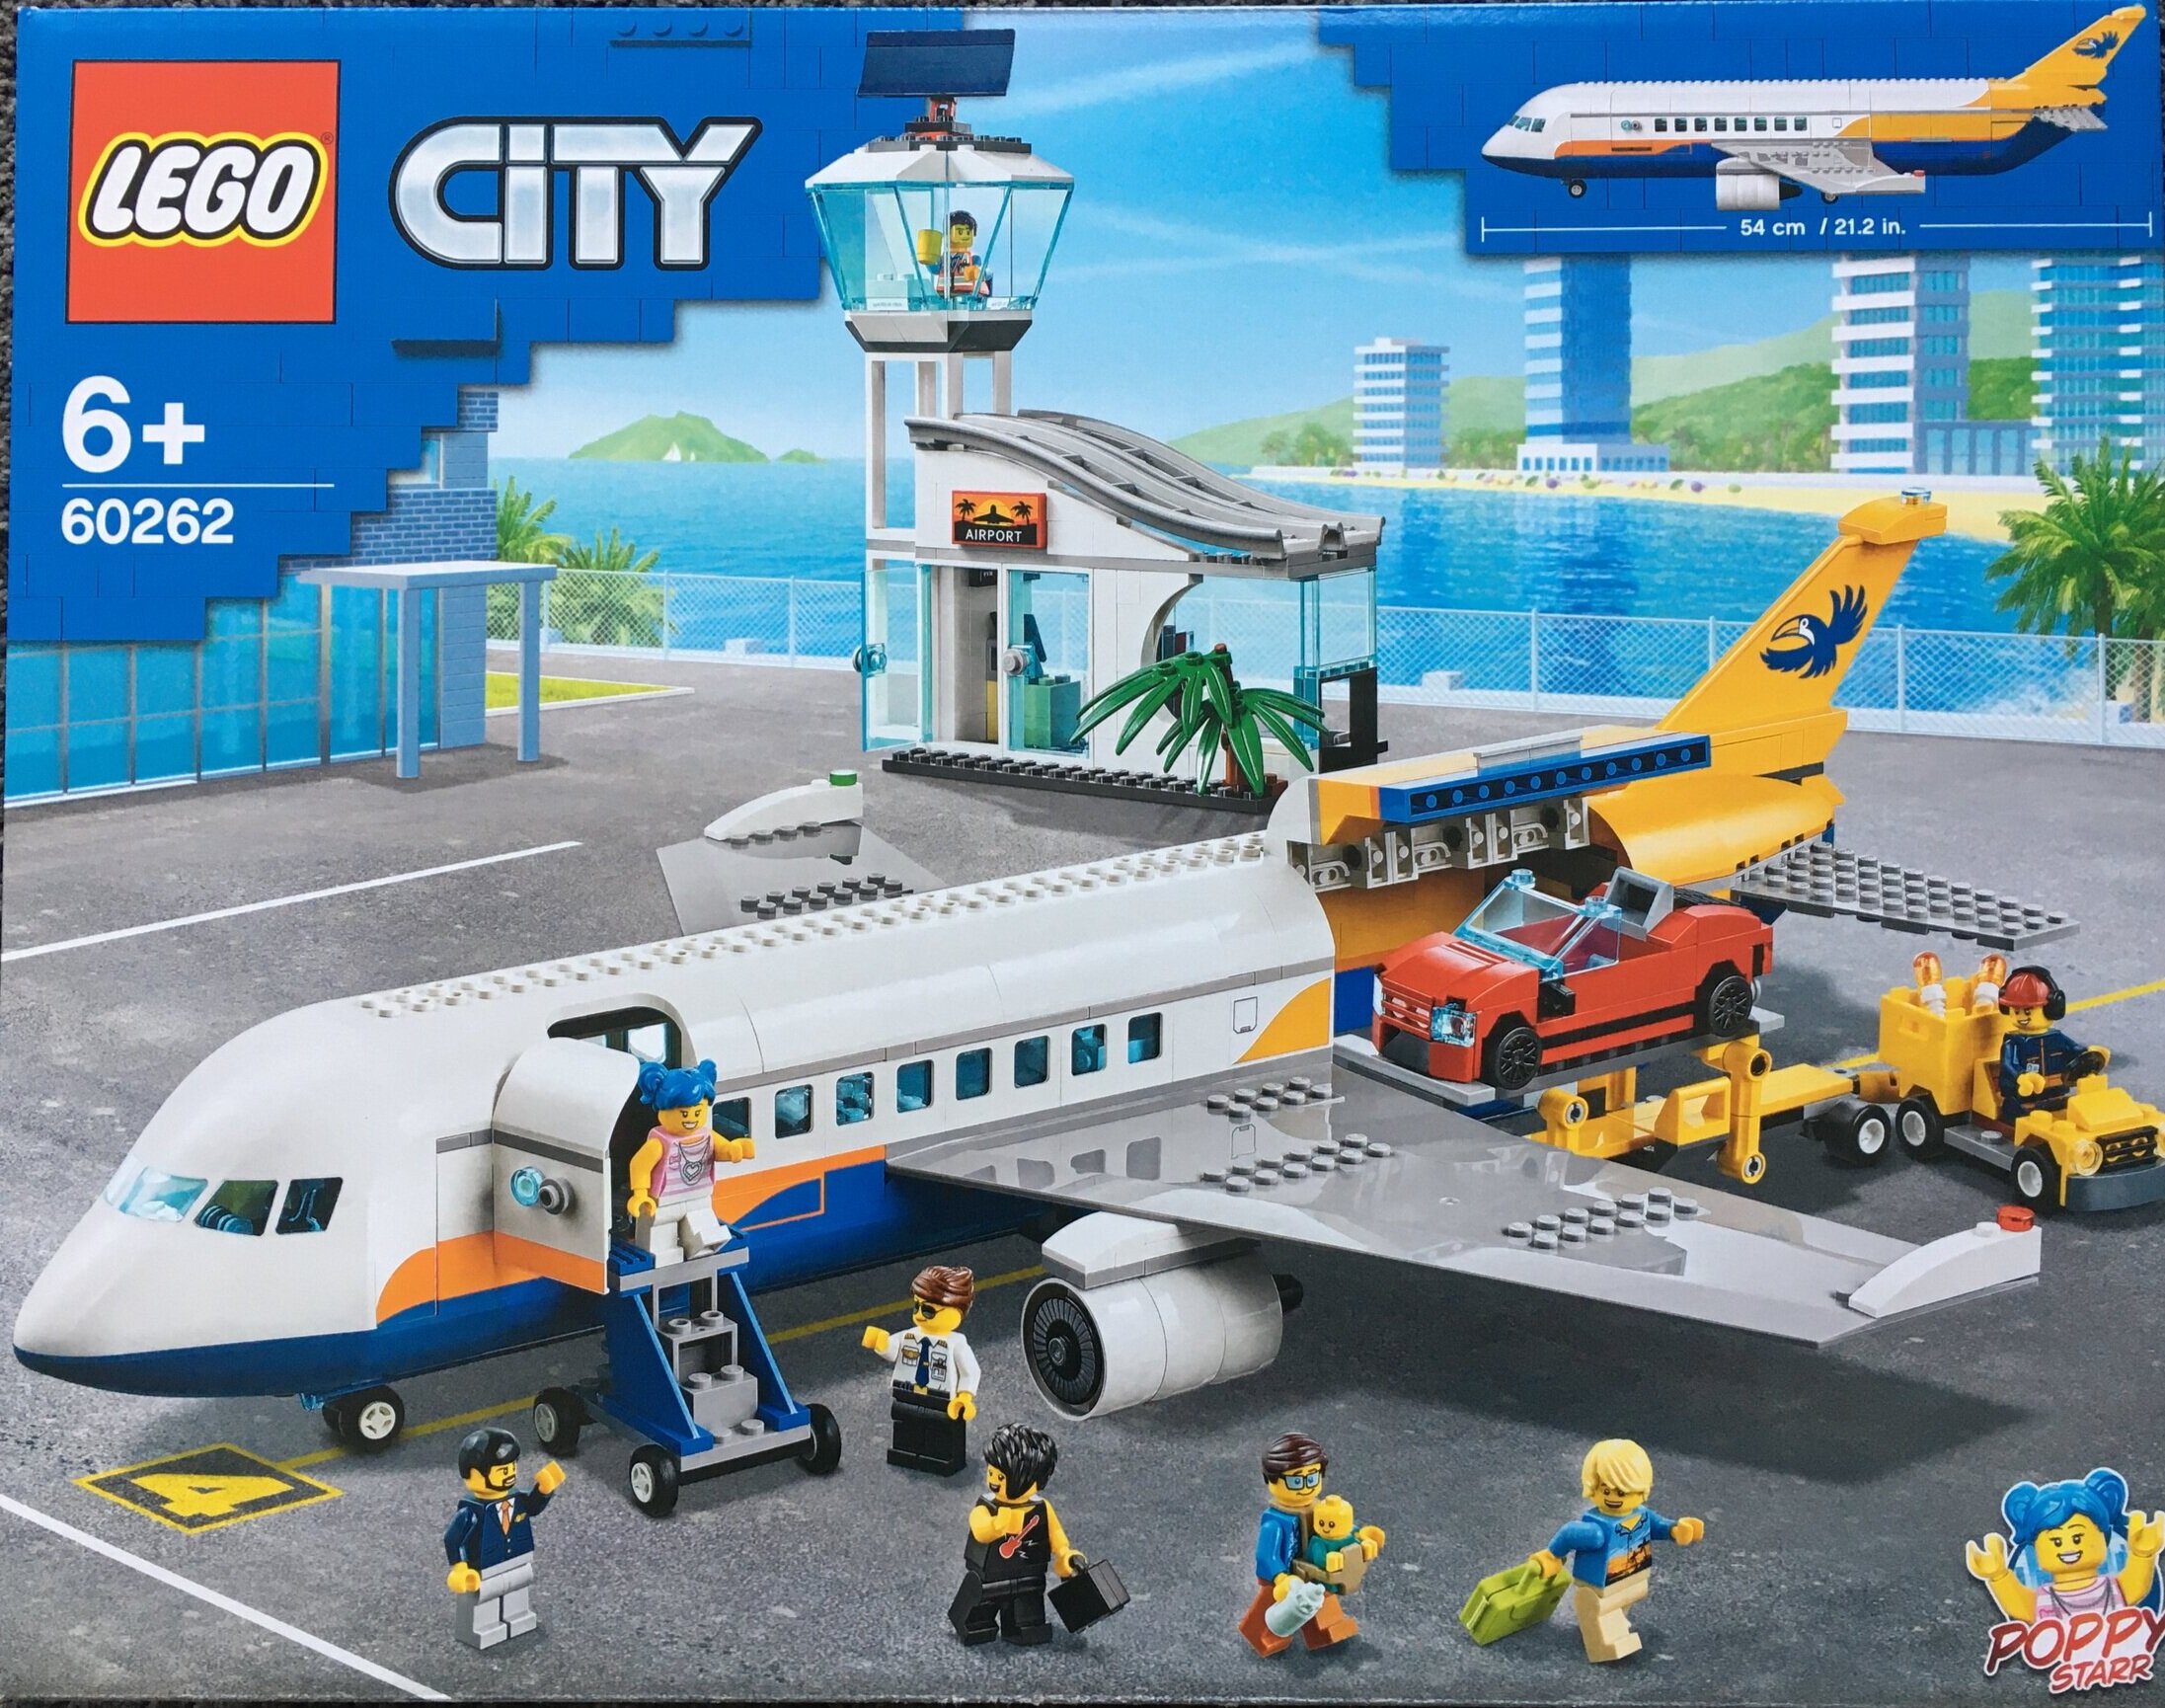
The LEGO CITY theme is back with another passenger airplane. This one is #60262-1: Passenger Airplane. It was released on 24 August 2020 in the US for $99.99. It contains 669 pieces and has 9 minifigures. This works out to $0.149 per piece. I picked it up locally on sale for about $72.

The last CITY passenger plane came out back in 2016. You can see my review of #60104-1: Passenger Terminal here. It had 694 pieces and 6 minifigures, but retailed for the same price. Like this set, it contained an aircraft, a small terminal, some ground crew gear, and the minifigures.

Onto the review…

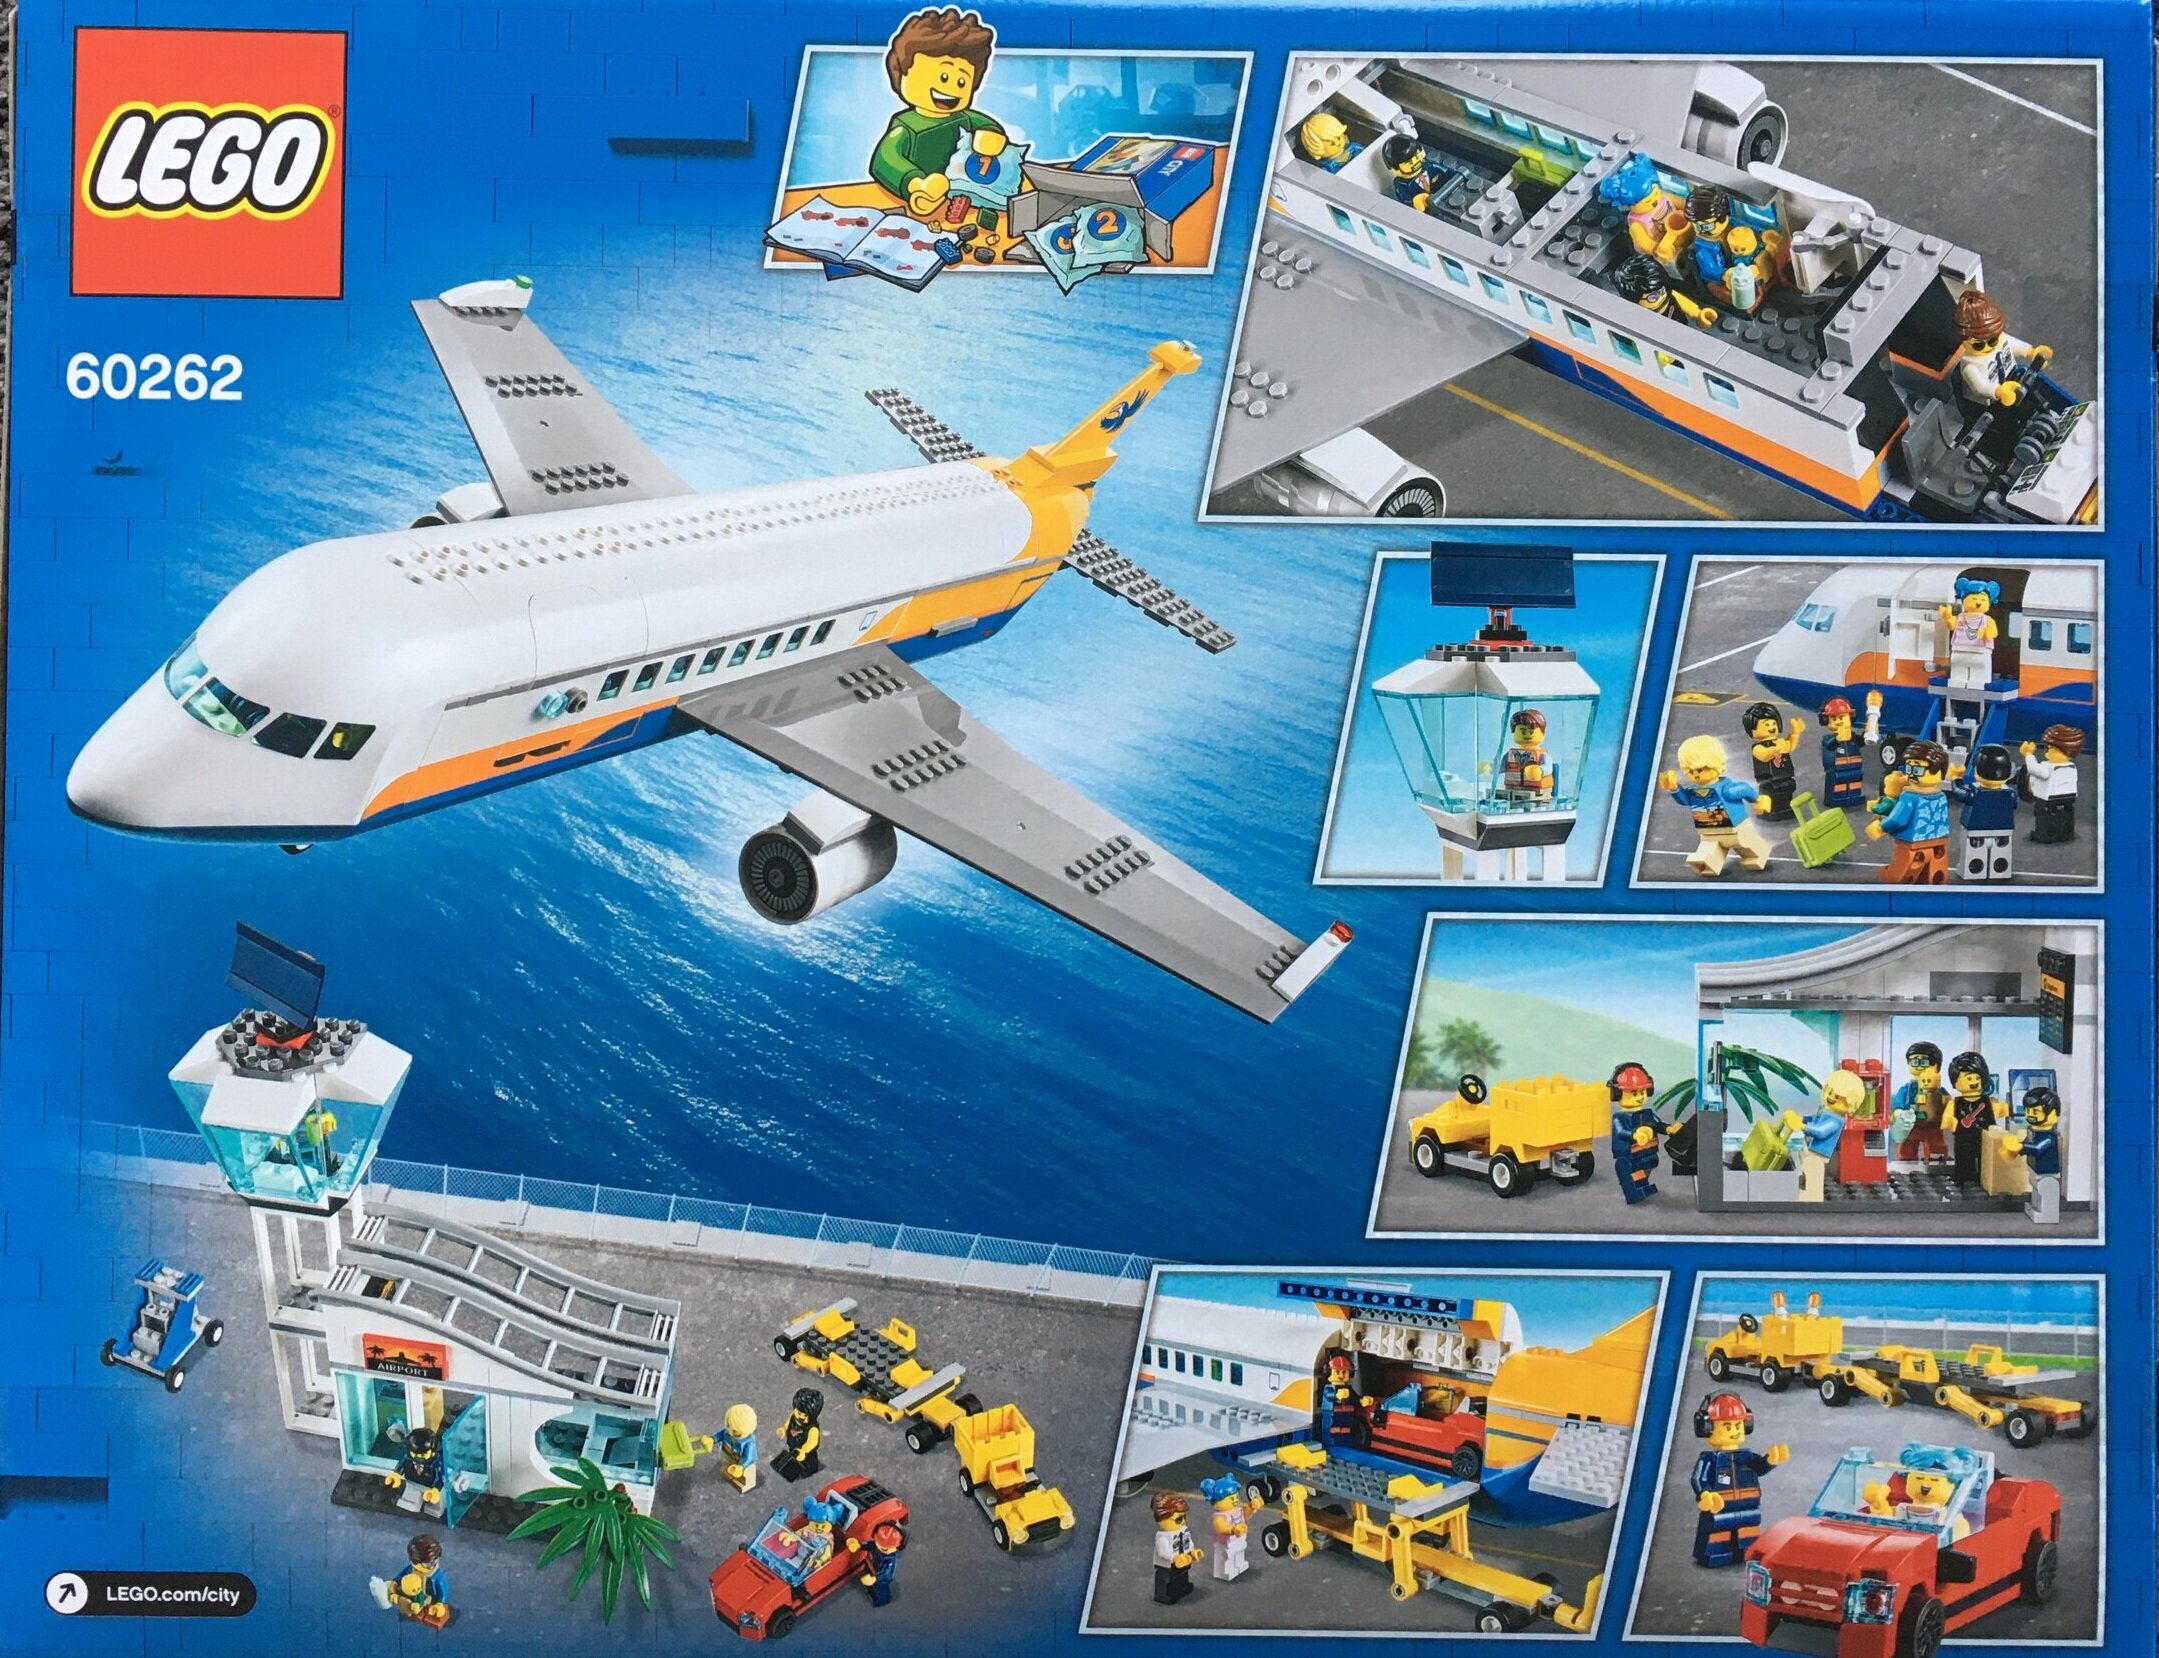
The front shows the full set with the minifigures in action. It also shows the length of the aircraft (54 cm/21.2 in). The back gives the play features like usual.

60262_box_front.jpg
60262_box_back.jpg

The set contains 9 parts bags. 7 of the bags are numbered and 2 are un-numbered with large pieces inside. It also includes the large wing which has been pretty standard in CITY sets. The instructions and stickers are in a plastic wrapping. There are 4 instructions booklets and a small sticker sheet.

60262_contents.jpg
60262_instructions.jpg

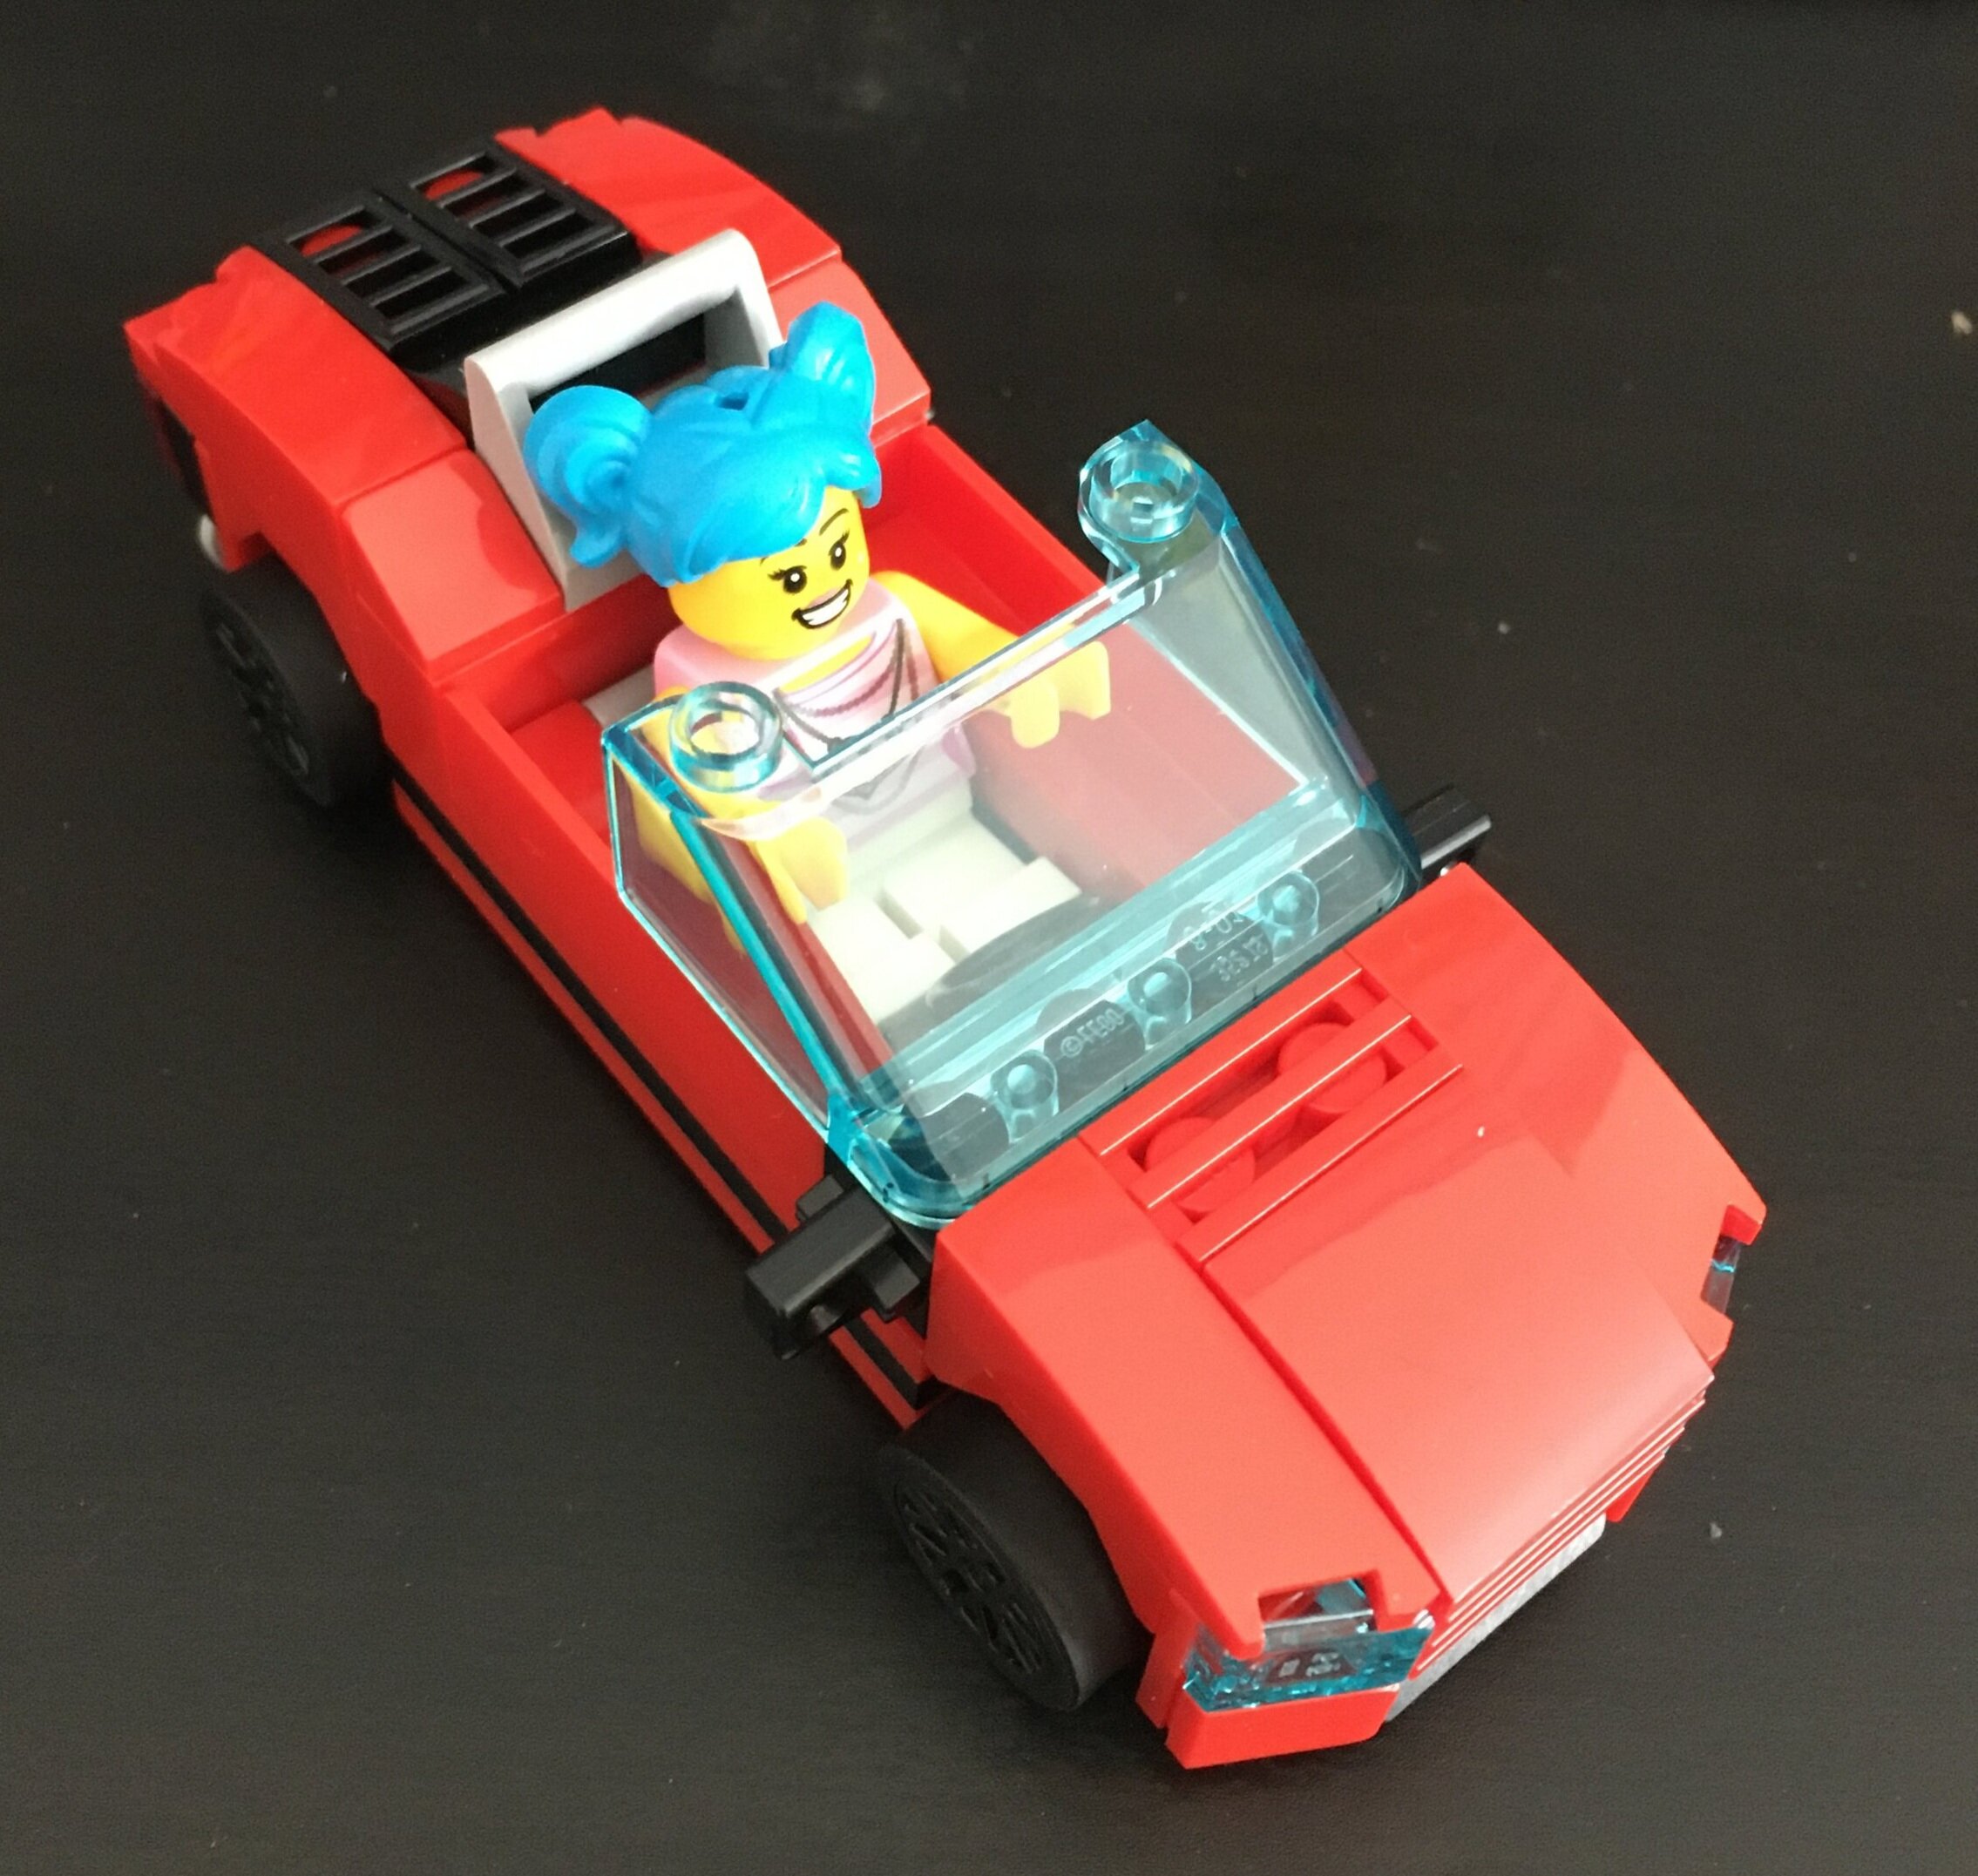
Bag 1 builds a 4-stud wide red sports car. It comes with the minifigure Poppy Starr. This minifigure is from a LEGO CITY TV show that I didn’t even know existed. I’m not sure if this set or car is seen on the show or not. Anyone?

The build of the car isn’t anything special, but it’s designed to fit in the aircraft as you’ll see later.

60262_build1.jpg

The second bag builds an airport vehicle. This vehicle can tow various equipment to include stairs (built later) and the lift to transport the car to the aircraft. While there’s nothing special about the vehicle, it seems to be in line with the small vehicles you see driving around any airport in the world towing various pieces of equipment or baggage trains. You can easily create your own additional pieces of equipment to tow around and attach to this vehicle.

The trailer isn’t too hard to build, but I question if a 6 year old could do it as the box states. Maybe with some help they could? The design does hold the car built in the last bag and can “lift” it up. There is no mechanism to move the car into the aircraft, but I guess that’s something you can build on your own as most 6 year olds aren’t concerned about that.

Two minifigures in this bag. One is an airport worker with a hard hat and ear protection. The other is a passenger with a Hawaiian shirt on. He has a large piece of luggage which is different from the standard LEGO briefcase I’m used to seeing. This one looks like it could be a roller bag or something… just no wheels.

60262_build2.jpg

Bag 3 builds the small terminal. I’m not sure why it is included in this set. I understand that the set is designed for playability, but to me I’d rather see the terminal as a separate set. The aircraft set could be focused on the plane itself and some ground crew. Then the terminal set could be a bit larger with some more detail. This terminal has a small baggage claim, a vending machine, and a check in desk all crammed onto an 8x16 plate.

The facility uses roller coaster track as the roof. I like the concept, but it seems like a cop out to not putting any effort into making a curved roof. Easy for a 6 year old to install I guess. There’s also a small control tower with a radar dish attached. Like many CITY sets, the minifigure has to jump or climb to the top, but it gets the job done I guess.

Four minifigures in this bag. A female with a black bag sporting a guitar shirt, a male wearing a carrier to carry a baby and holding a bottle, the baby, and then an airport worker with a coffee mug. I love the baby carrier concept. Bonus points to the designer who came up with that piece!

60262_build3a.jpg
60262_build3b.jpg

Bag 4 starts to build the fuselage. Not a lot of details yet and like past CITY passenger planes, it uses a lot of BURPs to achieve the shape. One area I appreciate is the cockpit. Besides the printed slopes for controls, they added in a steering column which moves. It is just a bucket handle on a droid arm, but still a nice detail.

This bag has two minifigures to include a female pilot with some cool shades and a male flight attendant.

60262_build4a.jpg
60262_build4b.jpg

Bag 5 adds the standard wing piece along with some seating and details on the wings to include the winglets on the tips of the wings and the farings to hold the engines on. I’ve seen a few complaints about not enough seating, but I think the inside is large enough to make changes to as required. Add in your own additional seats if you don’t like how it looks. It is just LEGO after all.

60262_build5.jpg

The sixth bag adds in the windows in the cabin, a small bathroom on board, and starts to build the cargo compartment. The horizontal elevator on the tail is also added.

60262_build6.jpg

Bag seven finishes the build with BURP pieces to complete the top of the cabin, a BURP tail with a printed logo, a cargo door that rotates up and has a small latch to hold it down, and the engines. The engines are not a single piece, but instead are multiple cylinders attached together with around piece with a sticker on it for the fan blades. I’m indifferent on the design. Not sure if it is better or worse than previous jet engines. Besides the aircraft, you get the steps to get on and off the aircraft. No hand rails though so watch out.

60262_build7.jpg

Nine minifigures in total which isn’t’ bad. It’s a good selection with some good accessories. I would have liked a co-pilot for the second seat in the cockpit, but we’ll take what we get.

60262_minifigs.jpg

Here’s the full set. If you ask me, it’s in line with all previous CITY passenger plane sets. Lots of playability, some fun details, and good minifigures. While the piece count went down slightly, the price remained the same. If you can find it on sale like I did, even better. This is probably not a great set for adults unless you want pieces or you have a CITY airport (or like me, plans to build one). A good set for kiddos. My little guy absconded the vehicles and both of my kiddos enjoyed flying the plane around.

What are your thoughts on this one? If you’re an adult and hate the CITY plane designs, I recommend you check out the YouTube channel Big Planes. The builder here makes some incredible MOCs of actual aircraft and doesn’t use BURPs.

Happy building!

60262_final.jpg

Set Review - #75968-1: 4 Privet Drive - Harry Potter

Another of the 2020 Harry Potter series… #75968-1: 4 Privet Drive. Also released on 24 August 2020 in the US, this one cost $69.99 in the US. With 797 pieces, it works out to $0.088/piece. This set captures a scene from the second book/movie titled “The Chamber of Secrets.” It’s where Ron rescues Harry from the room he was locked into so he can go to Hogwarts. If you don’t know what I’m talking about, look it up on line.

The set has the standard box with the front showing the full set while the back shows the other side of the set along with some play features.

75968_box_front.jpg
75968_box_back.jpg

This set contains 5 parts bags, a sticker sheet, an 8x16 plate, and the instructions. Bag one includes a piece separator.

75968_contents.jpg

Bag one starts off on the bottom floor with some furniture, the door (with stickers to show the letters coming in, but they can’t fit due to the boards nailed on), stairs up to the next level, and then the street sign with an owl. Proportions wise, I think they fit a decent amount of details in considering the size of the set and it seems to match the movie scene well. The minifigure for Mr. Dursley is in bag one.

75968_build1a.jpg
75968_build1b.jpg

The second bag finishes up the first floor with some details like the fireplace, carpeting, a plant on an end table, and the railing leading to the second level. Additionally it finishes the small room under the stairs where Harry was locked away in the first book. This section has a small door on the one side and then uses hinge pieces to open up to the small space.

The minifigure for Dudley is in this bag.

75968_build2a.jpg
75968_build2b.jpg

The third bag starts the second floor where Harry’s room is located. It adds the walls, a bed and some details to include a copy of the Daily Prophet newspaper, a picture of Harry’s parents, and some clippings from Hogwarts. It also adds the window that Mr. Dursley bars up. This window is placed in using friction and there are no studs in contact with the frame so it can easily be pulled out.

On the first floor by the fireplace, a Technic gear is added. This is connected to a small mechanism that allows you to slip 1x2 tile letters down a slot. They can then come out the fireplace similar to the movie how Harry wanted his letter welcoming him to school. The gear allows you to open or close the slot as desired.

The front of the home has some plant life for decoration. I like how they did the roof with the slope bricks offset by one tile each. It’s a pretty simple way to add in some details without making it an over technical roof build.

The Mrs. Dursley minifigure comes in this bag.

75968_build3a.jpg
75968_build3b.jpg

The fourth bag finishes the roof. It uses the same technique as the small porch area on the first level. I’m a fan of how it looks. If you don’t like it or the set, at least you get a bunch of the black slope pieces to use in MOCs as desired.

This bag contains Dobby and the cake/pudding Dobby levitates over the Dursley’s guest. It also contains Hedwig which is the same figure from #75969-1: Hogwart’s Astronomy Tower and #75979-1: Hedwig.

75968_build4a.jpg
75968_build4b.jpg

The fifth build completes the set with the Harry minifigure and the Weasley’s flying car. It’s a different build from the original one we saw in #75953-1: Hogwart’s Whomping Willow. The two minifigures don’t fit in super well, but the truck has space for Harry’s trunk.

75968_build5a.jpg
75968_build5b.jpg

Lastly, there’s the final view in the side room of the house. Not much has changed there other than the light on the outside.

Final look at all the minifigures… There are 6 in total plus a Hedwig. Not a bad mix if you are a Harry Potter minifigure collector.

Overall, it’s a good build with some good play features and it captures the movie scenes well. There are some decent pieces you can use in MOCs if you don’t want to keep the set together. The small size of the set with the ~$70 price tag make it seem a bit overpriced. I picked it up on sale here for ~$52 and I recently saw it on sale on Amazon.com for around $56 so better. Unless you’re a big Harry Potter fan or collect the minifigures, I would steer clear of this one. Or maybe if you can find a better sale. This one seems to me like a $39 set.

What are your thoughts on this one?

Happy building!

75968_final_side.JPG
75968_minifigs.jpg

Set Review - #75967-1: Forbidden Forest Umbridge’s Encounter - Harry Potter

Continuing my review of the 2020 Harry Potter sets, this one is #75967-1: Forbidden Forest Umbridge’s Encounter. It depicts a scene from the fifth book/movie titled “Order of the Phoenix.” The set contains 253 pieces and retails for $29.99 in the US. This works out to $0.119 per piece. The US release date was 24 August 2020. The set was released on 3 May in Germany and I found it on sale for around $22.

Nothing special about the packaging. Full set on the front with play features on the back.

75967_box_front.jpg
75967_box_back.jpg

The contents are 2 parts bags, 2 instruction booklets, and a small sticker sheet.

75967_contents.jpg

One highlight for me in this set was seeing the sand green sausage. I thought it was new, but apparently this is the third set it has been in. I’ve only seen this in red so nice to see another color.

hot_dog.jpg

Bag 1 builds a small tree structure that opens up to include some of Grawp’s items. It also includes a Harry Potter minifigure and 2 Centaurs. For minifigure collectors, these are probably a big draw in this set.

75967_build1.jpg

Bag 2 includes Hermione and Professor Dolores Umbridge. The build is Grawp who is a relative of Hagrid (I forget the exact tie). In seeing the box, I thought Grawp would be a lot of BURP pieces, but it uses a lot of SNOT techniques and not as many molded pieces. The hands are molded and the face, but everything else is regular pieces.

Overall, not too much special to this set besides the Centaur figures. Probably a must buy for Harry Potter collectors. I recommend finding options to get it on sale as it’s a bit much at over 10 cents per piece.

Happy building!

75967_build2.jpg

Set Review - #75966-1 - Hogwarts Room of Requirements - Harry Potter

Continuing with the 2020 Harry Potter series, here is #75966-1: Hogwarts Room of Requirements. It was released in the US on 24 August 2020 (3 May 2020 in Germany). It contains 193 pieces and retails for $19.99 in the US. This works out to $0.104 per piece. I picked it up here in Germany on sale for just under $17.

Onto the review…

Here’s the box with the set on the front. It is the standard front with the Harry Potter logo, pictures of the actors, and the minifigures on the bottom. The back shows some of the play features as well as the other side of the set.

75966_box_front.jpg
75966_box_back.jpg

The contents are two numbered parts bags, the instruction booklet, and a sticker sheet. It’s not a ton of stickers, but I am not a fan of the small stickers you have to place on a larger panel or brick.

75966_contents.jpg

The first bag builds part of the room. It includes the outer sliding door that opens when the students need it to. There is a door behind it so they can get in. I like the larger translucent blue bricks for the windows and am trying to think of some cool ways to use them elsewhere.

This bag has the Luna Lovegood minifigure.

75966_build1a.jpg
75966_build1b.jpg

At 193 pieces, the build goes quickly. Bag 2 includes the remainder of the set to include Technic elements to knock down the proclamations. For minifigures you get Harry, Hermione, and the training Dementor. You also get some patronus charms to include a rabbit and… a gopher? Finally you get some “flick pieces” to shoot your charm from the minifigs and have them land somewhere on the floor for you to find later.

75966_build2a.jpg
75966_build2b.jpg

Overall, it’s not a bad set. You get a few decent pieces, there are minimal stickers, the minifigures are okay, and you get some translucent pieces. It’s not a bad set to pick up if you are a Harry Potter fan and you can get it at a discount. The set has holes for Technic pins so you can connect it to others released over the past few years to create a larger scene. Beyond that, not much else to say. It’s a smaller set with not a lot too it, but it’s designed for that price point so you can’t expect much more.

What are your thoughts on this one?

Happy building!

Set Review - #31109-1: Skull Island - Creator 3-in-1

Here is the last review for #31109-1. The Pirate Ship is here and the Pirate Inn is here. Skull Island is the smallest of the builds and I found there were a lot of pieces left over when it was complete. The design includes a brick built raft, a brick built row boat, and then the island itself. The island includes a brick built palm tree and a brick built monkey. The skull itself protects a pirate treasure of gold coins (1x1 round plates) and the treasure chest. The skull is mounted by a Technic axle and you can spin a wheel to have it move up and down. It doesn’t move much, but it would scare away anyone trying to steal the treasure.

The pictures below include the front and the back of the build. Overall, I think the skull could look slightly more realistic, but I guess that’s what is left up to the builder to adjust as required. The three builds for this set are all great and I could see wanting to keep all three assembled (I don’t plan to buy two more of these sets). They all would be a great part of a pirate scene or layout.

I haven’t bought a 3-in-1 set in a while, but this one was definitely worth it. I highly recommend this one… especially if you can find it on sale like I did. The builds are great and the pieces available are useful in other builds.

What are your thoughts on this one? A great addition for your Pirates or a lame attempt?

Happy building!

31109_skull_island1.jpg
31109_skull_island2.jpg

Set Review - #75969-1: Hogwarts Astronomy Tower - Harry Potter

The Harry Potter sets are back for another round. The 2020 releases came out in late August in the US and in early May in Germany. A few of them are already on sale here in Europe so I picked them up and will let you know what I think.

The first is #75969-1: Hogwarts Astronomy Tower that was released on 24 August 2020. It contains 971 pieces and 8 minifigures and retails for $99.99 in the US. That works out to $0.103 per piece. I found it locally for around $74 and thought that was a much better deal.

The box format looks similar to last year. The front shows the set with a digital background and the three main characters from the movie in the upper right. The back shows some of the play features and the back side of the set.

75969_box_front.jpg
75969_box_back.jpg

The set contains 6 parts bags and the instructions which are wrapped up in plastic with the stickers. There is also an 8x16 dark gray plate that comes separate.

The sticker sheet isn’t too bad although I don’t like trying to put the smaller stickers on the larger pieces as you’ll see later. I can never seem to properly center them.

75969_contents.jpg
75969_stickers.jpg

Bag one builds the green house. It’s a simple build, but the roof is done differently. There are no stud connections and instead it is attached based on friction between the pieces. I found it to fit well and wasn’t super loose. This bag has the minifigures for Harry and Professor Horace Slughorn. It also has Hedwig the owl.

The only other notable part of this build are the Mandrake plants which are printed 1x1 round bricks. They have a plant piece attached and I thought this was a nice detail in the set and I was glad it wasn’t a sticker.

75696_build1a.jpg
75969_build1b.jpg

The second bag starts the base of the tower. It’s a fairly simple build, but I do like the curves and arches and how they add detail to the castle look. The use of stickers on the front columns wasn’t fun to apply. You can see from my picture that I didn’t put them on evenly.

The inside of this part has a classroom. It is maybe a potion classroom with various items to pour into pots. This is a cool part of the set, but is rather small. It needs expansion in my opinion.

75969_build2a.jpg
75969_build2b.jpg

Bag 3 builds the roof of the bottom portion of the tower. I like the design and the use of angled plates to create the detail. The spires are fun too. The inside adds a few candles hanging from the wall.

75969_build3a.jpg
75969_build3b.jpg

The fourth bag adds to the base of the tower which is hooked into the other section with Technic pins. This section appears to just be a hallway. There’s a shovel hanging up and well that’s about it. There’s also a decoration with red lanterns/balls. It appears this is part of the scene from book number 6 “Harry Potter and the Half-Blood Prince” where Professor Slughorn hosts a “Slug Club” party before Christmas. This set includes a table with a food set up and Neville serving a drink. Hermione is the other minifigure included here.

75696_build4a.jpg
75696_build4b.jpg

The fifth bag builds the next floor up and includes Luna Lovegood. This floor is the Ravenclaw common room which I don’t ever recall seeing in the movies. Was it mentioned in the books? It’s a pretty simple set up with a few beds, the house colors as a sticker, and some books on a brick books shelf.

75696_build5a.jpg
75868_build5b.jpg

Bag six builds the last floor and roof for the astronomy tower. It has the actual astronomy tower portions with the telescope. The minifigure included here is Malfoy. While I like how this set looks from the front, I would have liked to have seen how the telescope points out. Is there a retractable roof piece or something that opens? Again, another part not seen in the movie, but it would have been interesting to build or it could be something you build on your own.

75696_build6a.jpg
75696_build6b.jpg
75696_build6c.jpg

As mentioned, you get 8 minifigures in this set and a Hedwig. Hedwig appears in six sets this year in the same manner so if you’re looking to get the owl, no need to get the most expensive set. The minifigures all appear in this form only in this set so if you collect Harry Potter minifigures, sorry…Also of note, these all have dual expressions. I tend to go with the happy or not mad expressions when I do reviews. The remainder of the expressions are either mad or a look of disgust or something similar.

75696_minifigs.jpg

Here’s the final build. Overall, I think it’s a cool structure from the front and I look forward to some day having the space to connect the sets from the previous few years. While I understand the back is open for kids to play with, I think it would be cool to have the full set filled in. Perhaps some day I will work on a minifigure scale Hogwarts castle.

I recommend trying to find a sale on this one before buying. It sits a little about the $0.10 per piece point at retail and I think it could be slightly cheaper (although you are paying for the license as well).

Happy building!

75696_final1.jpg
75696_final2.jpg

Set Review - #31109-1: Pirate Inn - Creator 3-in-1

This is part two of the set review. You can see part one here. I built the Pirate Inn after the ship just based on how the instructions are set up. The ship is first and you build it following numbered bags. Then the inn is next. You had to take apart the ship first to get all the pieces. It then takes a bit longer to build as you aren’t building by bag, but searching for pieces through the 1,264 available. I could have made it easier by sorting the pieces first, but what’s the fun in that?

I didn’t take pictures of the build process, but instead included a few pictures of the final build. It appears as though the ship was designed first and then the designers figured out what they could build based on the pieces available. Or maybe the inn was designed already and they just had to tweak it for parts availability. Either way, you will have a bunch of pieces leftover when the inn is complete so don’t fret.

Here’s what you get at the end.
-the inn
-a brick built horse and cart
-the same 3 minifigures only one now has an accordian
-a brick built bird on the top of the inn

31109_pirate_inn1.jpg

The build has some interesting features. The front has a small crane that you can crank up and down. I’m not sure what you’d use it for, but it’s a cool looking feature. The crow’s nest is on top so you can look out or maybe someone sleeps there?

I don’t know my styles of architecture, but I like the front façade of the inn. The angle of the roof, the windows, and colors all seem to make it fit right in with the pirates theme. The V roof in the front left of the house is made by connecting plates to ball and hinge joints. I had never seen that method of build before and I like how it was done.

The back of the inn folds out so you can have access to it. There are 3 beds on the upper level and then the lower level has a table and some cups for beverages.

Outside is a large wheel which I assume is a water wheel. It spins either by you rotating the wheel itself or by spinning the Technic pin that is inside the inn. You could hook it to a motor if you really wanted to. This feature would help you build out this set to connect it to a stream running down from a hill/mountain and meeting the bay that the inn overlooks. And in the bay would be a pirate ship… and you’d have to buy another set #31109… and LEGO continues to make money…

31109_pirate_inn2.jpg
IMG_1467.JPG

Last shot is a closer view of inside the inn. I’m not sure what the build in the center on the ground floor is. Maybe a clock?

Overall, it’s a good build with some good techniques. Since it is limited by parts, a few of the steps don’t make sense like using three 1x1 pieces versus a 1x3. I get why it’s done that way so not a major complaint. Along with the ship, this build would fit well with any pirate scene and is a welcome addition to the slight come back of the LEGO Pirate theme through other themes.

Onto the third build… Skull Island…

Happy building!

31109_pirate_inn4.jpg

Set Review - #31109-1: Pirate Ship - Creator 3-in-1

The LEGO® Pirate theme is not back, but they found a way to bring back Pirates in some other themes. We had the LEGO® Ideas #21322-1: Pirates of Barracuda Bay and now this set #31109-1: Pirate Ship which is part of the Creator 3-in-1 theme. The set was released in the US on 24 August 2020. It contains 1,264 pieces and retails for $99.99 which works out to $0.079 per piece. I picked it up locally here for ~$74 as the set has been out in Germany since June 2020 so the stores are running discounts 3 months later already.

Is the set worth it?

The front of the box shows the pirate ship with the Pirate’s Inn and Skull Island designs smaller and to the side. The back shows a few of the play features and shows the sets at different angles.

31109_box_front.jpg
31109_box_back.jpg

The set contains 11 parts bags. The bags are numbered one through nine. There is one of each with two numbered six. There is also a non-numbered bag with some larger parts. There are no stickers. WOOHOO!!! There are two instruction booklets wrapped in plastic. The larger booklet has the instructions for the Pirate Ship and Pirate’s Inn. The second booklet has the Skull Island instructions.

31109_contents.jpg

I started with the pirate ship. The ship instructions follow the numbered bags while the other two just have the parts, but not by bags.

Bag one builds some of the accessories to the ship. To start, there is a shark which is brick built. I like it much better than the 2-piece molded shark from the pirates theme. The tail moves along with the side fins and mouth. Plus you can adjust pieces to create movement.

There’s a barrel to store some weapons, a treasure chest with some gems (I miss the old gold coins), and then a brick build bird.

31109_build1a.jpg
31109_build1b.jpg

The set contains four minifigures. There’s a pirate captain with two pirates and then a skeleton. It’s a pretty decent spread and they are all in line with the theme.

There are 2 cannons in the set along with some 1x1 round bricks to use as ammo.

31109_build1c.jpg
31109_build1d.jpg

The second bag starts to build the hull of the ship. Unlike the Pirates of Barracuda Bay, this is a brick built hull versus a large BURP type piece as the base. I like the brick built version better I think. It doesn’t look as realistic, but it uses existing pieces versus the giant piece. It’s structurally sound too although not as big as the Pirates of Barracuda Bay ship.

31109_build2.jpg

Bag three is the stern (back) of the ship. Each half of the build is identical except for one half uses red while the other uses green. I think this was done just to help make the build process easier.

31109_build3.jpg

The bow (front) is included in bag four. it attaches on as you can see in the picture. Like the stern, it has a similar build process for each half, but one is green and the other is red.

31109_build4.jpg

The fifth bag starts to add details to the ship as a whole. There are covers to the four cannon windows and some structure for the masts.

31109_build5.jpg

The sixth bag builds the cabin at the stern of the ship for the captain. It is not as ornate as the Pirates of Barracuda Bay ship, but still has a bunch of detail in it. I like how the designers created angles in the build instead of making it square. The red, black, and gold are a great color scheme.

31109_build6.jpg

Bag seven finishes up the stern of the ship and the compartment for the Captain.

31109_build7.jpg

The eighth bag puts more on the top to include the steering wheel at the stern and more detail on the front.

31109_build8.jpg

To wrap things up, you add the masts and rigging. The masts are all brick built. They look okay, but I think I prefer the cloth ones. I do like the brick built skull and crossbones though. That’s a nice touch. The rigging is all rubberized pieces versus strings. It looks a little thick, but it works.

The front of the ship has a brick built figure. I think I like the minifigure body for the front better, but I get the idea of what they built.

31109_build9.jpg

A few more shots of the completed set. The front view shows the brick built skull and cross bones well. The other shot is a little closer on the front. There are four ports for cannons, but it only comes with two. There is no covering so you have easy access to get to that part of the ship.

31109_build 9b.jpg
31109_build9c.jpg

And for fun, here’s the ship next to the Pirates of Barracuda Bay ship. Definitely much smaller, but pretty similar in terms of rigging and masts. The brick skull and crossbones helps it to stand out, but it is missing the skull and crossbones flags.

Overall, it’s a great set. A fun build with a lot of potential for parts in future builds/MOCs. The price is decent considering the price per piece and I found it at a discount so even better. Definitely get this set if you’re looking to expand your brick pirates.

I’ll show the alternate builds in another post.

Happy building!

31109_comparison1.jpg
31109_comparison2.jpg

Motorizing the Crocodile Locomotive

The latest installment of LEGO® Train sets is #10277-1: Crocodile Locomotive. I reviewed the set last month and you can see my review here. As mentioned in the review, the set is just the locomotive and a display track. It does not include the motor so if you want to motorize the locomotive, you need to do something separate. You can attempt to motorize it on your own using a Power Functions or 9V motor on a separate car. Or you can use the new Powered UP set up that is now available. I decided to give Powered UP a try so here are my thoughts…

The first step is to remove the crew compartment from the cab area. This section comes out very easily without having to disconnect any pieces.

10277_cab.jpg

The motor is the Technic Large Motor (#88013) and it is currently retailing for $39.99 in the US. It’s a little pricey in my opinion, but the good part is you can use the motor in other models or sets.

The motor fits in very easily without having to snap it in anywhere. The only thing you have to do is remove the small Technic pin and gear. You place the motor in and then slide the pin in place. It was a pretty easy process.

10277_motor.jpg

The next piece to install is the Powered UP Hub (#88009). This part retails for $49.99 in the US. While it is a bit pricey in my opinion, you do save by not having to buy a controller or an IR sensor. The downside is you need to have a device which can handle the Powered UP app. I thankfully have a device which supports the app so that was good. The hub fits in easily and connects to the motor without any challenges. The only small concern I ran into was making sure all of the cable from the motor would fit in with the top of the cab installed. Not a major problem, but you just need to make sure the cables are arranged appropriately.

10277_hub.jpg

While assembly was easy, operations were not as easy for me. I installed some batteries and the app and expected to try it out, but it didn’t work right away. The instructions said to make sure the batteries were all the same. I did that, but it still didn’t work. I guess my batteries were too old as I bought some new ones and it worked after I installed them.

The app is easy to use with a control for the speed, a brake, and then some sounds (train whistle, conductor’s whistle, and then a bell). It also has sounds effects for starting, stopping, and braking. The downside is you can’t operate the train unless you have the app on. So don’t have any plans to send a text or check something out online.

Others noted issues with train operation. I didn’t install the rubber bands and I had no issues on the oval track I built. Granted I didn’t have it pulling any cars so that might make up the difference.

Overall, it’s a slightly expensive proposition. Given the expansion of sets using Powered UP, I’m hoping I can use the hub and motor elsewhere. One other concern is that LEGO® decides to stop supporting the app and it can’t be used anymore. We’ll have to see how the system evolves as it grows.

Or more importantly… we can hope LEGO® puts out more train sets for us to put the motor and hub in…

Happy building!

10277_ops.jpg

Set Review - #75979-1: Hedwig - Harry Potter

The next round of Harry Potter sets are out in the US. They were fully available starting on 1 September 2020. In Germany they have been out since May 2020. The price in the US is $39.99 which includes 630 pieces. The set works out to be $0.063 per piece. Thankfully, the set is already being sold at a discount here. I paid $34.01 here after a discount and the exchange rate. The dollar has been dropping against the Euro so buying sets in Europe at places like Smyths hasn’t been as beneficial for me.

Here’s the box. It’s the European version as you can see from the front where it doesn’t give the number of pieces or that the set is a “building toy.” The back of the box shows that the head can move, the wings flap, and give the dimensions of the set. It’s a 14 inch wingspan, 8 inches long, and 7 inches tall.

75979_box_front.jpg
75979_box_back.jpg

The set contains four numbered parts bags, an instruction booklet, and then a small sticker sheet. Thankfully there are only three stickers and they aren’t super small.

75979_contents.jpg

The first bag builds the base of the set and starts the stand. The base has translucent red and yellow 1x2 bricks around the bottom. It also has a sticker with the name “Hedwig” on it. You can see the start of the Technic pieces with the crank to move the wings later on.

Included in this bag is a Harry Potter minifigure and then a Hedwig minifigure to go with it. Harry has a wand and is the younger version with the short legs. He has blue hands which I assume mean he is wearing gloves. Hedwig has a small stand which is a gold telescope piece.

75979_build1.jpg
75979_minifigs.jpg

The second bag starts to build Hedwig’s body and you can see some of the Technic elements included.

75979_build2.jpg

The third bag starts to expand on Hedwig and builds a letter for Hedwig to carry. The letter has three stickers. Two create the envelope and once is the red seal for the envelope.

75979_build3.jpg

The fourth bag finishes up the set. The first picture shows the left wing and left part of the tail finished up. The next picture is the final figure from the back. You can see the wings spread out and the tail feathers split out.

75979_build4a.jpg
75979_build4b.jpg

Here are a few other views of the final model. Hedwig’s eyes are printed to come up with the color which I think works good. The head rotates although it doesn’t move with the crank. I had no issues with the Technic mechanism to make the wings move. They don’t move smoothly, but it’s not bad considering it is mechanical versus an actual owl.

Without having a picture of Hedwig from the movie to compare it to, this Hedwig seems to be in line with the design from the movie with bits of black mixed in with the white.

I’m a fan of this set. It seems to be in line with some of the larger model Star Wars sets like R2-D2 or BB-8. In addition the movement adds to the set besides just building Hedwig in a single pose.

The set isn’t priced too high and I was glad to get it on sale. Not bad considering it is a licensed set.

Overall, I’m glad I picked this one up. I hope LEGO continues on this trend of different scaled models and I look forward to digging into the Harry Potter theme this year.

Happy building!

75979_build4c.jpg
75979_build4d.jpg